Monday 31 October 2011

Happy Halloween

I had SUCH good intentions this year. I went through my card box and dug out the Halloween cards that I didn't have time to send last year. I figured out who was getting what card.

Then, I had to boot it out to our cabin to 'supervise' the contractors and didn't bring the cards with me. Bah Humbug - tomorrow I will put them all back into the box.


Even this little card, which I made last week. It's a 4-1/4" square card, and I used the Halloween Paper Stack by Recollections. This is the same pad of paper I used to make the BOO banner for Sue for our 'first of the month' mailing. Speaking of which, I actually cut out TWO banners - and mine is sitting in a pile. An unassembled, uninked pile. Sigh.


Sorry for the blurry pic, but I wanted to show you the dimension on the CUTE little 3-d pumpkin sticker by K&Co. And my new orange bakers twine. While it's a shame to put this little guy away for a whole year, this card will make me smile next year when I dig out my Halloween card box.


I popped the inside panel up with foam tape, just to add a little fun to the inside of the card. The stamp is one I picked up from the Michaels bargain bins a couple of years ago and I sure get a lot of use out of it. Maybe one year, someone other than ME will get to hold a card with this stamp on it. 

Maybe next year I will send out my Halloween cards in August.

Happy Halloween - and thanks for stopping by today.

Sunday 30 October 2011

Purple Bird Cards

I seem to go in phases with this punch - sometimes I use it constantly, and sometimes I almost forget about it completely. These cards remind me how much I like the Stampin' Up bird punch, even though I haven't used in in awhile.


I made 2 almost identical cards, one with a top fold and one with a side fold. The purple background panel (DCWV) has a beautiful pearl sheen to it.

The bird was punched out of a coordinating patterned paper - the branch is the reverse side of that paper!

All edges were inked, and the label is a Sizzix die.  I also added a tiny self adhesive pearl for the eye.


The cards have no words on the outside, so they can be used as note cards or people can write a greeting inside. 2 more cards done to put in the Christmas Craft Sale!


As for our little renovation project? We wanted to put in a 2nd sliding door, this one off the kitchen newly enlarged kitchen deck. After it taking the contractor most of last week to install the one door in the basement, my hubby said he would look after putting in the kitchen one himself.

That required actually getting the (really, really heavy) door up onto the 2nd story deck. !!  However, he had a co-worker come out yesterday morning, and a neighbor got out of bed (sorry Mark) to help lift and heave for the 5 minutes it took to get it up.  Then 'G' and DH installed the door. Start to finish time? 2 hours.  2 HOURS ... unbelievable.

I expect the contractor to be completely surprised when he arrives tomorrow and sees that it did, in fact, get done. I restrained myself from emailing him a photo of the installed door before noon yesterday, but I guess the fact that I really wanted to makes me somewhat petty.  :-) 

We went to a Halloween party last night (thanks Mark) and were talking to some of the people in the neighborhood who had also had renos done - inside and out. Most of them had the same issues, and said the trades work in "Mountain Time".  Good to know!

I think I am going to learn how to work in that time zone, ha ha. AFTER the craft sale. Which means, I'd better get going here and see if I can get something done for the sale.

Thanks for stopping by today!

Saturday 29 October 2011

Floral Thank You Card

I love it when patterned paper takes center stage. I bought this paper stack (K&Co) last year when it felt like Spring would NEVER get here. I just needed to see flowers.

This is a card I sent to our SIL's parents, who hosted us in BC for a surprise party. We had SO much fun, and they made sure that I had lots to eat (I'm vegetarian). With everything else they had to worry about, I thought that gesture was very kind.

"M" is a gardener, and I knew she would love a card with flowers on it. I dressed up the paper panels with a die cut label (Spellbinders) stamped with Verve words and a couple of due cut butterflies (Stampin' Up).

I believe there is a Martha Stewart punched butterfly in the mix as well as some gems from my stash.

This is a 5x7 card and the base is a pretty pale green astroparche from my stash.

Thanks for stopping by today!

Friday 28 October 2011

Loom Knit Cowl

I'm completely un-inspired. Completely. Being stuck here with contractors who really couldn't move any slower is downright depressing. Yesterday I had people in and out most of the day, so at least things were PROGRESSING. Today? They managed to put up a sheet of Tyvek. And sanded down an uneven strip of wood. And boarded up a hole under the new sliding door that I'm lucky I noticed.

You see, I don't want CRITTERS in the house. We made ourselves perfectly clear - do not leave the opening for the new door unattended. I was thinking mice. But look at the size of the hole that they left yesterday and went for their hour long lunch.


That is big enough for a BEAR to wander in, should one have been in the mood to come check out the inside of a house. OMG. (The black fenced in area is our little dog-run, and above it are the beams for the new deck.).  Never mind the critters, the house was flippin' FREEZING! It was 2 degrees outside and they didn't even put up a sheet of poly when they drove off for their lunch break. 

I had loom knit a cowl to put in our Christmas Craft Sale, but ended up so cold I had to wear it. I don't mind, ha ha - I really like it. 

Even though I didn't have time for it, I did a quick dash to Michaels on Tuesday morning. I thought I'd seen somewhere they were having a huge yarn sale. Well - I was wrong, but they DID have the new Martha Stewart loom set and I had myself a 40% off coupon.  Score.  
I think her idea is great - you get several sections of different sizes and shapes to create weaving or knitting looms in various sizes and configurations. Cool. Even better - it comes with both large and small gauge pegs!  So I put together an oval loom using large pegs and every other hole.  I had 46 pegs, and I think it was a little large for a cowl. But now I know.  :-)


I did a 'chain 2' bind-off and I like the lacy look of it. I wanted it to have some 'give' and it does! However, I have a very short neck (more like no neck) and with the cowl being somewhat large - I had to fold it around my neck at the back when I wore it with my coat. So I did a 2 peg icord and threaded it through the large stitch holes. That way I can snug it up if I want to, or loosen it if I don't need it to be quite so warm.  


The beautiful yarn came from a local knitting store and it looks SO much nicer in real life. It has a satin sheen to it and now I want another skein in a different colour. I really enjoyed using it - it ranges from thick and fuzzy to thin and satin'y.  Beautiful stuff. I think I may becoming a 'yarn snob'. I could have spent a small fortune in that shop.

I used the Lacy Diamond stitch for the entire cowl - and even though it looks like the stitches are fairly loose - it keeps me really nice and warm!

So today is Friday, and it took these guys the entire week to get one sliding door in. It's not trimmed or insulated or anything. Just installed. Gregg put on the hardware when he got home from work - they didn't even do that.  But it's not cold in the house anymore at least, so I only wear my cowl when I go out to walk the dogs.

Happy Friday - and thanks for stopping by today.

Wednesday 26 October 2011

Felt Snowman Card

I have snow on the brain. Not happily, mind you ... but it's COLD outside and inside and there is a skiff of snow on the roof and deck that is not melting. Not only that, but the contractor has knocked a BIG HOLE in our wall and is dickering around (technical term) getting the gas-line moved for the BBQ.

Trust me when I say that a 5' x 7' hole open to the outside makes the house REALLY COLD. Really, Really Cold. He put a piece of plywood over the opening when he went for lunch, and I cranked up the heat while he was gone.

Here is a card I made using some paper backed felt and the Tim Holtz snowman die.


I added a small black brad for his eye  and coloured his arms, hat and buttons with Sharpie markers. A narrow ribbon around his neck and some glitter glue finishes off the look. How can a snowman look warmer than I feel???


Last night I started to loom knit a cowl to put in the craft sale. Yeah right. I finished it this morning and now I'm wearing it to keep my neck warm. One less item for the sale, but hey - a girl has to do what a girl has to do.  Once the contractor is gone for the day and the heat is back on I will have to take a photo of the cowl to share. Meanwhile,  I'm off to flip on the fireplace (thank heavens for gas) and see how close I can sit to the glass. 

Thanks for stopping by today!

Tuesday 25 October 2011

A Sketch Card or Two (or Three or ... )

This is the new sketch that is on the 'Clean And Simple Stamping Blog' ... and I think it's just FABULOUS!


I have so many ideas!  Immediately I wanted to use my Stampin' Up pennant punch and stamp set:


The trees were punched out of patterned paper while the tree stand and stars were stamped right on the white panel with  glitter glue added for some sparkle and shine.  The 'Happy Holidays' is also a Stampin' Up image.


Next, I did more tree cards but this time I used a Sizzix die. I like the size of these much better for the sketch.


The trees were die cut out of green card stock, stamped with polka dots and I used a brown Copic marker to colour the trunks brown. While it's hard to see in the photo - there are 3 little glitter glue dots above the trees.

These next 2 cards are my favourite out of the bunch, because the snowman die (Sizzix) is SO flippin' cute:


Seriously - is he cute or what?  I cut a bit of black scrap card stock and glued it behind each snowman so the buttons and face showed up a little better. They were cut from white glittery card stock and the arms were coloured with a Copic marker.  The Merry Christmas is by Recollections (Michaels) in their bargain bins.

I deviated a little from the sketch for this next one, but I just HAD to make another card using that snowman. And that wonderful aqua snowflake paper (Brenda Walton). I love it. LOVE it.


Doesn't that little guy just make you SMILE???

I had a little strip of the aqua paper leftover, so thought I'd try it with more die cut trees:


Finally, I used some resin snowflake embellishments from my stash for the final two cards:


What a great sketch to use with embellishments - I have more ideas than time at this point. So - that's it for me today. Thanks so much for stopping by.
***EDITED. As Jenny pointed out, the polka dot trees fit in with the 'Less Is More' Week 38 challenge this week. Waa hoo!

Saturday 22 October 2011

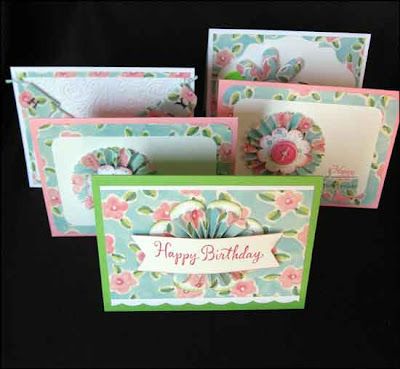
Group of Birthday Cards


Back this summer when I had made it my mission to deal with the towering 'Odds & Sods' pile in my studio, I made these cards.  The floral paper (possibly by ProvoCraft) had been in my stash for years and years and for some reason I had cut it down into A2 panels and added them to my overflowing  'Odds & Sods' pile. 

I joined a couple of the floral paper panels together so I'd have long enough pieces to run through with the Tim Holtz rosette die, and made some matching rosettes. I was bound and determined to USE UP that paper, once and for all.  :-) 

 This first card is on an A2 pink card base, with some stamped elements added as well. The Happy Birthday is by Verve and was coloured with markers to get the two toned look.

The top flower layer was cut with a Sizzix die and stamped with a Stampin' Up background image, and the edges were inked with pink.

A little button tied with string was added and ... that was one card done.

This 2nd card is almost identical, but I added a little banner piece to stamp the word 'birthday' on.

To make the banner, I punched a label (Stampin' Up punch) from a scrap of the paper, folded it in half and added a string to the fold before gluing it closed.  The little butterfly was also in my 'Odds & Sods' pile and is from a Stampin' Up Embosslet.

Card #2 - done.

This next card is probably my favourite of the bunch. I hand trimmed a little banner to 'drape' over the rosette and Sizzix flower die and I really like the bright green card base with this paper.


Card # 4 uses a couple of dies ... a Tim Holtz shaped die for the white piece, and a Sizzix flower die.

You can see the layered flowers better in this photo - I cut the die from both white card stock and the floral paper and added foam tape between the layers. Those green leaves? From the felt flower package I picked up at Michaels (in the kids craft section) this summer.


Word stamp is either by Verve or Hero Arts. I'm pretty sure it's Verve, but ...    Sheesh.


This card turned out pretty good too - and the bonus was that I got to use that white textured panel
that was also in my 'Odds & Sods' pile!  I had made a couple up for a different reason and they ended up being too busy. Into the pile they went.

I used the same folded label punch idea as for card #2, this time stringing the bunting pieces on a knotted string. I used an alphabet set (Hero Arts?) to stamp the letters with black ink, and some more of those tiny butterflies from the 'Odds & Sods' pile.


So - 5 feminine birthday cards done and into my stash. And I used up every bit of that floral paper too! Win Win.  :-)

We are having company this weekend (my DD & family) so I likely won't be posting anything tomorrow. I'll be playing with our little Granddaughter instead.  Can't wait.  I'm head over heels in love with that baby.


Thanks for stopping by today!

Friday 21 October 2011

My Hat

This morning was a morning of waiting. Waiting for the electrician. Waiting for the bobcat. Waiting for the hot-tub and people to move the hot tub. I am not good at waiting for people, as I just pace and keep checking out the window and don't really get anything done at all. I needed something mindless to work on, so ... I took some yarn from my 'tag fibre' stash, and a beautiful skein of cream alpaca and made myself a hat. In between going to the window to check for people.


I used the green Knifty Knitter loom (2nd largest) and the Twisted Knit stitch (e-wrap) throughout. I WANTED the brim to roll. The brim was made using 2 strands of the cream, and then I switched to one strand of each of the three yarns held together as one.


Notice anything different about this hat? The front (shown on the right side of the photo) is higher than the back.  !!  I am very pleased with myself for figuring this out because the hat fits my head much better this way. 

The loom has 36 pegs, so I marked the front 12 pegs with masking tape on the loom base. I ewrapped the first 12 pegs, and also the marked 12 -- but DID NOT CONTINUE wrapping the final 12 stitches. So 24 pegs had 2 loops and 12 had one loop. I then worked the marked 12 stitches as a short row and knit off the 2nd set of loops on those 12 stitches, ewrapped them again, knit off and ewrapped them a final time but continued wrapping right to the end of the row. All 36 pegs had 2 loops, which were then knit off. But I was able to sneak in that 2nd short row of stitches at the front of the hat. (Patting myself on the back here).  I did this 4 times throughout the knitting and was able to build up the front that way.

Next, I used Kristen's (from Goodknit Kisses) technique of decreasing at the crown so there wasn't so much bulk when I did the gathered cast off. This wasn't the first time I decreased at the crown but it was the first time of using Kristen's technique and I really like it! (Thanks Kristen!!)  See? No bulk!


I could have used this hat last night when we took the dogs out to do their business. I'll be ready tonight! And the electrician came (not at 8am, but at 11:30am). The bobcat arrived 10 minutes before the hot-tub, and got situated where he needed to be. The crew moved the hot tub from the street all the way into the back yard (I actually took some video's with my phone - it was quite the process moving it through the trees) and the bobcat used forks to get the hot tub-up on the deck.  'Slick as a Whistle'. 

Once the electrician is done, they will come and fill the tub with water, make sure it all works ok and then we can tick THAT off the list. Waa Hoo!  Now that I'm done waiting for people, I've got some housework to do. It's probably a good thing I'm out at our cabin today as I LOVE the new sketch at the Clean And Simple Stamping Blog and I'd much rather be in my studio playing.  :-)

Thanks for stopping by today!

Thursday 20 October 2011

Mini Coin Purse

I came across a YouTube video on crocheting a Mini Coin Purse and it was SOOOOO cute I had to try it. Worked like a charm, so I made 5 using leftover bits of wool and have them all packaged up for the Christmas Craft Sale.  Thanks BobWilson123.


They are the perfect size to hold a Loonie or Twoonie, and I immediately thought of 'Shopping Cart Coins'. I included a Loonie (our $1 coin) and a Quarter (25 cent coin) in each little pouch.


They are held closed with a button, and there is a little loop to attach it to your keychain or inside your purse etc.   Here they are, packaged for the sale:


The little frame graphic is by Lettering Delights, but I adjusted the colours on the original file to better match my projects. 
Thanks for stopping by today!

Wednesday 19 October 2011

Dog Cards

Here are a couple of dog themed cards I'm putting in our Christmas Craft sale ...


The printed paper is all from a paper stack by DCWV that I found on clearance at Winners last summer. I cut the square focal images from a different sheet of paper from the same stack, attached them to a piece of card stock to give them more 'body', then popped them up over the paper panels & ribbon with foam tape.


These three cards are approx 4.5 x 6.5", so larger than my usual A2 cards.

Thanks for stopping by today!

Monday 17 October 2011

Birdhouse Row Card

Here is a card that is not coloured with Copic markers, but with pencil crayons for a much softer look:


The image is by Art Impressions (I've had it for years), stamped on off white water colour paper, then lightly coloured with pencils.


I couldn't resist adding a little sparkle with glittter glue. And of course, I used foam tape to mount the matted stamped panel to the folded A2 speckletone card.  :-)

Thanks for stopping by today!