Monday 31 August 2015

Brownie and Cocoa Note Cards

Good morning friends

It's Masculine Card Monday here on my blog, and I have two cards that can be classified as 'sort of' masculine. I used Karen Burniston's Brownie the Cow, and Cocoa the Horse - Pop it Up Character dies from Elizabeth Craft Designs. They were sitting on my stamping table, and I had a strip of patterned paper leftover from a different project. It had clouds at the top and grass at the bottom - and I was able to use it to make both of these note cards!


Hay there.  First up is Brownie. I just love Brownie the Cow - she has such a fun expression on her face and she works perfectly with the 'Hay There' from the Accordion Rectangle. I added a panel of green patterned paper and the grass portion of the scrap patterned paper strip, then popped Brownie up on an Action Wobble.


Cocoa the Horse is also on an Action Wobble. The blue patterned panel is actually leftover packaging! I used the top, cloud portion of the leftover strip and the tiny leftover bit of green polka dot paper and grass die from Karen Burniston's Outdoor Edges.


Below you can see the Action Wobble ...


I also added the basic fence from the Fence Pop Stand, and used up the last bit of green polka dot paper for the little grass clump. I love it when I can use up scraps!


Into my stash with these ones!

Brownie Card:
Brownie the Cow, Pop it Ups - Karen Burniston (Elizabeth Craft Designs)
Accordion Rectangle (word bubble), Pop it Ups - Karen Burniston (Elizabeth Craft Designs)
Hay There Pop Stand (Hay There), Pop it Ups - Karen Burniston (Elizabeth Craft Designs)
Elizabeth Craft Designs Fine Pointed Tweezers
Elizabeth Craft Designs Transparent Double Sided Tape, 112mm (6")
Cream, Kraft, White, Brown and Orange card stock
Patterned paper - DCWV
Green Polka Dot patterned paper - The Paper Studio
Twine
Action Wobble
Baby powder
Card Size - Standard A2

Cocoa Card:
Cocoa the Horse, Pop it Ups - Karen Burniston (Elizabeth Craft Designs)
Fence Pop Stand (fence), Pop it Ups - Karen Burniston (Elizabeth Craft Designs)
Outdoor Edges, Pop it Ups - Karen Burniston (Elizabeth Craft Designs)
Kraft, Cream, Tan, Grey and White card stocks
Black marker
Glossy Accents
Patterned paper- DCWV
Action Wobble
Blue patterned paper - recycled packaging
Card size - Standard A2


Thanks for stopping by today!


Sunday 30 August 2015

Burgundy Wreath Christmas Cards

Good morning friends

I have some Christmas cards to share today, ones that I started a couple of years ago. While I'm doing better at finishing up the cards I have started - I still have a whole pile to do though!


The card bases are a beautiful burgundy pearlized card stock with an embossed wreath (embossing folder).


I added gold glitter glue and a gold Peel-Off from Elizabeth Craft Designs.  Inside, I added a stitched panel and stamped label. I was making over a dozen of these cards, and the MISTI was such a great tool for multiples. Every label stamped perfectly straight and if there was a spot that didn't stamp properly then I could easily re-stamp it.


I left some of the wreath's without any of the glitter glue as well.


Supplies:
Blueprints #13 - My Favorite Things
2581 Seasons Greetings Peel-Off in Gold - Elizabeth Craft Designs
7018 Glitter Dots - Elizabeth Craft Designs
Embossing folder -
Stickles
Gold paper
Cream card stock
Burgundy pearlized card stock - Stardream
Labels - Sizzix
Stamp - Papertrey Ink
MISTI - My Sweet Petunia

Thanks for stopping by today


Saturday 29 August 2015

C4C301 Use a Tag

It's Saturday and that means a new challenge at the Crazy 4 Challenges Blog.  Frances is our August hostess, and here is her challenge: "Tag You're It!  This week let's use a Tag on whatever you create. It can be an individual tag or you can add the tag to your card/project you create".

It was only  natural to use Karen Burniston's Tag Pivot for my card, which is available at independent retailers or Elizabeth Craft Designs.

I used this fun hot-air balloon patterned paper, which is orange patterned on the other side. To add the pattern to the front and back as well, I cut two 4-1/4 x 5-1/2" panels and attached them over the card base before cutting the Tag Pivot. This gave the card extra stability.


As a place to add a signature, I cut one of the Accessory dies that come with the Tag Pivot, but I stopped the cutting pad short of the end of the small tag. Then I just trimmed it the length I wanted it, and tucked it under the seam binding.


I had fun using the Lawn Fawn Hot Air balloon die set again, which also had the cloud die.


Finally, here is the back view ...


... and the view from the top.


Check out the blog to see how the Crazies have been inspired by the challenge. We'd sure love to see your take on it, so be sure to stop by the Crazy 4 Challenges blog and link up your creations. If you are uploading to an online gallery, please use the keyword C4C301.

Supplies:
Tag Pivot, Pop it Ups - Karen Burniston (Elizabeth Craft Designs)
Hot Air Balloon stamps and dies - Lawn Fawn
Zig Zag border - The Stamps of Life
Patterned paper - Echo Park
White card stock
Orange patterned paper - Basic Grey
Stamped words - Stampendous
Chalks
Card size - standard A2

Thanks for stopping by today


Friday 28 August 2015

Welcome Home Pull Card Trio

Good morning friends

Our eldest daughter and her family went on a holiday this summer, and of course I missed them like crazy. I made the Grandkids 'Welcome Home' Love notes to be waiting when they came home.

I used the Rectangle Pull Card, by Karen Burniston for Elizabeth Craft Designs along with some Suzy Zoo stickers and fun patterned papers. Get ready for lots of photos!

First up is the card for Ethan. He is such a sensitive little guy, this sticker reminded me of him.


Inside I added another Suzy's Zoo sticker to the Spinner that comes with the Rectangle Pull card. I use that spinner a lot. A LOT. Note, the stickers were adhered to white card stock then fussy cut.


Olivia's card is next ...


And finally Zachary's card:


Zachary is a bit of a wild man, so he didn't get a spinner. He'd have it pulled of faster than you can blink.


I love making Pull cards ... the notches that hold the card in the closed position are my favourite part, and that spinner is so much fun - both for me AND the recipient.

Supplies:
Rectangle Pull Card, Pop it Ups - Karen Burniston (Elizabeth Craft Designs)
Stickers - Suzy's Zoo
White card stock
Patterned paper - Echo Park and Recollections
Red marker - Stampin' Up
Card sizes - Standard A2

Thanks for stopping by today


Thursday 27 August 2015

'In The Meadow' Christamas Cards

Good morning friends

It's Throwback Thursday here on my blog, and I have a couple of older Christmas cards to share today.


I used the larger cards and envelopes from Michaels for the card bases. The Top Note Die and tree stamp is by Stampin' Up; the horse & buggy stamp & die are by Papertrey Ink.


Here is a peek at the inside:


Thanks for stopping by today


Wednesday 26 August 2015

Pop it Ups Wednesday Masculine Card Duo

I'm on the Elizabeth Craft Designs Blog today, for Pop it Ups Wednesday.  Since many card makers get stumped when faced with making a masculine card, I have two flat cards to share. I also wanted to show you how adding some simple die cut shapes to patterned paper can add texture and pizazz. My first card is for a Birthday and features the Barbed Wire from Karen Burniston's new Western Edges. Let's get started...

WesternEdgesBDCard_KAicken_1

1. Cut blue card stock to form a 5 x 7" folded card. Cut masculine print patterned paper to 4 x 6". Cut red card stock to 4-1/4 x 6-1/4", centre and adhere the patterned paper to the red panel. Cut black card stock to 4-3/8 x 6-3/8", centre and adhere the decorative panel to the black one.
2. Adhere a 2-1/2 x 3-1/2" piece of black card stock to one side of Elizabeth Craft Designs Transparent Double Sided Adhesive. Use the arrow from the Rectangle Pull Card and die cut 9 Arrows. Peel off the backing from 8 of them and adhere to your patterned paper where desired. Set aside the remaining arrow and scrap of adhesive black card stock.
3. Die cut 3 Barbed Wire pieces from a Black Velvet Adhesive Sheets. From the Happy Birthday Pop-Up, die cut a Happy & Birthday using the same sheet of Black Velvet Adhesive. Wrap one of the Barbed Wire pieces around your decorative panel at the top left as shown below. Repeat for the bottom right. Then apply your finished panel to the front of the the card with Double Sided Adhesive Tape.

WesternEdgesBDCard_KAicken_3

For the inside of the card, cut a white panel to 4-1/4 x 6-1/4", and a red panel to 4-1/2 x 6-1/2". Centre the white panel over the red one and adhere. Adhere the third Barbed Wire down the left side and the Happy Birthday as shown, then adhere your panel inside the card with Double Sided Adhesive Tape.
The black velvet adds such a nice feel to the card - you just want to touch it! Tip: Keep the scraps from when you die cut the Barbed Wire as it makes perfect Pop it Ups Character noses, hooves etc. Another  great way to use those smaller dies, as the Black Velvet Adhesive Sheets essentially make those pieces into stickers and easy peasy to attach.

WesternEdgesBDCard_KAicken_4

I had one small piece of the patterned paper leftover, and I was determined to use it up. So I created a simple A2 sized note card that will be perfect to send to my Dad, who is in a Nursing Home.
1. Cut white card stock to an A2 folded card (4-1/4 x 5-1/2"). Cut the remaining patterned paper to 4 x 5-1/4" and a piece of black card stock to 4-1/8 x 5-3/8. Centre the patterned paper on the black panel and attach, then repeat to attach the decorative panel to the front of the white card base.
2. From the Rectangle Pull Card, die cut 'hello' using the remaining adhesive backed black card stock from Step 2 above. Adhere the remaining arrow from Step 2 and the 'hello' to your patterned paper where desired and your note card is done and ready to send to someone special.

WesternEdgesBDCard_KAicken_5

I hope I've inspired you to use some of the Accessory Dies that come with the Pop it Ups in a new way!

Elizabeth Craft Designs Supplies:

Other Supplies
Blue, Red, Black, and White card stocks
Patterned paper - Ruby Rock-It (leftover from a previous Elizabeth Craft Designs Blog Hop)

Thanks for stopping by today


Tuesday 25 August 2015

Black and White Stand-Up Card

Good morning friends

I had this black and white paper stack out for a different project, and inside was the label - already cut out that was obviously intended for something else and wasn't needed. It was all I needed to decide to make a Stand-Up card Love Note for our daughter.

When you are faced with your child's life threatening health issues day in and day out, it can get the better of you. While our daughter and husband handle these trials better than most people could, I like to send a little encouragement when I can.


The little punched bird doesn't show up very well in the photos, but does in real life.


Supplies:
Royal Stand-Up - Sizzix
Patterned paper - My Minds Eye
Bird Punch - Stampin Up
7018 Glitter Dots - Elizabeth Craft Designs
Wavy Label die - Karen Burniston (Sizzix)
Remarkable stamp - Simon Says Stamp
MISTI - My Sweet Petunia

Thanks for stopping by today


Monday 24 August 2015

Firetruck Birthday Pivot Card

Good morning friends.

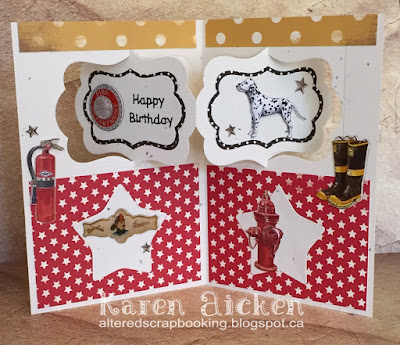
It's Masculine Card Monday here on my blog, and today's share is the Birthday card I made for our Grandson, who loves firetrucks.


I used the Katie Label Pivot die for the card base, by Karen Burniston for Elizabeth Craft Designs. The embellishments were in a package of stickers I purchased especially to make his card.


Pivot cards are so easy to make, yet give you a lot of 'OOOH' bang for your buck.  The design on the front label pivots to the inside when the card is opened.


I was happy with how the card turned out, and Ethan liked it too!
Supplies:
Katie Label Pivot, Pop it Ups - Karen Burniston (Elizabeth Craft Designs)
Accordion Star (star), Pop it Ups - Karen Burniston (Elizabeth Craft Designs)
397 Happy Birthday Peel Off - Elizabeth Craft Designs Carta Bella
Washi Tape
Fireman stickers - Life's Little Occasions
Confetti card stock - stash
Patterned paper -

Card size - 4-1/2 x 6

Thanks for stopping by today.


Sunday 23 August 2015

Floral Happy Birthday Card

Good morning friends

Today's share is a Birthday Card that I donated to Seniors Secret Service. I had just received my new stitched border dies and wanted to try out the curved one. This pretty patterned paper was sitting out from a different project and it worked perfectly for the card.


I added a punched flower and Peel-Off sticker along the curve. then stamped the inside words.


Supplies:
Stitched curve die - My Favorite Things
Blueprints #1 - My Favorite Things
White card stock
Patterned paper - My Minds Eye
Yellow card stock - Stampin' Up
0397 HBD Peel Off (black)
Flower punch - Stampin' Up
Lovely birthday - My Favorite Things
Distress Stickles - Ranger

Thanks for stopping by today


Saturday 22 August 2015

C4C300 Ride The Wind Day

Good morning friends

It's Saturday and that means a new challenge at the Crazy 4 Challenges Blog:


"The 23rd August is Ride the Wind Day, for our challenge this week create a card that features something that relies on the wind eg kite, hot air balloon, pinwheel, sailboat, windmill, balloons etc.

Today's challenge is our 300th challenge since we started this challenge blog back in September 2009. Wow we have had lots of fun during that time. Thank you all for helping make this Challenge blog such a success and I hope you will continue playing along with us for the next 300 challenges."

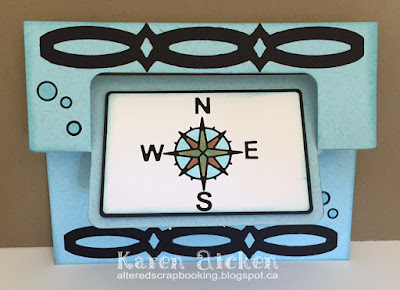
I couldn't figure out what to make for the longest time, then all of a sudden I knew exactly what I wanted to do. I used Karen Burniston's Rectangle Pull Card turned horizontal so it forms an Easel Card.  Here is the front of the card - note, I did not cut the notch from the Rectangle Pull Card.


The Maritime Peel-Off's from Elizabeth Craft Designs were perfect for this project. I applied them to white card stock, added colour with Copic Markers and fussy cut them out. The Compass and letters were die cut with the Accessory Rectangle Die instead of fussy cutting. I matted the rectangle with the Accessory Rectangle from the Accordion Rectangle.

The waves are from the Beach Edges, also by Karen Burniston for Elizabeth Craft Designs and the black border is one of Karen B's older Sizzix dies.


The anchor is attached to the spinner that comes with the Rectangle Pull Card. It is hidden when the card is closed, but spins up as it is opened.


I love getting more use from my dies - and turning the Rectangle Pull Card this way gives it an entirely different look!


Check out the blog to see how the Crazies have been inspired by the challenge. We'd sure love to see your take on it, so be sure to stop by the Crazy 4 Challenges blog and link up your creations. If you are uploading to an online gallery, please use the keyword C4C300.

Supplies:
Blue card stock - Stampin' Up
Black card stock
Rectangle Pull Card, Pop it Ups - Karen Burniston (Elizabeth Craft Designs)
Rectangle Accordion (Rectangle), Pop it Ups - Karen Burniston (Elizabeth Craft Designs)
Beach Edges, Pop it Ups - Karen Burniston (Elizabeth Craft Designs)
2592 Maritime Peel-Off's - Elizabeth Craft Designs 
Elizabeth Craft Designs Transparent Double Sided Tape - 6" and 1/4" rolls
Fine Point Tweezers - Elizabeth Craft Designs
Stamp - My Favorite Things
Copics
MISTI - My Sweet Petunia
Fun Foam
Stickles
Card size (closed) 4-1/2 x 6"

Thanks for stopping by today