Sunday, 30 September 2012

Freshly Made #54

There is a new sketch at the Freshly Made Sketches blog and I wanted to play along. It is such a fun sketch and I have so many ideas for it!


I made these two butterfly cards using coordinating papers. The purples look 'off' in the photos, but they match really well since they come from the same paper pack.


The iris' on the paper have glittered centers, which I could not manage to capture in the photographs.


The butterflies were cut with Spellbinders dies, and I added some flat sticker 'gems' to the bodies.


On the second card, I notched the end of the paper strip and I think I like that look the best.


There is room on the 2nd card to add a sentiment, if I think it needs one when I go to send it.

Supplies:
5 x 6.5" card base - Michaels
flat sticker 'gems' - Stampendous
Butterflies - Spellbinder Dies
Patterned paper - K&Co.
Foam Tape - Dimensionals by Stampin' UP

Thanks for stopping by today!


Saturday, 29 September 2012

Dynamic Duos #22

Well this is it - my final post as September Guest Designer for Dynamic Duo's. I've sure enjoyed my stint - all the ladies on the Design Team are so warm and friendly, not to mention creative!

The colour challenge this week is Cherry Cobbler and another colour of choice ...


So I chose KRAFT! I love the way red goes with kraft.


I had this beautiful piece of red textured - almost glossy - card stock so I cut out the Victorian label  and punched out 3 butterflies.  I also punched the same butterflies out of kraft card stock and kraft printed paper. The butterflies were layered together with foam tape then I added brown bling.

The tabbed label is was cut from patterned kraft, with the edges inked in red. I wanted to mat it, so I cut a slightly larger rectangle from a different patterned kraft and punched two 1" circles. These were layered together, edges inked and then attached. The


I am sending this card to Sue for her October mailing** so I wanted to do something a little different with the inside. I made a sort of pop out, with a butterfly cut out.


The little red flag is stamped with the words ... you've got mail.  Fitting!


** If you are new to my blog, my friend Sue lives in a city a couple of hours away from me. The first of every month we pop something in the mail to each other.

Supplies:
Butterfly punches, embossing folder, tabbed label die - Stampin' Up
Butterfly die - Spellbinders
Word stamp - Papertrey Ink
Victorian Label - Tim Holtz, Sizzix.
Kraft card stock - Michaels
Kraft printed paper - Michaels
Bling - Michaels.


Be sure to stop by and see all the creative way the Dynamic Duo Design Team has used Cherry Cobbler (red).

Karen Aicken (GD) -- that's me!
Thanks for stopping by today!

Friday, 28 September 2012

Embossed Pear Note Card

I have a simple card to share today, using a sheet of patterned crumpled tissue from my stash.  I matted it with burgundy card stock, which was trimmed with deckle scissors. The edges were touched with a gold metallic marker to dress it up a bit.


I gold embossed the pear and words, then added a little colour to the pear with chalks.


This is an A2 card, that I have already sent on it's way!

Thanks for stopping by today.

Thursday, 27 September 2012

Merry Monday #34 Cards

As I mentioned earlier this week, I really liked the Merry Monday sketch at Lesley's "Always Playing With Paper" blog...


... and these cards are the 2nd time I used it! That's 3 quick cards from one sketch ... gotta love it.


The embellishments were cut from one of the patterned paper sheets in the stack - there is a whole 12 x 12" sheet of different images!  On these two, the red words and children image are foiled, which makes them catch the light. I added 3 flat self adhesive sticker gems to this first card.


Because the embellishments are just paper, I cut a slightly smaller piece of scrap card stock and attached it to the back of the paper. That gave the piece substance needed to pop it up with foam tape.  On the card above I used crochet cotton in place of the ribbon on the sketch, and the card below uses button twine.


For both cards, I nicked the sides with a tiny circle punch to give the threads a rounded 'notch' to nestle into.  This last card has a strip of patterned paper attached below the image which gives the twine better focus yet stays true to the sketch.

Thanks for stopping by today!

Supplies:
A2 Card Base - white card stock from Staples
Patterned paper - K&Co
Crochet Cotton
Button Twine - Papertrey Ink
Foam Tape
Flat sticker 'gems' - Stampendous


Wednesday, 26 September 2012

Fancy Card for Dynamic Duos

I couldn't help myself. I was so crazy about the colour combo for this weeks Dynamic Duo challenge I had to make another card.


I went FANCY - or at least fancier than I usually do.  ;-)   I was inspired by this package of crochet flowers that I had in my stash - they matched the colour challenge perfectly.


Confession time. I ordered this label die BY MISTAKE. I have the Tim Holtz label die, which is very similar - and I intended to order the snowflake die when I placed my Stampin' Up order last month. But when my box arrived, I saw that I had in fact ordered the label and NOT the snowflake. Sigh. Since I have it though, I am determined to USE it and use it lots.

I cut the fancy label twice, once from white card stock and once from Always Avacado. The green one was cut down the center then attached on either side of the white one (after the white was embossed with an embossing folder)  with just a sliver showing on the sides. This way of matting a die is a great way to get more mileage out of your dies!


The swirly vine die was one of my purchases from the Rubber Stamp Show in Mesa last March - so it was fun to use it on this card. It has such nice detail and I'm always happy when I can use the butterfly stamp and punch set from Stampin' Up.


Somehow the card still needed something, so I added some pale green gems


I used a 5 x 6.5" card base for this one, and I'm putting in my stash for a special occasion -- maybe Mother's Day? With a sentiment flag on the front for an anniversary or wedding?

Thanks for stopping by today.

Tuesday, 25 September 2012

Card for Merry Monday 34

Sometimes a simple sketch is the most appealing, and that is certainly the case with the latest sketch for the Merry Monday Challenge. I got three cards made last night, using variations of this sketch!


I die cut the label from red Bazzil, and since I felt it has a Victorian look, I used a K&Co 3-d sticker as the embellishment. It also has that 'old time' feel.


I added a strip of striped paper and button twine, then stamped the Merry Christmas and added 2 tiny gems.


The sticker has glitter and a gem to give the card that Christmas SPARKLE I seem to crave.

Supplies:
White A2 card base - Office Depot white card stock
Red card stock - Bazzill
Patterned paper - K&Co
3-d Sticker - K&Co
Label die - Tim Holtz, Sizzix
Bling - from my stash, Michaels
Word stamp - Papertrey Ink
Foam tape.

I will share the other two sketch cards another time. 

Thanks for stopping by today!


Monday, 24 September 2012

Coloured Leaves Thanksgiving Card

I have another Thanksgiving card to share today, that went into my parents card order:


The leaf was stamped with brown ink and coloured with Copic markers. I punched it out with a circle punch, backed it with a punched scalloped circle and mounted it over the patterned papers with foam tape.


A simple card, but it works well for Thanksgiving!

Supplies:
Punches and stamps - Stampin' Up.
A2 white card base
Patterned paper from my stash.

Thanks for stopping by today.

Saturday, 22 September 2012

Dynamic Duo's Challenge #21 Cards

It's time for another colour challenge at the Dynamic Duo Blog! I think the monochromatic challenges are my favourite - although I did branch out with this one by incorporating several neutrals. Here is the challenge:


Because we can also use neutrals, I wanted to use this fabulous wreath die from Memory Box cut from brown card stock. I ran the Tim Holtz fall cluster die through my Big Shot three times. Once with Always Artichoke, once with Pear Pizzaz (because I don't have Certainly Celery) and once with kraft.  Then I added some of each colour to the bottom of the wreath.


I liked the look so much, I made three almost identical cards!


These cards started out as 5 x 6.5" cards and I was going to stamp a large word image below the wreath panel. But I decided I wanted them as square cards so cut them down to 5" square. I have all the Thanksgiving cards I will need for this year, so these will be going into my box for Thanksgiving 2013.  Haha - hope I find them, since I still have not located my Halloween stickers in my studio. They must be in a safe place too.


I used an embossing folder called "Give A Hoot" for the texture, the silk ribbon is from PTI and the ribbon is from Stampin' Up. The first card has lots of pale green bling on it while the card below has none.


The final card has just a sprinkling of bling around the leaves.


I have used my  few Thanksgiving verse stamps so many times over the years that I think it's time for a new one. I will have to keep my eyes open, as verse stamps are hard to come by.

Be sure to check out the wonderful submissions from the Dynamic Duo Design Team, as well as the other two Guest Designers for September!

Karen Aicken (GD)   That's me!!

Friday, 21 September 2012

Paper Pieced Pumpkin Cards

I admit it.

I make cards ahead.  I already have 3 cards done for next years Thanksgiving, and will post them tomorrow as they are for my Dynamic Duos Guest Designer post.

I have all the Thanksgiving cards I will need for this year for ourselves and my parents, but the desire to make fall themed cards is still there. That's how I end up with cards made ahead of time, because any fall/Thanksgiving cards I make this season will be put away for next year.

These cards are a bit of a cheat, since they were posted on my old blog when I made them. Then they were put in the box to send out this year. Since they haven't been posted on this blog yet, I'm sharing them again.


I made three almost identical cards, even though I only photographed two of them.  Such an easy technique, but so effective! I die cut the pumpkin three times, using 2 different patterned papers and one time with rust coloured card stock. These were stacked together, then sliced into 3 pieces using a metal ruler and Xacto knife.  I die cut three more pumpkins out of kraft card stock to use as the base, and coloured the pumpkin stems with a green Copic marker.


All the pieces were inked, then they were reassembled onto the kraft bases giving me patchwork pumpkins. A bit of faux stitching and ... done. 

As for the supplies? The die is a Sizzix one, but I honestly can't remember who makes any of the other supplies. This would be a fun technique to do on a large leaf, a Christmas stocking etc etc.

Thanks for stopping by today - have a great weekend!

Wednesday, 19 September 2012

Lotsa Turkeys Thanksgiving Card

This is another Thanksgiving card for my parent's card order ... the foil turkey stickers  catch the light when the card is turned.


I stamped the Hero Arts shadow stamp in a pale yellow ink, and when it was dry I added the turkey stickers (Sandy Lion). That panel was trimmed then matted with red and tan card stock then wrapped with a red satin ribbon.


The whole thing was added to a white A2 card base. I didn't tie a bow, but instead a knot. It will still need a card stock panel to line the envelope, but the knot will stay put as it goes through the mail.

Thanks for stopping by today!

Birdhouse Row Christmas Card

I bought this stamp many years ago, while visiting St. Catherine's Ontario. So many of my stamps have memories attached to them ...


I cut a white card stock panel that fit inside the embossed panel, then stamped the birdhouse row in black. I added colour with chalks, pencils and markers.


While it looks like I used a white pen or paint for the snow, it is actually just the white card stock with colour around it.

This is a simple card, but the blue card and matching envelope are nice and heavy, with almost a felt-like texture. The whole thing just feels good in your hands! Another card for my Christmas Card stash.

Thanks for stopping by today.

Tuesday, 18 September 2012

Merry Monday #33 Card

I took a little time away from loom knitting a baby gift, our year end and all the other chores I am behind in - to play along with Always Playing With Paper's  Merry Monday Challenge. Here is the sketch:


I rotated the sketch to work better with the Prima Chipboard Deer embellishment:


I am not a huge fan of putting bows on my cards. Ribbons? YES - but bows? Not so much. One, I can't tie a nice bow on my own - the red one above was done with the Bow Easy. Two - they are SO bulky and don't easily go through the mail and/or require extra postage, and three - don't they get all squished in the mail?

I look at the Merry Monday's Design Team cards, and the other entries and their bows are wonderful and the cards look great. I just don't think I can pull it off, on this card for sure. So I took a picture of my card with the bow and without.


I like the one without the bow better ... what do you think?

There was a big sale at Scrappin' Great Deals last year, and I ordered a 6x6" paper stack and matching chipboard set by Prima. From the tiny thumbnail on the website, I thought it would be wonderful for making Christmas cards. Well - it's waaaaaay more funky than I thought it would be and I struggle to use it.  This chipboard deer though, appealed to me immediately.


I added a strip of the same patterned paper inside the card before I stamped the verse.


This was a fun sketch, and when you change up the center shape you can really get a lot of mileage from it!

Supplies:
Card Base - 5 x 6.5" (Michaels)
Patterned Paper and Chipboard Deer - Prima (Northwoods)
Verse Stamp and Punches - Stampin' Up
Word Stamp - Hero Arts
Ribbon - from my stash
Bling - Self Adhesive Gems from my stash (Michaels)

Thanks for stopping by today!


Monday, 17 September 2012

Embossed Pumpkin Thanksgiving Cards

While it doesn't show up in the photos, the orange panel is a shimmery textured card stock by Bazzill. I love how nicely it embosses with an embossing folder -- so crisp! These are two cards that went into my mom's Thanksgiving card order.  The shimmery orange matches nicely with the subdued avacado A2 card base.


I wrapped the panel with a bit of sheer orange ribbon, slipping in an Avacado card stock punched label below the knot.


One of the colours of card stock and ink I ordered from Stampin' Up was Tangerine Tango. I used the ink to stamp the inside white panel - and I really REALLY like that shade of orange!


Supplies:
Coloured card stock, ink & label punch - Stampin' Up
Orange shimmery card stock - Bazzill
Sheer ribbon from my stash
Embossing folder - Sizzix
Word stamp - Stampendous

Thanks for stopping by today!

Sunday, 16 September 2012

Leaf Get Well Card

When I first thought about making a card for the latest challenge at the Dynamic Duo's Blog, I wanted to use this leaf stamp. When I opened up my 'Leaves' stamp drawer though, the tree that I used for my Design Team card (see yesterday's post) was on top and I went with that instead.

Yesterday I thought I'd make another card for the challenge, this time a fairly quick one:


The leaf stamp is one I've had for years - my favourite way to use it is with a rainbow ink pad, so this was a stretch for me. Simply stamping it in black? I don't think I've ever done that with this image, but you sure see it's detail this way!

I pulled out my deckle edges scissors for this card too - another old tool but one I used to LOVE using. Haha, this was a nostalgic card to make -- who uses deckle scissors anymore? Who uses any of those fancy edged scissors that were all the rage a few years ago?


Banners, pennants and flags - now THAT is a popular trend these days and one I am happy to jump on.  I read someone's blog (?) and she said she has a little bowl on her stamping area filled with nothing but 1/2" strips of card stock scraps that she uses for flags and banners. Brilliant!  I now have a little glassine bag that I tuck my scrap strips into. Just a few, as we all know there is no shortage of white strip scraps when you are card making!


Supplies: 
Card base - 4 x 6
Coloured card stock - Pear Pizzaz and Basic Black (Stampin' Up)
Button and twine - Papertrey Ink
Word stamp - Gina K
Leaf Stamp - Rubber Stampede
Black Ink - Momento
Green Ink - Lucky Limeade (Stampin' Up)

Thanks for stopping by today!

Saturday, 15 September 2012

Dynamic Duo's Challenge 20

It's time for another colour challenge at Dynamic Duo's  where I'm happy to be one of the guest designers for September. This week the colours are Lucky Limeade and Basic Black with the option of doing a Halloween Theme.

Last November I picked up several packages of ADORABLE Halloween K&Co 3-d stickers on clearance. Can I find them? NO.  I wasted way too much time searching through the studio for them, and finally decided to forgo the whole Halloween idea and instead make a card for our Son-In-Law.


His thesis was published, and we are very proud of him!

I thought I had ordered Stampin' Up's Lucky Limeade card stock, but it turns out I only ordered the ink pad. So I used my SU Pear Pizzaz instead (love).

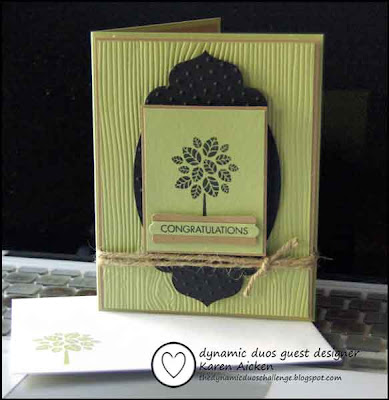
The tree (Hero Arts) was stamped in black on a green rectangle, which was matted with kraft card stock. I embossed the black die cut label (Stampin' Up) with the Swiss Dots embossing folder for some texture, and ran a Pear Pizzaz panel through with a wood grain embossing folder.  After matting the wood grain panel with kraft, I popped the black label up with foam tape, then popped up the tree panel as well.


The twine sits below the stamped rectangle, which I'm hoping will help with the bulk when mailing this card. I will still line the envelope with a card stock panel though.

The words were stamped in black on a narrow strip of the green, which was attached to a scrap of kraft card stock. Then I punched it out (Stampin' Up) and yes - used MORE foam tape to attach it at the bottom of the tree image.

 Here is a peek at the inside.  I added a kraft panel inside the A2 Pear Pizzaz card base, and stamped the tree again in black. We will write our message to him inside, so I didn't add any word stamps.


This fun shade of green paired with black are perfect Halloween colours, so I wanted to at least do a little treat holder:


I used a black and green print patterned paper from my stash to make a simple 'sour cream container', with crimped edges. I always like that look, it helps keep the container sealed, and it's good to haul that crimper out of the drawer once in awhile.  Inside are a couple of nuggets wrapped with a piece of Pear Pizzaz.

I punched a label (Stampin' Up) out of Pear Pizzaz, penned the EEK and added a creepy black flocked spider sticker. The stickers were added to the chocolate nuggets as well. NOT exactly my choice of Halloween images (ug) but those sweet K&Co sticker packages are hiding really well!
Be sure to check out the wonderful submissions from the Dynamic Duo Design Team, as well as the other two Guest Designers for September!

Karen Aicken (GD)   That's me!!