Tuesday 29 November 2011

More Hard Cover Journals

Here are a few more of the hard cover journals I made for our Craft Sale,


I covered these with scrapbook paper from my stash, as well as stickers & other embellishments. Each one had a ribbon bookmark with a bead at the end. 

I've been busy wrapping gifts, gifts and more gifts - just stocking stuffers but there are a LOT of them. My Mom and I exchange stockings on December First each year, and there is usually something to open every day between the first and Christmas Day.  I continued the tradition with each of our three children when they moved out. So now, I have like 100 stocking stuffers to buy and wrap. 
I haven't had a chance to upload the deck photos or spend any creative time in the studio, but will be back later in the week with some new cards.

Thanks for stopping by today!

Monday 28 November 2011

Ayda's First Birthday Card (#2)

Last week I shared the birthday card I made for my parents to give to Ayda (my cousins daughter), and this week I will share the one I made for her.


It's quite large -- 6" square! My 6-1/2" square envelopes are coming in handy, even though they do require extra postage.  I used the 'Birthday Bash' Cricut cartridge for this card, and the patterned paper is by K&Co.


Since I was paying extra for postage anyhow, I decided to add lots of foam tape - I love the extra dimension it gives to a card.  Doodled and inked edges, some doodling with my Sakura glitter pen, and lots of Stickles make the card more festive. I added black brads for the eyes, and even those got a dab of glitter.  
 
While it's hard to see in this photo, the letters for AYDA were cut out with a Sizzix die and glued inside. I doodled on them as well, and the verse is a Stampin' Up stamp.

I loved making this card, and I hope that Miss Ayda has a very happy first birthday.

Thanks for stopping by today!


Sunday 27 November 2011

Puffy Birdhouse Card

This week's challenge at Less Is More, is a "Bit of Bling". 

Bling? No problem. CAS (Clean And Simple)?? Yikes!

However, I DO have a card to share that qualifies for the challenge.  :-)


I found these puffy stickers at Michaels last year - and splurged on a package. They were just SO cute, and completely new.  (Now, I believe they are being cleared out - crazy!). Anyhow, my friend D loved them too and also picked up some. We got together, sharing papers and ideas, and made up several cute cards with our puffy felt stickers.

As usual, I chose not to put a sentiment on the front of the card.


I have exciting news - our cabin's deck is almost finished. It's useable now and the dogs can go out on it and it's BEAUTIFUL. I will take pictures today and will share this week. The only thing left is to put glass panels on the railing above the hot-tub. NOT our choice, but it's a building code. The glass is on order and we should have this project finished next week. Even though it took waaaaaaaaaay longer than it should have (slow contractor), the end result is every bit as wonderful as we had hoped for. YAY!

Have a wonderful Sunday - thanks for stopping by today.

Friday 25 November 2011

Chipboard Butterfly Cards

I love butterfly elements - so of course when I saw the K&Co chipboard butterflies last year I HAD to get them. I hoarded them for the longest time (sheesh) but when I found some matching K&Co butterfly paper in one of my paper stacks I made up a couple of cards.  Here are the first two - both are done using the large card packs from Michaels, which are 5 x 6.5":


The butterflies come with bling and glitter and they are ready to use.  Love.  

The scalloped label shape was in my 'Odds & Sods' pile and is a Cricut cut piece not used on another project.
Lots of foam tape used on these ones, then into my stash with them. I will add the words inside when I go to use the cards.

Thanks for stopping by today!

Thursday 24 November 2011

Snowman Christmas Card


I had fun with my Tim Holtz snowman die for this card. I cut it out of pearlized Bazzil card stock, and inked the edges with brown. The A2 card base is a confetti card stock, and the patterned papers have sparkly touches.


The buttons were threaded with narrow strips of chocolate brown card stock (Basic Grey - more like a heavy paper) and attached with Crystal Effects.  I cut a strip from the Stampin' Up chocolate chip striped ribbon, which is quite wide, for the scarf. The snowman is popped up with foam tape.

I love dies, and how versatile they can be. After I made this card I cut about 10 more snowmen out of  white card stock. Left plain, they make perfect tags for wrapped Christmas packages, with lots of room to write on them. They can be attached with foam tape, 2 faced tape, or tied on with bakers twine through his folded arm.

Thanks for stopping by today.

Wednesday 23 November 2011

Pennant Birthday Card


I used my Stampin' Up Pennant PUnch and some sparkly Christmas paper to make this A2 birthday card. While it's hard to tell from this angle, I trimmed about 1/2" off the bottom front of the card, and attached the patterned paper to the bottom inside edge. When the card is closed you can see the patterned paper showing through the trimmed edge.


This little 'flower' punch is in my supply stash - I've had it for years and years. The red bakers twine is by Stampin' Up. 

The tiny candle punch is also in my stash ... it was fun to get it out again, as I haven't used it in a LONG time.  I like the little surprise they give the card when you open it up. Words by Stampin' Up.

Thanks for stopping by today!

Tuesday 22 November 2011

Birds & Branches

This weeks challenge at Less Is More, is a theme challenge - Silhouettes.

My Penny Black birds & branches stamp seemed to fit the bill and honestly? This card just made itself.


Sorry for the bad lighting - I took these pictures fairly early yesterday morning and the lighting was terrible.  The card itself is a 5-1/4" square, and made from white Bazzill. The silhouette image was stamped with Rich Cocoa ink on white smooth card stock, then matted with Basic Grey chocolate brown and Stampin' Up's  Garden Green.

The stamped layer is popped up with foam tape, and then the matted layer is also popped up. I used Stampin' Up Dimensionals for the first time and WOW - I'm loving them. The backing paper peels off so easily, they aren't too thick, there is no waste & I'm really impressed with them. Waaaaaay better than the foam tape from the dollar store I've been using for years.

I thought at first this card might be too bleak to be a sympathy card, but I'm going to dig out my Emily Dickinson quote stamp and then it will be perfect with a handwritten message.

"Hope" is the thing with feathers -
That perches in the soul -
And sings the tune without the words -
And never stops - at all

It has warmed up here - and even though it looks like the stamped picture outside, the bitter cold has gone and the dogs and I are happy HAPPY HAPPY!

Thanks for stopping by today.

Monday 21 November 2011

Loom Knit Scarflet and Hat

Once the craft sale was over,  I needed to just sit and knit something. Something that could be worked up fairly quickly as I was looking for instant gratification.


I found the pattern for this "Lacey Scarflet" by Brenda Myers and pulled out one of my Knifty Knitter looms. This was knit with 2 strands of yarn, one soft green #4 weight and one very thin yarn with tiny sequins. I seem to be addicted to this shade of green these days.

As I was finishing up the scarflet, we got word that a bitter cold snap was going to hit and I decided that I needed to make a matching hat!


The hat turned out pretty good, but I did end up doing a double crochet border around the brim as it made the hat a little deeper. Plus, I can fold up the back a little and I like the shape that gives the hat. I added the fun flower, since flowers on hats seem to be really 'in' right now.

The pattern for the flower can be found HERE - it's the Be Happy flower.  You can get a look at the tiny sequins in the following photo.


Not only does this hat and scarflet set make me happy just looking at it (must be that cheery green), but the hat is nice and warm. Believe me -- in this weather a warm hat is a necessity!

Thanks for stopping by today.

Sunday 20 November 2011

Christmas Sketch Cards

There is a new sketch over at CAS-ual Friday's blog, and these scraps of sparkly Christmas paper were just the perfect size!


I used Stampin' Up's Old Olive to make the folded cards, and put a white insert inside to add the verse and sign our names. The greeting is a Tim Holtz stamp, done with Old Olive ink.


This is such a useful sketch - I want to have another go at it, this time using a much smaller greeting below the popped out layer. 

Thanks for stopping by today!

Saturday 19 November 2011

Noel Ornament Card

The new sketch is up at the Clean And Simple Stamping Blog and I just had to play along. But I also had to take some artistic liberty with it:


Here is the sketch  FTL167:


So I added the sentiment INTO the circle element, which was made into a Christmas ornament shape and moved the strip up to the top of the ornament. Gotta love the flexibility of sketches!

I added packing tape to the reverse side of the cut out ornament and added Martha Stewart glitter to the front. The adhesive of the packing tape keeps the glitter attached.  A hand trimmed white card stock oval backs the ornament and I used a silver metallic pen to colour the top of the die cut. I also added 2 silver dots to the paper strip to represent the buttons on the sketch.


The ornament and words are by Tim Holtz, and the little paper strip is from a Martha Stewart package I've had for ages. I ran it through a Stampin' Up embossing folder.  I'm not sure who makes the green patterned paper but I will update this post the next time I haul the paper stack down from the shelf.

Thanks for stopping by today!

Friday 18 November 2011

Ayda's First Birthday Card

Our cousin's daughter Ayda has a birthday coming up ... this is the card I made for my parents to send to her:

The card base was made using a Sizzix die, and two sided pink heavy paper. I found it and the sparkly castle print on clearance at our LSS over the summer and knew that it would be perfect for the little girls in our life.  
I cut the '1' and shadow using the 'Birthday Bash' Cricut cartridge, and added glitter glue to the edge of the top layer after embossing it with the 'Swiss Dots' folder.

It is popped up with foam tape, and decorated with inked punches and paper scraps. (Flower is a SU punch, leaf is Emagination ?)


The cute little banner was hand trimmed from another sheet of paper and layered with foam tape.


All in all, a really fun card to make and I know a special little girl will enjoy it too.

Thanks for stopping by today!

Wednesday 16 November 2011

Dragonfly Card

I cut this pretty dragonfly from the Home Decor Cricut cartridge out of black card stock, and the shadow from a shimmery green Bazzil.

While I could have added some bling to the dragonfly body, I really like the solid black silhouette. Plus, the background paper has shimmer & shine.

The dotted trail is an Impress rubber stamp. For those of you that want to know, this is an A2 sized card.  
Thanks for stopping by today!

Tuesday 15 November 2011

Snowman Sketch Cards

I had a chance today (when I dug out the studio) to make 2 cards for the latest sketch at the Clean And Simple Stamping Blog.  This card also qualifies for the CFC28 which is to make a CAS card with a tag on it, over at the CAS-ual Friday's Blog

Here are my cards:


and here is the sketch:

I was able to use some sparkly scrap paper from my Craft Sale Mess Chaos Stash and that always makes me happy. The two snowmen were cut from another scrap, but before hand trimming them I glued the scrap to a piece of white card stock for stability.

The tag is a Tim Holtz die - I love that die set, as there are so many little tabs and tags on it.  :-)

I tried to capture the sparkle in the paper and snowmen scarves, but it never shows up well in a low res web photo.

Word stamp is by Hero Arts, and the scallop border is a MFT (My Favorite Things) die.

I sold quite a few Christmas cards in our Craft Sale this past weekend, so it's time to re-build the stash!

Thanks for stopping by today.

Friday 11 November 2011

Santa and Rudolph and Chocolate ... Oh My ...

So the Kit-Kat chocolate bars in yesterday's photo? Well I actually had TWELVE of them. What's a better way to decorate Kit-Kat chocolate bars, than to disguise them as Santa and Rudolph.  And put them in the Craft Sale!


After using the Swiss Dots embossing folder to add texture to the red card stock, I taped it around the chocolate bar, enclosing it completely. Both ends were crimped, because I really like that look.

I used my Cricut and the Doodlecharms cartridge to cut out the faces, layered everything with glue and foam tape, then attached the head to the top of the wrapped chocolate bar. Glitter glue was added after the ribbon was attached around his middle. 

Instead of using the nose and hat pom-pom that cut with the file, I glued a red Dew Drop for his nose, and punched a 3/4" circle (Stampin' Up) out of sparkly white card stock.  Santa has sparkly eyes too, courtesy of black glitter glue.

I used the Doodlecharms cartridge so often last Christmas that I thought I'd give it a rest this year. Then Jayne (see my blogroll for her blog) used the Santa and Reindeer to make the most adorable gift boxes and I just had to get the cartridge out to play with again.


Next up -- Rudolph:


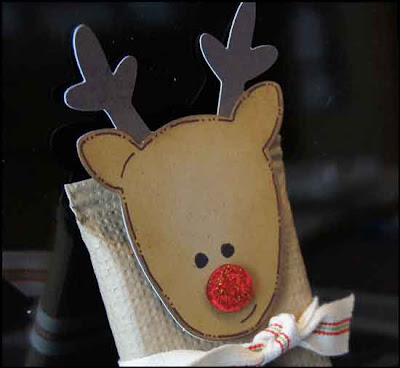
These are SO cute, that if they don't sell well I will have no problem tucking one in everyone's stocking this year. Rudolph was made the same, this time using kraft card stock and the textile embossing folder from Stampin' Up.


Some inking, some doodles, and a glitter glued nose.  :-)  The twill ribbon was from the Stampin' Up Clearance Rack. It is sooooo soft and easy to use. I kept thinking he needed SOMEthing else though.


The word stamp is by Verve, and the punches by Stampin' Up ... popped up with foam tape and then I was happy with them.

Here is a look at the Santa bars, all tucked into their box and ready to be put out for the sale today.  :-)


Thanks for stopping by!

Thursday 10 November 2011

"Homemade Fudge" Bars

I made some of these last year for our Christmas Craft Sale, and they sold out right away. So - I did them again this year, only this year I made more of them.  :-)

I did not come up with the verse, I saw it in several different versions all over the web. I may have tweaked it a little - but it's the same verse as last year's purchased chocolate bars. They were wrapped up with sparkly Christmas scrapbook paper, and tied with a pretty ribbon bow.


These chocolate bars are huge. I mean HUGE. Here you can see it against a normal sized chocolate bar. They are nice and heavy too - so it feels like a substantial gift.  I hope they sell as well as they did last year!


These ones have a pared down version of the poem. These bars are what I would consider a LARGE chocolate bar. They sold out last year too.

Again, wrapped with sparkly Christmas scrapbook paper, and these ones have a Nestability label cut out of red to mount the verse on. I used Sizzix snowflake dies and pretty sparkly red sheer ribbon.

I have had these stored in a plastic bin all week -- no way I was taking a chance on mice getting in the house and nibbling on all my hard work. The bows will all have to be adjusted before I lay them out for the sale but other than that - they are done!!

Thanks for stopping by today.