Saturday 31 December 2016

Happy New Year Pivot Card

Good morning friends

When I was putting away the Christmas embellishments, I found a package of New Years stickers! I made yesterday's card with them but wanted to use the rest of the sheet and not store them for another year.  This is what I came up with:


Remember to follow me on my new blog - Painted Mountain Cards starting tomorrow January 1 2017. I'd love to see you there!

Happy New Year, everyone

Supplies:
White card stock
Katie Label Pivot, Pop it Ups - Karen Burniston (Elizabeth Craft Designs)
Silver metallic card stock
Stickers - Jolee's Boutique
7051 Glitter Border Peel-Off - Elizabeth Craft Designs
Gel Pens - Sakura
Glitter Dots - Elizabeth Craft Designs
Gold metallic card stock

Card size - standard A2

Thanks for stopping by today

Friday 30 December 2016

Sparkly Happy New Year Flip-It Card

Good morning friends

***NOTE:  I will be moving my blog to Painted Mountain Cards in the New Year. I will leave this blog open, as there are frequent hits from Pinterest and over 5 years worth of cards etc to reference.

It's Flip-It Friday here on my blog and I have a sparkly New Years card to share.

I found this package of stickers in my Christmas embellishment box - I didn't get around to using them last year.


I added some hand lettering with a gold gel pen. The gold glitter paper is by Stampin' Up - I love that stuff.

Supplies:
Circle Flip-It's #   - Sizzix
Stickers - Jolee's Boutique
Charcoal Stardream card stock (Pearlized black)
Gold glitter paper - Stamping' Up
Gold gel pen - Sakura

Card size - standard A2

Thanks for stopping by today

Thursday 29 December 2016

Gingerbread Man Card Duo

Good morning friends

***NOTE:  I will be moving my cards and paper crafting to Painted Mountain Cards in the New Year. I will leave this blog open, as there are frequent hits from Pinterest and over 5 years worth of cards etc to reference.

I had big plans for Joset's Gingerbread Man die when I finally ordered it. Not sure what happened to the time though - I'm going to blame it on my surgery & recovery and our newest Grandbaby. But I did manage to make a couple of cards with it and look forward to playing with it more next year.


I love Kraft with red, so added red accents. The 'Hi' is from Karen Burniston's Circle Twist Pop-Up card - it's a little word that comes in very handy for lots of different cards.


The red borders come from a different card set, and I also got out Els' Curvy Ovals fitted frames. Another set I purchased and want to use more in the future.


Inside of both cards is the same ... stamped using Joset's 'Winter Sentiments' clear stamps - this one is my favourite in the set. Ok I admit it - I bought the set BECAUSE of this phrase. :-)


While I'd like to say this is the last Christmas card I'll be sharing till next year this time, I hope to work on holiday cards/tags etc throughout the year. But it is the last one for a little while! I still plan on cutting and assembling a whole bunch of cute little gingerbread men to have on hand.

Supplies:
White card stock
Patterned paper - DCWV
Gingerbread man - Elizabeth Craft Designs
Kraft card stock
Red card stock
Xyron
Border - Spellbinders
Curvy Oval Fitted Frames - Elizabeth Craft Designs
Twist Circle Pop-Up (Hi), Pop it Ups - Karen Burniston (Elizabeth Craft Designs)
Winter Sentiments - Elizabeth Craft Designs
Stickles

Card size - both, standard A2

Thanks for stopping by today

Wednesday 28 December 2016

Stitched Mittens Christmas Card

Good morning friends

***NOTE:  I will be moving my cards and paper crafting to Painted Mountain Cards in the New Year.  I will leave this blog open, as there are frequent hits from Pinterest and over 5 years worth of cards etc to reference.


I was so excited to get this mittens die when it was on the discontinued list at MFT. I had them sent to a friend in Arizona and had to wait a couple of months before I could play with them. Then ... I couldn't figure out exactly what I wanted to DO with them! So these were actually test cuts that I decided to make into a basic Christmas card.


I'm looking forward to some more playtime with these mittens for next year's cards.

Supplies:
White card stock
Patterned paper - DCWV
Mittens stamp and die set - MFT Stamps
Bakers Twine
Dotted Scalloped Rectangle - Elizabeth Craft Designs
Stitched Ovals - MFT Stamps
Red card stock - Bazzill
Stitched Rectangles - Elizabeth Craft Designs
Words - MFT Stamps
Glitter Dots - Elizabeth Craft Designs

Card size - standard A2

Thanks for stopping by today

Tuesday 27 December 2016

Holiday Cards - From Bits & Pieces

Good morning friends

***NOTE:  I will be moving my cards and paper crafting to Painted Mountain Cards in the New Year. I will leave this blog open, as there are frequent hits from Pinterest and over 5 years worth of cards etc to reference.

The name of the game has been to USE THINGS UP as I worked on our Christmas cards this year. I had several pieces die cut and ready to mount onto card bases, so I combined those pieces with some stickers etc from my stash and made these three cards. I still have some Christmas cards to share this week, then I promise you I'll be onto something different.

This first one has a super sparkly card base - I keep forgetting I have these, and they are perfect for holiday cards. The tree is a glittered foam tree sticker from my stash.


I had two panels cut for these next two cards, but that was before I had stitched rectangle dies (which I love, by the way). I re-cut the panels with a Blueprints stitched rectangle then mounted them to the dark red card bases.


The vintage red snowflake paper was too pretty to throw away anything but the tiniest scraps. I used a couple of the smaller leftover pieces for these two cards as well as 3-d snowflake stickers from my stash.


This week I've had all my blog posts scheduled so I can spend time with friends and family.

Supplies:
Folded cards - DCWV
Blueprints #1
Blueprints #???  with bracket
Snowflake stickers - K & Co
Tree stickers - Michaels
Clear double sided adhesive, 1/8" width - Elizabeth Craft Designs
Stamps - Verve
Glitter Dots - Elizabeth Craft Designs
Cream card stock
Scalloped scissors
Bakers Twine

Card sizes - A2

Thanks for stopping by today


Monday 26 December 2016

Designer Challenge Happy New Year Card

Good morning friends

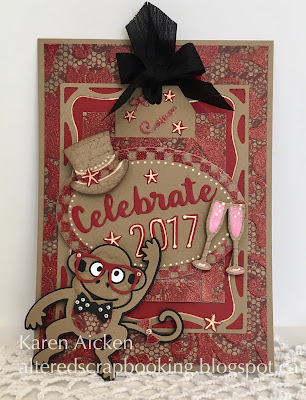
Welcome to the second Karen Burniston's Designer Challenge for December 2016 - this time teammate Sandy Diller issued the challenge:   Team theme - Sandy Diller - "Party Animals" - use any of the Character dies for a card celebrating the New Year or anything else!

For my card, Jinks the Monkey is off to a Black Tie New Years Eve Party where he has just tossed his top hat into the air so he can catch a glass of pink champagne. 


I used this cool patterned card stock with embedded glitter, along with kraft and red card stocks. Love this colour combination!


When you pull the tab, the oval slides up for display, revealing a penned greeting underneath.


Jinks is popped up with three layers of foam tape, but I still needed to curve his hand and the top of his head up slightly, to slide the oval back into place.


This is a flat, post-card style card, but I did add some pattern and colour onto the back where I'll write my note & add our signatures.


Another peek at Jinks ... his black bow-tie and snazzy glasses are embellished with Glitter Dots. I cut his face piece 3 times from kraft card stock then layered them together for dimension. The top layer got some glitter from a Wink of Stella pen - because any monkey going to a New Years  Eve party should wear some glitter. Ha! Jinks also has a sparkled bow on his tail.


Be sure to check out the rest of the Designer Challenge Team, which are linked on the right. Karen Burniston will have her post tomorrow (Tuesday) on her BLOG.

***NOTE:  I will be moving my cards and paper crafting to Painted Mountain Cards in the New Year. I will leave this blog open, as there are frequent hits from Pinterest and over 5 years worth of cards etc to reference.

Supplies:
Hanging Charm Pull Tab, Pop it Ups - Karen Burniston (Elizabeth Craft Designs)
Evergreen Pivot - Stars, Pop it Ups - Karen Burniston (Elizabeth Craft Designs)
Flourished Gift Frame (Celebrate), Pop it Ups - Karen Burniston (Elizabeth Craft Designs)
Wedding Charms, Pop it Ups - Karen Burniston (Elizabeth Craft Designs)
Steam Punk Charms, Pop it Ups - Karen Burniston (Elizabeth Craft Designs)
Jinks the Monkey, Pop it Ups - Karen Burniston (Elizabeth Craft Designs)
Midnight the Bat (small bow), Pop it Ups - Karen Burniston (Elizabeth Craft Designs)
Props 1, Pop it Ups - Karen Burniston (Elizabeth Craft Designs)
Props 2, Pop it Ups - Karen Burniston (Elizabeth Craft Designs)
Patterned paper - Recollections
Kraft, red, black and white card stocks
Fine point Tweezers - Elizabeth Craft Designs
Numbers & More 1 - Elizabeth Craft Designs
Fitted Frames 3 - Curvy Rectangles - Elizabeth Craft Designs
Fitted Frames - Stitched Rectangles - Elizabeth Craft Designs
Glitter Dots - Elizabeth Craft Designs
Water colour pencils - Derwent
Dove Blender pen
Wink of Stella
Clear double sided adhesive, 1/8" width
Heart hold punch
Fitted Frames - Ovals
Metallic Gel pens - Sakura

Card size - just over 5 x 7"


Thanks for stopping by today

SaveSave

Sunday 25 December 2016

Red Deer Christmas Cards

Good morning friends

I've had a bunch of posts scheduled, so I can spend time with friends and family this week. I will be hosting the family today for our traditional Christmas Day ... we keep it very casual and everyone loves it. The morning starts off with fruit salad with a white chocolate sauce and fresh home-made muffins. Food is put out and as family arrives they just dig in. Once everyone is here and fed, we will open gifts. We used to wait longer for this but with the Grandkids it's more fun to open them earlier in the day. Love watching the kiddo's - love love love.

We don't cook a big turkey dinner - my brother looks after that on Christmas Eve. Here we have the Food Table. Ha! Lots of snacky things, with hot appy's throughout the day. We eat and visit and play and snack and then eat some more. Food is out for anyone to help themselves with whatever they want.

I have the table all set with the serving dishes, and pretty paper plates & napkins. The kids used to laugh at me, but once they got old enough to help they appreciate this - and still do. Inside all the dishes is a little piece of paper with what food item goes in that bowl/plate/platter. The first people to arrive help me and we get the veggies/dip, crackers/cheeses/salami's served. Then, while they enjoy their breakfast I put out the rest of the goodies.

If it's not too cold, everyone goes for a walk, sometimes more than one! This year, we have a chair lift so everyone (including my Mom and myself) can get down to the basement. We have a wonderful play-room set up for the Grandkids and they love to go down and play. There is a table and chairs set up near the play area so whoever wants to play a game, can. Hardly any dishes, once the prep work is done - it's an easy relaxing day for everyone.

The family come dressed for comfort, and it's a happy day that we all spend together. One year we thought we'd be more traditional, and I cooked a turkey dinner instead of putting on the Food Table. While we enjoyed the meal - it was not the same and the vote to return to our way of celebrating Christmas Day was unanimous!


Today's share are Christmas cards with a red deer on the front. Just some quick and easy cards made with holiday print patterned papers and dies.


If you celebrate Christmas, I wish you a very Merry one. If not, I wish you a very happy day.

***NOTE:  I will be moving my cards and paper crafting to Painted Mountain Cards in the New Year. I've been toying around with the idea for a long while, and this seems like a good time to make the change. I will leave this blog open, as there are frequent hits from Pinterest and over 5 years worth of cards etc to reference.

Supplies:
Patterned paper - stash
7010 Glitter Lines - Elizabeth Craft Designs
White card stock
Wavy Label Framelits - Karen Burniston (Sizzix)
Words inside - Papertrey Ink

Card size - 4-1/2 x 6"

Thanks for stopping by today

Saturday 24 December 2016

Cardinal Gift Card Holders

Good morning friends

***NOTE:  I will be moving my cards and paper crafting to Painted Mountain Cards in the New Year. I will leave this blog open, as there are frequent hits from Pinterest and over 5 years worth of cards etc to reference.

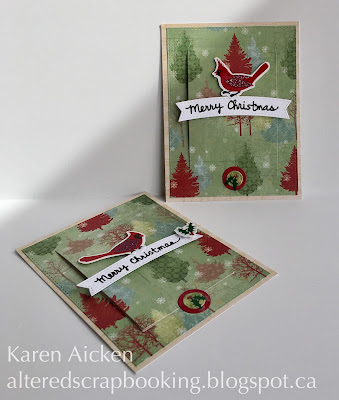
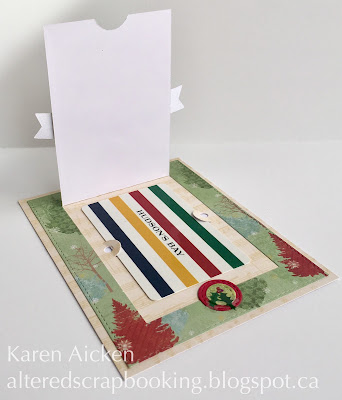
Today I have two more Christmas Gift Card Holders to share.


You may have noticed that I use my Blueprints dies a fair bit ... I always feel like I get my money's worth from them. This one is the Blueprints #28.


I cut the notches to the inside panel, the notch die is a separate MFT die; it isn't included with the Blueprints #28.


I always like to have some nice holiday Gift Cards on hand, and if they don't get used this year I'm ahead of the game for next year!

Supplies:
Patterned paper - The Paper Studio
Gift Card Slots - MFT Stamps
Blueprints #28 - MFT Stamps
Black Glaze Pen
Stickers - the Paper Studio
Stamps on back - Hero Arts

Card sizes, standard A2

Thanks for stopping by today

Friday 23 December 2016

Sleigh Full of Cheer, Pop-Up Gift Card Holder

Good morning friends

***NOTE:  I will be moving my blog to Painted Mountain Cards in the New Year.  I will leave this blog open, as there are frequent hits from Pinterest and over 5 years worth of cards etc to reference.


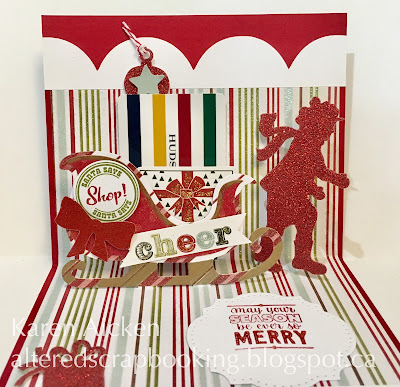
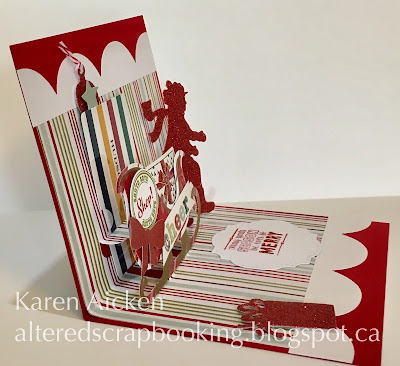
Todays share is another Christmas Gift Card Holder I made using Karen Burniston's Sleigh Gift Card Holder.


The large white scallops have been in my stash for years - they were Cricut pieces that weren't needed for whatever project I was working on at the time. They make me want to dig out my Cricut and cut some more!


Inside, you can see the striped Hudson's Bay Gift Card tucked into the slots that cut with the Pop it Ups die.


Finally, a side view so you can see the pop-up a little better.

Supplies:
Sleigh Gift Card Holder, Pop it Ups - Karen Burniston (Elizabeth Craft Designs)
Patterned paper - My Mind's Eye
Gold Sharpie marker
White card stock
Printed embellishments - My Mind's Eye
Glittered Embellishments - K & Company
Stitched circle - MFT Stamps
Wink of Stella
Merry & Bright Clear Stamps, Pop it Ups - Karen Burniston (Elizabeth Craft Designs)
Ring Accordion (circle), Pop it Ups - Karen Burniston (Elizabeth Craft Designs)
Large Scallops - Cricut cut from my stash
Labels & Circles, Pop it Ups - Karen Burniston (Elizabeth Craft Designs)
Holiday Clear Stamps, Pop it Ups - Karen Burniston (Elizabeth Craft Designs)
Bakers Twine
Stickles

Card size - 5 x 6"

Thanks for stopping by today

Thursday 22 December 2016

Crumpled Tissue Christmas Card

Good morning friends

Earlier this year I found this scalloped card die - I believe it was at Michaels, but at any rate I had a coupon and had been feeling down in the dumps with my RA symptoms so this purchase cheered me up. I really like this set - it's supposed to have a drop in sentiment for the front, but I'm not crazy about that part. This scalloped card base with the eyelet overlay though? LOVE.


In my quest to USE THINGS UP from my Christmas stash, I found this pretty crumpled piece of tissue paper with lovely gold highlights. There was just enough of it for this card!  I added some 3-d Christmas stickers and a gold embossed sentiment on the front.


The inside got some decorations too.


***NOTE:  I will be moving my blog to Painted Mountain Cards in the New Year. I will leave this blog open, as there are frequent hits from Pinterest and over 5 years worth of cards etc to reference.

Supplies:
Scallop card base - Sizzix
Green card stock - Stampin' Up
Tissue paper - stash
Cream card stock
Gold gel pen - Sakura
Stamps - Stampin' Up
Gold embossing powder
Embellishments - K & Company
Stitched oval - My Favorite Things

Card size - Standard A2

Thanks for stopping by today

Wednesday 21 December 2016

Calligraphy Merry Christmas Card

Good morning friends

***NOTE:  I will be moving my blog to Painted Mountain Cards in the New Year. I will leave this blog open, as there are frequent hits from Pinterest and over 5 years worth of cards etc to reference.

Today's share is a holiday card using Suzanne Cannon's beautiful calligraphy Merry Christmas die. I have a couple of these lovely dies and don't use them nearly enough - going to remedy that for sure.


The Elizabeth Craft Designs Pine Cone comes in two pieces - a base layer and an overlay. Here, the base layer was cut from gold mirror card stock and the overlay from brown. I had backed the brown card stock with their clear double sided adhesive which made it much easier to adhere.


The bow was tied from seam binding, so it does lay nice and flat for mailing.

Supplies:
Spring with Berries - Elizabeth Craft Designs
Pine Cone - Elizabeth Craft Designs
Blueprints #24 - MFT Stamps
Soft Finish Card Stock, 100# weight - Elizabeth Craft Designs
Brown card stock
Gold foil card stock - Stampin' Up
Byron
Merry Christmas - Suzanne Cannon (Elizabeth Craft Designs)
Red card stock
Seam binding
Card base  & envelope - Michaels
Patterned paper - DCWV
Words inside - Verses

Card size - 6-1/2 x 5"

Thanks for stopping by today


Tuesday 20 December 2016

Pop-Up Snowman Card

 Good morning friends

***NOTE:  I will be moving my cards and paper crafting to Painted Mountain Cards in the New Year. I've been thinking about it for a long while, and the New Year seems like a good time to make the change. I will leave this blog open, as there are frequent hits from Pinterest and over 5 years worth of cards etc to reference.

Today I have another Pop 'n Cut Christmas card to share - made using one of the many card bases I cut out a couple of years ago. I still have some that will have to wait until Christmas 2017 to complete, although I hope to work on holiday cards throughout the year.


I used an older Karen Burniston Pop 'n Cut die with the Wavy Label Insert. The snowman was a clear sticker that was adhered to white card stock then fussy cut.


Supplies:
A2 Pop 'n Cut Base with Wavy Label Insert - Karen Burniston (Sizzix)
Wavy Label Framelits - Karen Burniston (Sizzix)
Stickers - Paper Studio
Outside stamp - Papertrey Ink 
Inside stamp - MFT Stamps
White card stock
Patterned paper - stash

Card size - Standard A2

Thanks for stopping by today


Monday 19 December 2016
White & Sparkling Pivot Christmas Card

Good morning friends

***NOTE:  I will be moving my cards and paper crafting to Painted Mountain Cards in the New Year. I've been thinking about it for a long while, and the New Year seems like a good time to make the change. I will leave this blog open, as there are frequent hits from Pinterest and over 5 years worth of cards etc to reference.

Today's share is one of those cards that looks better in real life - the camera just doesn't capture the sparkle. I made this holiday card for a friend who lives in the mountains - and used the Katie Label Pivot and heavy white card stock for the card base.

Then I had fun decorating with layers of white glitter paper, and this adorable owl 3-d sticker.


Here is the card open - with a Pivot card, the designs on the front and back pivot to the centre when the card is opened.


I've had the pine cone punch and evergreen bough die for years - and it was fun to get them out again.  There is a glittery snow bank strip across the bottom of the card, cut using one of the Beach Edges - another Pop it Ups set by Karen Burniston for Elizabeth Craft Designs.


Even with the large size, this card fit easily in a 5 x 7 envelope and mailed for a single stamp.

Supplies:
Heavy white card stock
Katie Label Pivot, Pop it Ups - Karen Burniston (Elizabeth Craft Designs)
Red card stock - Bazzill
White glitter paper - Stampin' Up
Beach Edges, Pop it Ups - Karen Burniston (Elizabeth Craft Designs)
Owl sticker - Jolee's Boutique
Sprig - Marianne Designs
Pinecone punch - Emaginations
Red glitter paper
Cardinals - Impression Obsession
Wik of Stella
Words - Hero Arts

Card size - 5 x 6-1/2"


Thanks for stopping by today