Showing posts with label Photographs. Show all posts

Sunday, 3 May 2015

Photo Love Notes

Good morning friends

We are blessed with four sweet Grandkids, and I like to send them Love Notes to let them know their Gramma is thinking about them. This time I sent them Love Notes with their photo!
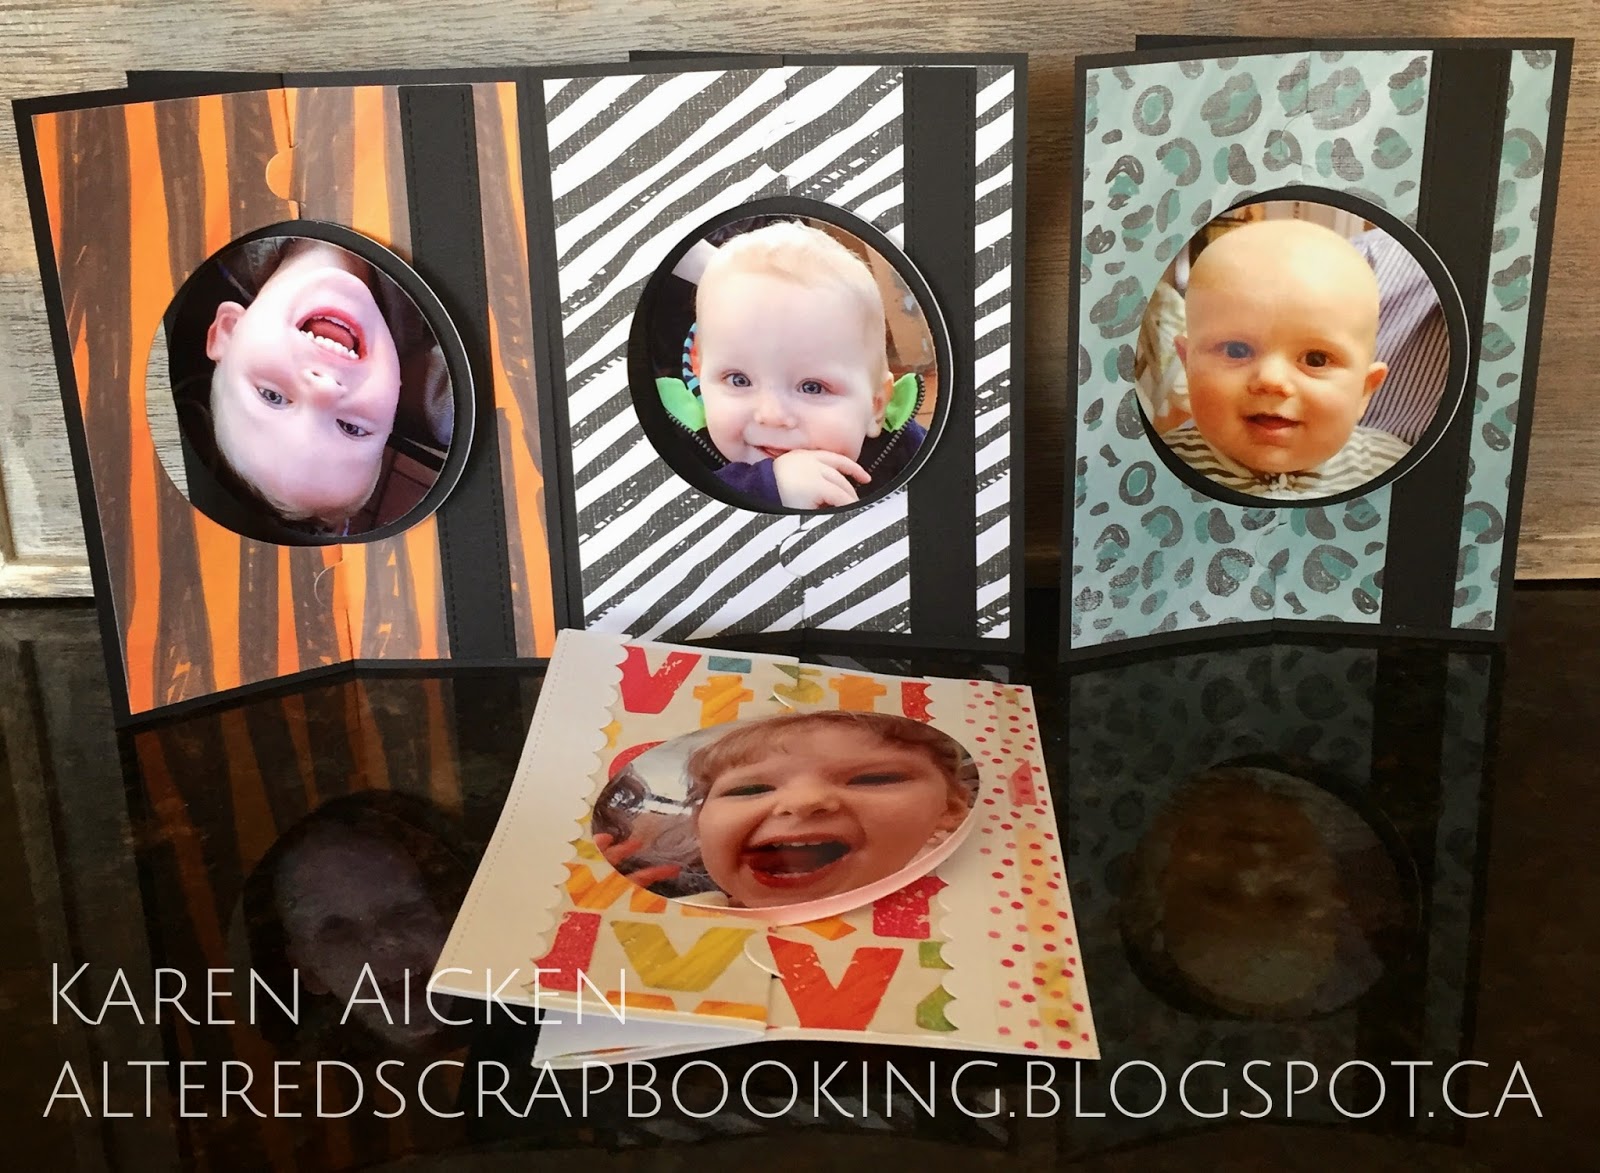

I used Karen Burniston's Spiral Circle Pull Card die and some fun zoo print patterned paper for the card bases. The photos were printed out on glossy photo paper and cut with a circle die. Then I popped each photo up with a smaller circle cut from fun foam.


Each of the card insides have the same stamp, coloured differently to coordinate with the patterned paper.  This card went to Ilai ...


Miss Olivia loves to make funny faces ...


Below are the ones for Ethan and Zachary. Yes, Ethan is hanging upside down - I didn't put the photo upside down.


Supplies:
Spiral Circle Pull Card, Pop it Ups - Karen Burniston (Elizabeth Craft Designs)
Accordion Circle (Circle), Pop it Ups - Karen Burniston (Elizabeth Craft Designs)
Kirkland Photo Paper
Printer
Blueprints #23 - MFT
Blueprints #1 - MFT
Patterned paper - DCWV
Fun foam
Copics
Stickles
Stamp - MFT
Washi Tape
Black card stock

Thanks for stopping by today


Monday, 12 January 2015

Travel Themed Pivot Birthday Card

Good morning friends

Today is Masculine Card Monday here on my blog, and I have a birthday card to share today using a couple of Karen Burniston's new dies for Elizabeth Craft Designs.  I haven't made a tri-fold Pivot card since Spring, so it was fun to do it again for this card.

Here is the card in the closed position.  I cut the Happy Birthday and the (new) Eiffel Tower from a beautiful bronze pearlized card stock. The corner's, camera and words were stickers I had in my stash. The Eiffel Tower is actually from a new category in the Pop it Ups line ... Pop Stands.  The set comes with a die that will allow you to stand up the Eiffel Tower in the centre of your opened card, but it also works as a Decorator Die as I've used here.


When the card is opened, you can see the newest Pop it Ups Pivot die - the Tag Pivot. This is a general shape that is going to amaze you with it's versatility.  As soon as I saw it, I thought it would make a great Masculine card so that is what I had to do first. But I made a sweet Valentine with it also, and look forward to playing lots and lots with this Pivot die.


The paperclip, reinforcements, tags and fleur decorative elements all come with the Tag Pivot set!  I added black die cut letters to spell our our Son-in-law's name as this is his birthday card.  I also added more of those corner  stickers and a copper printed acetate embellishment from my stash.

The tag layers were cut from the same pearlized bronze card stock, and embossed with Karen Burniston's Damask embossing folder.


Here are a couple of pictures of Olivia's Wish Trip to Disney World, granted by the Children's Wish Foundation.

Mickey Mouse came to the Give Kids the World Village to meet the kids, and autographed their Mickey Mouse Toys!


Dora also made an appearance one evening.


It was cold even in Florida! Patches came out to help celebrate Winter Carnival at the Give Kids The World Village. The kids got to meet Mrs. Claus, Santa, then Elves took them into a room full of toys to choose a present. They were SO excited! I was freezing, so bought a GKTW blanket. We rented a wheel chair for me so I could go with everyone to the parks and around the village. Olivia needed one as she tires easily and of course, we need to keep her heart rate down.


Olivia and her Daddy at the Halloween Party evening. The Village kids all dressed up and went Trick or Treating, and there were lots of activities for them to do as well. Guess what costume Olivia chose?  Ahahahaha. I love this picture, as Olivia looks really healthy here.  Ethan had fallen and split his lip open, so we were at their villa with Heather, Ethan and Zachary helping out.


There is a Dino-Putt mini golf course at the Village, and the kids LOVED it.  Here is Olivia and Ethan and their 'cheese faces'.


As I said yesterday, this was a trip Olivia will never forget. We are SO grateful to the Children's Wish Foundation and Give Kids The World.


Supplies:
978 Eiffel Tower, Pop it Ups - Karen Burniston (Elizabeth Craft Designs)
973 Tag Pivot, Pop it Ups - Karen Burniston (Elizabeth Craft Designs)
KB104 Damask Embossing Folder - Karen Burniston (Elizabeth Craft Designs)
783 Happy Birthday - Elizabeth Craft Designs
508 Transparent Double Sided Tape - Elizabeth Craft Designs
Alphabet die - Lawn Fawn
Patterned paper - my stash
Bronze pearlized card stock- Stardream
Camera sticker - K & Co
Acetate embellishment - K & Co
Corner stickers - stash
Wink of Stella glitter pen
Card size: 4 x 6" folded, 12 x 6" opened


Thanks for stopping by today


Tuesday, 24 June 2014

Goodbye to our Brandi-girl


There is nothing like a one-eyed dog in a party hat, is there? This picture was taken a couple of years ago by the boarding staff. We were on vacation for Brandi's birthday, so they threw her a little party. Just one of the reasons our dogs love going to Bow Bottom Veterinarian Clinic & Boarding/Daycare.

Even though it was brutally hard, we took her there today for the last time. We take comfort knowing she was surrounded by people who truly cared for her; Gregg & I and the staff at the clinic.  Life had just become too hard on our Old Girl, and rather than let her carry on being in pain and knowing that things were only going to get worse we made the choice to let her go to Doggie Heaven. I know Sasha would have been right there to greet her.

There will never be another dog like Brandi, she was truly one of a kind. She will be missed more than you can imagine.


Monday, 16 June 2014

Karen Burniston's June 2014 Designer Challenge

Good morning friends!

It's time again for the Karen Burniston Designer Challenge, and this month we are to create a "Photo Accordion Album". The Design Team was free to choose any of the Accordion's - including the newest ones - but for my project I used the previously released Fancy Label Accordion.

When it was finished, I made an envelope from soft handmade paper as a safe way to store it. And carry it - I also wanted to bring it to my Elizabeth Crafts Designs Demo last week at Paper Pastimes in Calgary, and give the ladies a sneak peek.  :-)


Normally when I make Accordion cards, I have the long side tabs all on the right side. For this one though, I wanted to add a cover to the front. So I had all the long side tabs on the left, and used the first one - the end one you would normally trim off - as the hinge for my cover. I sandwiched the long tab between the front and inside front covers. Easy Peasy.


We got to visit Arizona this spring, and I was in awe of the blooming cactus. Those are the photos I used for my album.  The cover was hand lettered and I added colour with chalks. Below is the peek at the accordion before it's fully open ...


Ta Da ...


This is a 5 page Accordion, cut from Kraft card stock. Then I cut another five Fancy Label Accordion pages from copper metallic card stock, trimmed away the label pieces & set them aside. The remaining copper frames were attached to the front panels, over the Kraft Fancy Label pages. Then I used a 'dauber' to splat metallic turquoise and green acrylic paints to the edges. I used the same technique on the back of each page as well.


Since I had nowhere in the house with good lighting, I took the completed Accordion Album outside to photograph. Now I see that the sunlight created a vertical shadow down the center of pages 1, 3 and 5. Sorry about that!


Each cactus has a unique bloom, and the colours are just incredible. I loved each one.

I cut just the label portion of the Fancy Label Accordion 5 more times with green patterned paper, and attached them over the Kraft ones (fronts). The photos were cut with one of the Decorator dies that come with the Accordion, and the black mat was cut from the next size up. Once they were attached together, I outlined each photo with what was supposed to be a turquoise gel pen. But it turned silver on the black card stock... ahh well.  I punched 3 holes along the top frames and added jump rings and Southwest themed metal charms from my stash.

I chose not to add a lot of other embellishments, as I wanted the photos to take center stage. Adding all the metallic shimmer and shine from the card stock and paint was enough for me. Once the album pages were attached together, I outlined the panels outer edges with border Peel-Off's then attached the label pages together.


I added more photos to the back, first adhering the leftover copper labels to the Kraft card stock ones and preparing the photo label shapes as I did on the front. That makes a total of TEN PHOTOS in this little album!


The picture below gives you a better idea of the metallic paint ..


In addition to the two rows of Peel-Off's on the inside cover, I cut one of the Fancy Edge Frame Edges from black card stock and trimmed off the corner pieces. This left me with a nice border!

When I was finished, I showed hubby who said "You are keeping this one right? Not sending it to anyone? I think you should keep this one."  I guess that means he likes it.  :-)


These Accordion Albums are SO versatile and fun to do. You can add as many pages as you wish, and make the Album's any theme or colour you want to!  Make sure to check out what the rest of the designers came up with and watch for Karen Burniston's post Wednesday on the Elizabeth Craft Designs Blog. She will have a new (and most likely jaw-dropping) project to share as well.

Supplies used:
Fancy Label Accordion - Pop it Ups, Karen Burniston (Elizabeth Craft Designs)
Fancy Frame Edges - Pop it Ups, Karen Burniston (Elizabeth Craft Designs)
Peel-Off's - Elizabeth Craft Designs
Kraft card stock
Metallic copper card stock - my stash
Black card stock
Confetti card stock
Chalks & Q-tip
Blue (silver) gel pen - Gelly Roll
Turquoise and Green metallic acrylic paints - Plaid
Photos - my own
Charms and jewelry findings - from my stash.  Yes, I have a huge stash. Huge.

Thanks for stopping by today!

Wednesday, 9 April 2014

Easter Bunny Trio

Good morning friends!

I've been able to spend the past couple of days getting lots of cuddles in with our newest Grandbaby (Zachary). He seems soooooo tiny! Olivia is still madly in love with him, and even Ethan is coming around.


I wanted to make the Grandkids some cute Easter cards, and have been seeing versions of this one all over Pinterest. When I saw THIS one by Nancy Amato though, I knew I had the one I wanted to make. Especially since I also had the new word bubbles stamp set from Stampin' Up.  :-)


To create the bunny, I used dies from both Karen Burniston's Oval Accordion set and the Circle Accordion set ... even the little heart for the nose is in the Accordion Oval!  The eyes were cut from black card stock scraps using one of the circles in an Elizabeth Craft Designs Flower Die set and I touched each one with a white gel pen.


Now the word bubbles were facing the wrong way, but I just flipped them over and used the 'wrong' side. I penned their names using Tombow markers, and the background uses one of the new embossing folders at Elizabeth Craft Designs.

Since Olivia loves everything girly (including Pink and Purple), her bunny got Stickles on the nose, and a few Glitter Flower Peel-Off's.  Not to leave them out, the boy bunny noses got a lick from my Wink of Stella glitter pen. :-)


I think they turned out pretty cute, and I know the kids will love them. Well, Olivia and Ethan will. At 2-1/2 and 1, they have this card thing figured out! Zachary will be a month old and probably won't really care.  

Supplies used:
All three cards are the standard A2 size
White card stock
Coloured card stock - Colorbok
Dots embossing folder - E114, Elizabeth Craft Designs
Ovals - Oval Accordion, Pop it Ups - Karen Burniston (Elizabeth Craft Designs)
Circles - Circle Accordion, Pop it Ups - Karen Burniston (Elizabeth Craft Designs)
Eyes - 701 Flower Set 1, Elizabeth Craft Designs
White Sakure gel pen
Glitter Flower Peel-Off's - 7048, Elizabeth Craft Designs
Speech Balloon die - Stampin' Up
Tombow Markers

Thanks for stopping by today!


Thursday, 20 March 2014

Sparkling St. Patrick's Day card

He is here!  Meet our newest Grandson ... Zachary.  He was born March 18, weighing 7 lbs 15 oz. His big sister Olivia (2) and big brother Ethan (1) got to meet him yesterday morning. Olivia is quite happy with the new baby ... Ethan? Not so much.


I am one happy Gramma, and V*E*R*Y thankful for FaceTime. It will be a few more days before I get to meet him in person.

Today is my turn to post on the Elizabeth Craft Designs Blog.  I'm sharing the card that I sent to my Irish pen-pal ... every year I send her a St. Patrick's Day card and this year it was a Pop it Up card!  You can read the full post HERE.


See you there ...

Monday, 9 December 2013

Dog Photo Christmas Cards

When we were visiting Arizona in the Spring, I managed to catch this picture of the dogs enjoying the sunshine. I was SO happy to get all three of them being still -- at the same time -- in the same place! In fact, this photo has been the wallpaper on my iPad since then.  :-)   I showed it to a friend, who said that is what SHE wanted on her Christmas card this year. So I made up three of them.  One for her, one for our vet and one for our groomer.


I've had these red photo cards for several years - I think there was 20 in the box and I don't use very many of them in a year.


I stamped the greeting, die cut it and layered it with another label die (both MFT) and a sticker from my stash.


I'm sure my friend has completely forgotten about the photo, so she will be very surprised to receive this card in the mail this year!

Thanks for stopping by today.

Wednesday, 30 October 2013

It's Brandi's Birthday!

Brandi is 15 years old today!  She is sporting a new hair-cut and her Blue Merle colouring shows up so nicely when she is clipped.


The groomer said she really noticed how weak Brandi is getting in her hind-end - something we see as well. But she is happy and her arthritis/old-girl pain is managed with medication. She goes for a little walk with me every day - we leave her rambunctious 'brothers' at home - and she wags her tail the whole time.  For those that don't know, she is not winking in the photo - she lost her eye a few years ago due to complications from a tumor removal. Doesn't phase her in the least.

Happy Birthday Brandi Girl!


I have a 5-1/2" square Halloween card to share today ... the embossed circle panel was in the 'Odds & Sods' Halloween pile, so I dug it out and layered it with patterned paper (Recollections).


Since I did it a couple of years ago, I'm thinking I inked the embossing folder with black in before running it through the Big Shot with orange card stock. The popped up circles were punched out with a circle punch.


Thanks for stopping by today!

Friday, 28 June 2013

Monkey Love Note

I'm more than happy to announce that yesterday's crisis was averted.

The city's Emergency Response Team was once again stretched to the limits, but they managed to come up with a solution. The city  - indeed all of Southern Alberta held their breath during the almost 24 hour ordeal. The plan to use vacuum trucks & transfer the flammable liquid from the teetering rail cars onto another train, then pull the cars off the damaged bridge worked. There was no loss of life. There were no rail cars - weighing 80,000 lbs each - falling into the river. There was no flammable liquid spilled into the swollen river. 

 Larry MacDougal / THE CANADIAN PRESS

It could have been a major environmental catastrophe, and when the last of the rail cars had been emptied there was a country wide sigh of relief. Our newspaper called yesterday a "Day Of Nerves".  They weren't kidding.

Today I'm feeling quite a bit more normal (whatever THAT is haha) - and took some time to play in my studio. Haven't downloaded the pictures of those cards yet, but I do have a different card to share today ...


This is a Love Note I popped in the mail this week to our Grandkids (ages 11 mos & 2 years).  I had it finished a couple of weeks ago - the little monkey sticker cracks me up.


I used a Sizzix Pop N Cuts die with the star insert, and penned a little note on the white label.  The heart punch is by Stampin' Up, the labels and letter dies are also by Sizzix. Monkey embellishment is by K&Co.


It's a long weekend in Canada, and I am looking forward to some R&R in the sunshine. Hopefully only minimal news coverage of the Alberta Floods will seep into my hearing range.

This week was a really long one. Really long.  Thankfully it's Friday - and I hope you all have a good weekend. Thanks for stopping by.