Monday 31 December 2012

Wine Bottle Tag with BLING

I had found these gemstone champagne glasses on clearance at Michaels a couple of years ago. I used several of them for birthday cards, and now I'm glad I hung onto the last couple. They are perfect for  Wine Bottle Hangers!


While it doesn't show up in the photos, both the silver and the white card stock are Stardream - so shimmery and pearlized. Beautiful stuff.


I punched a small tag out of white card stock, added a pink self adhesive gem to it and tied it to the circle opening to write a message on if desired.


The label dies are by MFT, and Papertrey Ink makes the wine bottle hanger die. A wonderful Wine Bottle Hanger to hang on a bottle of cheer for the New Year.

To my wonderful blog friends, I wish you a Happy and Healthy New Year!

Thanks for stopping by today!

Sunday 30 December 2012

Birthday Wine Bottle Tags

When rummaging through 'The Stash' for embellishments to use on Sue's December First mailing (kraft Wine Bottle Tags ... see THIS post) I came across a package of sparkly birthday themed 3-d stickers. I decided to use them on Wine Bottle Hangers instead of the cards I had intended when I bought them and made this set of three:


The two white hangers were cut from heavy white card stock (Gina K) with a PTI die ... the center orange one was cut from Tangerine Tango (SU) and a wine bottle hanger die from MFT. I did NOT need or even want a 2nd wine bottle hanger die ... but I DID want the coordinating dies and stamp set and they were not offered separately.  The MFT die has a slit in the back, which may actually come in handy for bottles other than the standard wine bottle. At least, that is what I'm telling myself to help justify the guilt in now owning TWO of these dies. 


Nothing too fancy - but they will look cheerful on a bottle of sparkling water or wine at someone's birthday table!

Thanks for stopping by today.

Saturday 29 December 2012

Pine Cone Gift Tag Set

It's Saturday, and I have a holiday share today.  There are many Christmas pictures still in my file that have not been posted, and I hope to continue with the Merry Monday's challenge and work on my holiday cards all year long. Saturday's sound like a good day to share them!


I just found these photos in my file ... they are actually from 2011 when we had our Christmas Craft Sale. I made a couple of packages of these for the sale, and some to tuck into stockings.


The image was stamped with brown on white card stock, coloured with chalks then punched out with a coordinating punch. I packaged them in a polka dot cello bag with brown bakers twine. I thought they were so sweet!


Most people who visit my blog have a pretty good idea what supplies I've used, so I am not going to continue to list them. If you have questions though, please feel free to leave me a comment and I'll give you the specifics.

Thanks for stopping by today!

Thursday 27 December 2012

Watercolour Background Paper

It feels strange to be posting something other than Christmas, but I do have a couple of CAS (Clean and Simple) Sympathy cards to share. I found a pretty 12x12" sheet of water colour paper in my stash, so cut it down into panels and used those as the feature of the cards.


So soft and pretty!  I also added some soft twill ribbon and a stamped & punched label.


If you have questions as to any of the supplies I've used, leave me a comment and I'll see if I can get you the information.

I'm actually not getting much time in the studio, so my posting will be sporadic for the next week or so.

Thanks for stopping by today


Monday 24 December 2012

Masculine Christmas Cards

It's Masculine Card Monday, and I have two cards to share today! Both are the larger, 6.5 x 5" size and were made from the bottom half of a 12x12" patterned paper with glossy accents.


The first card uses the left side of the patterned paper; the plaid strip, scalloped circle and deer are all part of the pattern and they are completely embossed and shiny. So pretty in real life!


 I cracked open my set of Stampin' Up rub-ons for the words. Love that they come in both brown AND white! I added a little bling to this card with tiny red self adhesive gems.


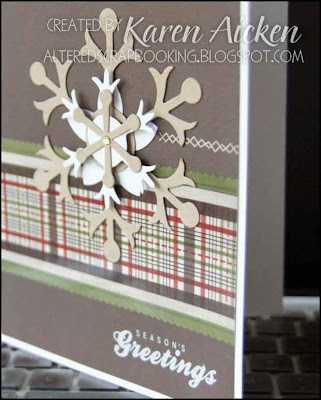
This 2nd card uses the right side of the patterned paper strip, with the plaid piece being the embossed & shiny element. I also used the Stampin' Up die snowflake die, cut from both kraft and white card stocks.


To give the snowflake a bit more substance, I layered it over a punched 5 petal flower in white (SU), and two punched circles. One light green gem sits at the center of the top snowflake.


Yay - two more cards to add to my box for next year's Christmas cards.

It's Christmas Eve, and I wanted to wish all of my blog friends and visitors a very Merry Christmas - or best wishes for however you celebrate this week.

Thanks for stopping by.

Sunday 23 December 2012

Ho Ho Ho ... Wine Bottle Tags

When I was visiting Arizona in October, I got to spend a few minutes at Hobby Lobby. I bought some of their laser cut felt Christmas stickers, because I had never seen ones like them before. I stacked three of the 'Ho' stickers to make each of these fun Wine Bottle Hangers:


The bases are a white pearlized card stock - for a bit of elegance. I love how thick the stickers are -- they add so much dimension!


I get such a kick out of these - so simple, but so unique too!

Thanks for stopping by today.

Saturday 22 December 2012

Christmas Cards for Sketch FM65

As mentioned when it was posted, I LOVE the Freshly Made sketch #65.  I used it and a sheet of sparkly patterned paper to make four cards for next year.  :-)


I made two larger cards (6.5 x 5") and two A2 cards ... the smaller ones will go into a box for my Mom as she usually needs about 40 Christmas cards.  (I need 60+).


The two larger cards have a matted flag with a stamped greeting. These MFT flag dies are sized so they are easy to mat. The poinsettias were Cricut cut last year and were just sitting in my stash. I had cut a whole sheet of them when I only needed a couple for the craft sale project I was working on. But since I was cutting anyway I filled the sheet and cut a whole bunch.

I took some time mid December to assemble the layers and add bling ... then I had lots of little poinsettias ready to add to my Christmas projects!


The smaller two cards don't have matted flags, and the stamped greeting is also smaller.


I am happy to get a head start on next years cards, before I get the Christmas stuff all put away.

Thanks for stopping by today!

Friday 21 December 2012

Reindeer Christmas Card

Last year, towards the end of the season, I bought this adorable reindeer stamp and die set by Hero Arts. I didn't have much opportunity to use it, so I hope to use it more for next years cards. So cute, and I love that they come with a coordinating die.


The doily die is by MFT and I'm always pleased with how well it cuts. I coloured the stamped deer with Copic markers, and added a bakers twine bow and a red adhesive gem on his nose. the stripes and dots in the patterned paper are embossed and sparkly, which of course doesn't show up in the photos.

Thanks for stopping by today!

Thursday 20 December 2012

Christmas Tree Wine Bottle Tags

I used the rest of the Christmas Tree embellishments from yesterday's gift tags for these Wine Bottle Hangers:


The bases were cut from champagne and a silver pearl Stardream card stock with a Papertrey Ink die. I used a Spellbinders die for the fancy label shape and 3 of the green labels were embossed with a Stampin' Up embossing folder.


I was able to use a couple of these for stocking stuffers, and I can use the others over the holiday season.

Thanks for stopping by today.

Wednesday 19 December 2012

Christmas Tree Gift Tags

When I started on this 'Christmas Gift Tag Making Craze' I mentioned having lots and LOTS of embellishments in my stash. I have had this little package of sparkly Christmas trees for a couple of years. They turned out to be a little small for Christmas cards, so I just hung onto them. Well, they are the perfect size for tags!! Since there were over a dozen of them in the package, I made a bunch of tags and also several wine bottle hangers (that I will share another day).


I used a Spellbinders label die - and the tag bases are made with two layers. The top green layer was embossed with a Stampin' Up embossing folder before attaching to the cream back tag.  That back tag has "to & from" stamped on it.


I had ordered some cream velvet ribbon from  Stampin' Up, and oh, that is beautiful ribbon. Love it!  I used it on these tags, tying off the top with a bit of button twine (PTI).


These were actually fairly quick to make, assembly line style... and they made a TINY dent in my stash.

Thanks for stopping by today!

Tuesday 18 December 2012

Chipboard Christmas Tags

I have a set of tags to share today, featuring some wonderful K&Co chipboard stickers.


I used various dies for the tag bases - these were so much fun to make!

Thanks for stopping by today.

Monday 17 December 2012

Baking Tags

One of our neighbors is an amazing baker.  Sometimes she will knock on the door with some fresh - still warm - baking that she wanted to share. We gave them a really cute Christmas cookie jar this year, and I included some tags to attach to the holiday baking she will give away.


I cut each tag with a MFT die, stamped the words with red ink (Stampin' Up and MFT) then attached these puffy stickers that I had in my stash.


I had some red cotton yarn with a silver thread in it, leftover from a Christmas dishcloth gift I'd made and it worked perfectly for the tag ties!


The tags fit perfectly into a little glassine bag, with the red strings hanging out.

Thanks for stopping by today!

Sunday 16 December 2012

Layered CAS Christmas Card

I have a Clean and Simple card to share today ... featuring a 3-d Christmas sticker from K&Co.


 The (K&Co) patterned paper has an embossed pearlized finish to it, and I layered it onto some green Bazzill card stock.


The A2 card base is an off-white confetti card stock which works so well with the sticker and paper.

Thanks for stopping by today!

Saturday 15 December 2012

Freshly Made Sketch #65

I am SO glad I got to play along with the Freshly Made sketch challenge this week - I think this has to be my new favourite sketch!  My time in the studio was limited this week, but I still managed to make THREE different cards using this sketch in less than 45 minutes. Insides and envelopes done too.  LOVE this sketch!

I am going to need a birthday card for my Brother-In-Law early next month, so the first card I did was for him.


The card base is 5 x 6.5" and is a soft grey colour. That center panel was just asking to be embossed, so I used a numbers embossing folder. 


 Love that little owl sticker ... the leaf stem is felt!


Above is a peek at the inside of the card.  

Now I know I should be saving this card for Masculine Card Monday, but I am going to be really busy on Monday and I didn't want to miss the deadline for the Freshly Made Sketch Challenge.

In addition - there is a new challenge blog that I hope to play along with as well -- called Seize The Birthday.  They won't be posting sketches until the New Year, but they ARE having a Linky kick off party.  I will add my link to this birthday card over there too.


Supplies:
Flag dies - MFT
White embossing powder
Happy Birthday Stamp - PTI
Circle Punch - SU
Stampin' Up Dimensionals
everything else from my stash.

The other two cards I made with this great sketch will be posted another time - thanks for stopping by today! 

Thursday 13 December 2012

2012 Christmas Cards for the Grandkids

I wanted to make a Christmas card each for Olivia and Ethan:


This card for Ethan is a 4.25" square. I used a cute little wooden reindeer embellishment from my stash, and that striped sparkly paper? It is the center of the frames I used on THESE cards.  It's hard to tell in the photo, but the 4" square white panel is embossed with a textured embossing folder and I tied a sheer red ribbon around it.

I found the CUTEST set of stamps (Stampendous) while visiting Arizona last month so used one of them on the envelope. I stamped the rectangle frame (Stamps By Judith) then the reindeer peeking over the top. He was coloured in with Copic markers and I wrote Ethan's name in the rectangle.


I used another wooden decoration for Olivia's card - hers is an A2 size. Both the white panel and the red areas of the label are embossed with a texture folder. The fancy label is a Stampin' Up die.


I used the same stamp set for her envelope, this time stamping a peeking elf over the rectangle stamp. It's a little boy elf, so I had to add some pigtails to make it a little girl.  :-)  Artistic liberty.


Thanks for stopping by today!