Showing posts with label Joys of the Season Cartridge. Show all posts

Sunday, 18 December 2016

Polar Bear Christmas Cards

Good morning friends

Using Things Up (otherwise known as Whittling Down The Stash) has been the name of the game for our holiday cards this year. These Polar Bear cards have been in progress for at least 4 years.


The Polar Bears were Cricut cut from the Joys of the Season cartridge, and I did the printed panel on the computer. To complete the cards, I simply assembled the polar bear layers and stamped a greeting on the white area of the panel. The panel was cut with a stitched panel Blueprints die and adhered to the A2 card fronts.


The eyes and ears were dotted with a clear Glaze pen so they catch the light. I used the snowflakes from the All Season's Tree, which cut 3 at a time.


I forgot to mention that I used the MISTI for the stamping. The MISTI makes it SO easy to quickly - and perfectly - stamp multiple images.


***NOTE:  I will be moving my cards and paper crafting to Painted Mountain Cards in the New Year. I've been thinking about it for a long while, and the New Year seems like a good time to make the change. I will leave this blog open, as there are frequent hits from Pinterest and over 5 years worth of cards etc to reference.


Supplies:
Polar Bears - Cricut, Joys of the Season cartridge
Snowflake panel - created on computer
White card stock
Blueprints #24 - My Favorite Things
Misti  - My Sweet Petunia
Stamps - Papertrey Ink
All Seasons Tree (snowflakes), Pop it Ups - Karen Burniston (Elizabeth Craft Designs)
Tweezers - Elizabeth Craft Designs
Glaze Pen - Sakura

Card size - A2

Thanks for stopping by today

Friday, 29 July 2011

CCC85 Christmas Card

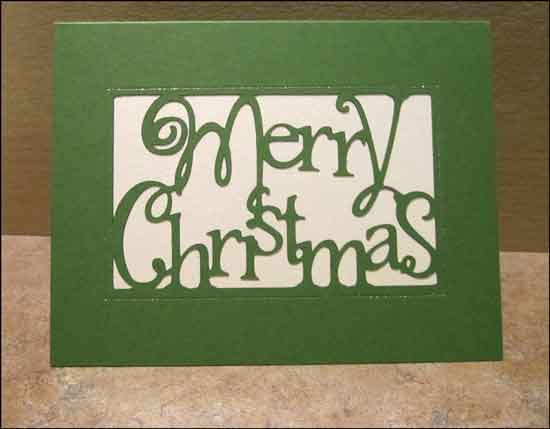
The challenge this week at the Cricut Cardz Challenge Blog is an open one. Any cartridge, any colour. Being as I have Christmas on the brain these days, I made a Christmas card. Two cards, actually - both identical.  :-)


This is a cut I've wanted to try for a long time, using one of my favourite Christmas Cricut cartridges "Joys of the Season".  It's one of those cards that is pretty hard to photograph though! I attached a panel of ivory pearl card stock in behind the cut-away words but the shimmer doesn't show up in a low res blog photo.


I outlined the word rectangle with a Sakura sparkly gel pen, but otherwise I've left it CAS and mail friendly. I may end up added a red gem to the "i" in Christmas, but we will see. Right now I like it the way it is. Sometimes it's hard to leave well enough alone.  :-)


Finally, here is a peek at the inside. Some patterned scrapbook paper and cream panels with a punched tree. Can green & ivory count as a Christmas card with no red on it at all? I'm not sure yet. Almost, but not 100% convinced.


  Today Sasha would have been 12. I remember buying her a doggie birthday 'cake' last year to share with Cooper & Brandi, and taking pictures of her on her 11th birthday. Then being grateful to have these photos of her when she got so sick. I miss you Collie-Girl.

Thanks for stopping by today!

Friday, 15 July 2011

Mitten Gift Card Holder

I KNEW I could do better than I did with yesterday's card, using that cute mitten from the 'Joys Of The Seasons' Cricut cartridge. I made this gift-card holder today and am much happier with the way IT turned out.  :-)


I even got to use kraft card stock, and lots of foam tape for this gift card holder which just fits into an A2 sized envelope. The kraft/white/plaid card stock is by Jillibean Soup. I was able to get  4 gift card holders from the one sheet -- and that is all I had. But that means I now have four items towards our Christmas Craft Sale stock!!!!   I used a Sizzix plaid embossing folder for the white mitten band, a Sizzix die for the snowflake and the tiny tag die is by Tim Holtz.


A gift card tucks right inside!
EDITED** to answer questions:
I cut two mitten shadows, scored the back side about 3/4" down from the top of the mitten, added glue above the score line and attached the two shadows together. They are attached just at the top of the mitten and the score line means the card opens nicely and looks good from the back - ie, no wobbly or buckled crease lines.
I cut it at 5.25, but just kept increasing the size on my Gypsy until I knew it would fit into an A2 envelope.
To cut the inside piece, I laid another mitten shadow off the edge of my mat (on the Gypsy), so only the bottom portion would cut. I had to fiddle with it once it was cut, to be sure that a gift card would fit in it ... kept trimming down the straight edge 1/8" at a time until I could easily slide a gift card in once it was glued down. You have to leave room for the glued edge! After punching the straight edge with a circle punch (punched half a circle) I textured it with the plaid embossing folder and glued it down on the curved sides.
Hope this helps!


Happy Friday - have a great weekend and thanks for stopping by today.

Thursday, 14 July 2011

Mitten Christmas Card


So this is one of those cards that looked better in my head than it did when it was finished. I tried to be creative and should have just kept it simple.  :-)

The challenge at 'Bitten By The Bug 2' is to use the mitten from 'Joys of the Season' cartridge -- one of my favourite Christmas cartridges.  I think if the mitten had been bigger and I hadn't used the shaped base it may have been better. And I wish I'd popped up the snowflake on the mitten as well ... but once it was glued down, there was no moving it.

I was hoping to make several of these, but ... I just don't like it enough to do multiples. Ahh well ... it won't go to waste and it's always grounding to know that not everything you do will turn out perfectly.


Now for something non paper related ...


Thunder - it can make for a miserable dog in a lot of homes. Poor Sasha used to vibrate so hard we thought her heart might stop. She would shake and pant and DROOL and I found a Thundershirt really helped her. Last year, Brandi was affected by thunder as well ... so I  bought her a Thundershirt at our local Pet Planet this week.  I would HIGHLY recommend this easy to use pressure wrap for any dog that is bothered by thunder, fireworks etc.  The other night a thunderstorm rolled in. Before I heard the first peal of thunder - Brandi was at my feet, shaking and I knew what was coming. I got out her brand new Thundershirt, wrapped it around her - and she lay down & went to sleep. She was still aware of the thunder, but she wasn't freaked out and she wasn't shaking.

Once we went to bed, she still needed to be on the bed with us -- but I think that is more because that is what she normally does if she is stressed. She didn't need to be petted. She didn't need to lean on us - vibrating/shaking keeping us awake. She just curled up at the foot of the bed and went to sleep.

I have a Jasper/Cooper sized Thundershirt as well, and Jasper wore his for a bit last night. He runs around the house barking like crazy whenever there is a thunder clap. After his shirt was on, he got up and barked the first couple of times - but no crazy racing around. Then he just went to sleep.

Thanks for stopping by today!