Showing posts with label Bookmarks. Show all posts

Sunday, 6 September 2015

Sparkling Roses Sympathy Cards

Good morning friends

I have 4 similar sympathy cards to share today, using a lovely sparkly floral paper. Each card is a step up from the one before it. There was a single strip leftover when I was finished the cards, so I made two bookmarks as well!


This first card is quite simple - the patterned paper is matted, and I used label dies from the Katie Label Pivot for the words. The paper is just gorgeous - it's hard to capture it in the photos.


Card number two has the same matted labels and floral panel, but the panel was wrapped with a sumptuous satin ribbon before attaching to the card.


This is the inside of the first two cards. Using the MISTI when stamping multiples is SO handy. Every stamp was straight and evenly inked. Ahhhhh.


The third card has the addition of a sheer pink ribbon and bow ...


... and the fourth one has the lovely satin ribbon tied in a pretty bow. This last one is fairly bulky, and would be best hand delivered.


Here is a close-up of the patterned paper so you can see all the glitter. It was quite heavy as well, so I needed a strong adhesive to attach it. The ECD clear double sided adhesive was perfect.


Here is a peek at the inside of the second two cards.


These will be packaged up to give as a gift to someone special, whom I know likes to have sympathy cards on hand.

Supplies:
Large white card blanks and envelopes - Michaels
Patterned paper - American Crafts
Cream card stock
Cream satin ribbon - Creative Packaging
Pink sheer ribbon - Creative Packaging
Katie Label Pivot (Labels), Pop it Ups - Karen Burniston (Elizabeth Craft Designs)
MISTI - My Sweet Petunia
Stamps - Verve
Elizabeth Craft Designs Transparent Double Sided Tape - 1/4"
Tag Topper punch - Stampin' Up

Card size - 5 x 6-1/2"

Thanks for stopping by today


Sunday, 5 July 2015

Pink and Yellow Pop-Up Get Well Cards

Good morning friends

My supply of Get Well Cards has dwindled and when I found this beautiful floral paper in my stash I knew it would work perfectly. I used the same layout for each card, but a different Pop it Ups inside. There was even enough paper leftover to make a bookmark!


This floral paper is almost plasticized - it has a lovely pearl sheen to it. I added some 3-d floral stickers to the fronts of both cards. This first card has a stitched label created with the Katie Label Accordion - another Pop it Ups die by Karen Burniston for Elizabeth Craft Designs.


I used the Lucy Label Pop Up inside this one, a stamped verse and a butterfly embellishment.


For the second card, I chose the stitched label from the Lorna Label - another of my favourite Pop it Ups dies by Karen Burniston.


I added a couple more stitched labels, stamped words and another floral embellishment.


I rounded the corners of both cards, and they are ready to go.

Supplies:
Lucy Label Pop Up, Pop it Ups - Karen Burniston (Elizabeth Craft Designs)
Lorna Label, Pop it Ups - Karen Burniston (Elizabeth Craft Designs)
Katie Label Accordion (Stitched Label), Pop it Ups - Karen Burniston (Elizabeth Craft Designs)
Katie Label Pivot (Small Label), Pop it Ups - Karen Burniston (Elizabeth Craft Designs)
Elizabeth Craft Designs Transparent Double Sided Tape, 1/4"
Patterned paper - K & Company
3-d Embellishment stickers - K & Company
White card stock
Yellow card stock - Papertrey Ink
Words - CC Designs
MISTI - My Sweet Petunia
Tag topper punch - Stampin' Up
Seam Binding
Corner Rounder - Zutter

Thanks for stopping by today


Thursday, 28 May 2015

Bookmarks

Good morning friends

It's Throwback Thursday here on my blog, and I have an older project to share today ... bookmarks!


I just wanted to play with the bookmark die by My Favorite Things and had a bunch of scraps sitting on my stamping table. It was fun finding words and embellishments to work with the papers, and whittled down my stash a little.


I love having bookmarks on hand for visitors, ourselves (who doesn't love a new bookmark to put into a new book?) and for little gifts to tuck into a card.

Thanks for stopping by today


Sunday, 31 August 2014

Elizabeth Craft Designs August 2014 Designer Challenge

Good morning friends!

It's time for the Elizabeth Craft Designs DESIGNER CHALLENGE, and this month the challenge is "Asian".  There was a lot to choose from in the Elizabeth Craft Designs line, and it took me a few days to narrow down what I wanted to do.

For my first project, I finally decided on a Stand Up card …


For complete directions on how to make this type of Stand-Up card, see my posts HERE and HERE.

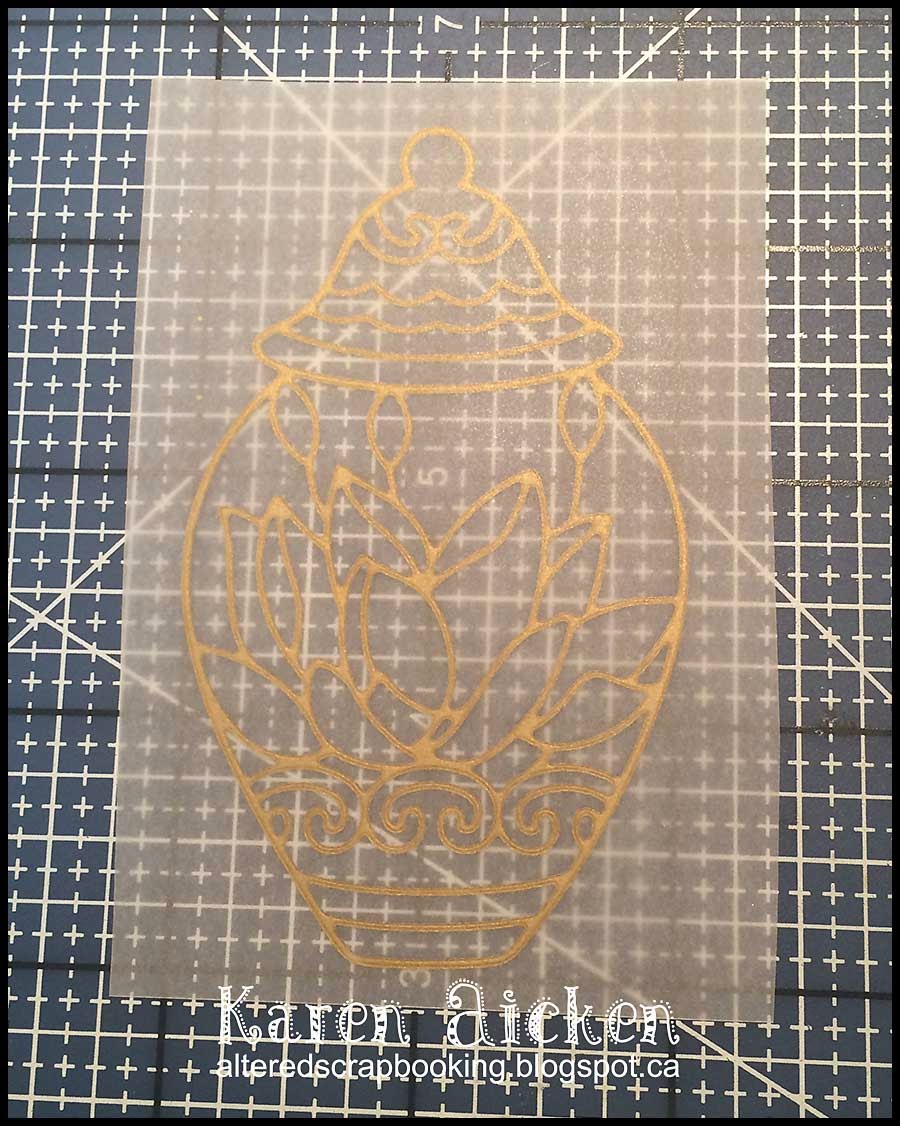
I started with the pretty Ginger Jar Peel-Off in gold, and attached it to a piece of vellum...


Then, I flipped it over and added colour with Copic markers on the back side. I love the soft look this gives the vase.


When I get a new package of double sided adhesive sheets, I usually take all but one and attach a sheet of lightweight white card stock to one side of the rest of them. I like having that step finished when I want to glitter Peel-Off's! I cut a piece from one of those card stock-backed double sided adhesive sheets, peeled off the liner and adhered the vellum to it. Then I simply fussy cut the vase and it was ready for mounting.

All the gold layers you see on my card are from a gold Shimmer Sheetz. The patterned card stock panel was attached to the slightly larger gold Shimmer Sheetz panel with strong adhesive, then I ran both layers through with an embossing folder. This gives a nice deep impression.


Here is the card in the closed position, and ready to pop into an A2 envelope!


I'm loving the new Word Stand-Up Helper dies, and chose Best Wishes for this card.


I don't usually back the word Stand-Up Helpers, but I wanted the gold to show through so I added a scrap of gold Shimmer Sheetz behind the word cut out.


Then, to make the back of the card nice and neat - I attached a panel of patterned paper to the back.


I was finished and heading back upstairs - I had already turned out the lights in my studio when I caught sight of a strip of Asian printed paper on my stamping area. Ha - I turned those lights back on and made a bookmark. No way I was going to let that mojo get away from me.


The patterned paper measured 10-1/2 x 2", so I scored it at 5-1/4, added adhesive to one side and folded it in half. Then I added the pretty Kimono Peel-Off adding colour with Copic Markers. This was fairly quick to put together, and will be a fun little gift to tuck in with a card.

While the carpet installers were at our house last week, I had some time in my studio. I decided to go ahead and make a second card for the challenge! I was inspired by a couple of things for this card. Karen Burniston did an AMAZING card using white images outlined with a black pen, so I outlined inside the gold peel-off with a black fine point pen.


One of the other ECD Design Team members shared their challenge card and they had used dragonflies, which I thought was brilliant. I didn't want to just copy the idea, so instead perched a butterfly on top of the vase.

The pretty metallic card stock was from a small stack I made a couple of years ago. I'm finding all kinds of things as I start to pack up my studio!


Inside, the Happy Birthday is cut from the same metallic card stock and I will use a gel pen to sign out names on the black card stock.


I added the floral border sticker to the last scrap of the metallic card stock, fussy cut it out and adhered it to the bottom edge of the panel. The panels were outlined with a Stardust pen for lots more sparkle and shine, and I added gold to the butterfly and flowers with a marker.


Supplies for first card and bookmark:
Card size - Standard A2
934 Best Wishes Stand-Up Helper - Elizabeth Craft Designs
2516 Asian Vases - Elizabeth Craft Designs
2517 Kimono - Elizabeth Craft Designs
SS 0212Gold Shimmer Sheetz - Elizabeth Craft Designs
E-106 Dancing Leaves embossing folder - Elizabeth Craft Designs
Patterned paper - DCWV
Vellum - stash
Score Tape
Tassel - stash

Supplies for second card:
Card size:  4-1/4 x 5"
2516 Asian Vases Peel-Off's - Elizabeth Craft Designs
1262 Ribbon Flowers Peel-Off's - Elizabeth Craft Designs
2342 Butterflies Small Peel-Off's - Elizabeth Craft Designs
738 Lg Happy Birthday - Elizabeth Craft Designs
Black card stock
Hand-made metallic card stock
Gold marker - Pilot
Pink Gel Pen
Sakura Stardust Gel Pen
Black fine point pen - Zig Millennium 

Be sure to check out the Elizabeth Craft Designs Blog today to see Joset's post and all the Designer's Challenge cards!

Thanks for stopping by today!

Saturday, 15 March 2014

Friendship Bookmarks

I have a quick post to share today ... a couple of bookmarks I made to tuck into a friends card ...


The bookmark and label die are both by MFT, and the heart flowers is a Movers & Shapers die by Karen Burniston. I added a Glimmer Dot to one of the bookmarks, and a glittery butterfly sticker from my stash to the other.


The word & bracket stamps are by The Stamps Of Life.

Thanks for stopping by today.


Tuesday, 16 April 2013

Spring Bookmark

I had a little strip of this pretty patterned paper leftover when I was putting away my Easter Card stuff so I thought I'd make a bookmark.


I cut it out of white card stock and the iris patterned paper, and attached the two together for stability.  A 3-d sticker from my stash, some bling and some YELLOW Bakers Twine (why am I liking yellow all of a sudden????) and it was done.


Oh, and the bookmark was cut using the Stampin' Up 'Two Tags' die. Another die I waited and waited to purchase, and wish I hadn't waited so long. I have already gotten a lot of mileage out of it (not everything gets posted) and I have lots more ideas too.

Thanks for stopping by today.


Thursday, 21 March 2013

Butterfly Bookmarks

I knew I'd be away from my studio for the next little while, but I wasn't expecting to be away from my computer too. Luckily I had some posts scheduled or you would have thought maybe I fell off the face of the earth!

It's no secret that I love dies.  Love 'em. I love that I can cut several at one time and also cut through  different materials if I use a Sizzix die.  Here are a couple of quick bookmarks I made using dies (MFT) and the Stampin' Up butterfly punch:


I was using this pretty K&Co paper to make some Easter cards and didn't want to just toss the leftover strips. Bookmarks were the perfect solution!


The center section is popped up, but I used the Stampin' Up Dimensionals instead of regular foam tape. They add height without adding too much height, and are nice and soft so they shouldn't damage book pages.

Into my stash with these ones, and I will send them out next Easter.

Thanks for stopping by today.

Thursday, 28 February 2013

Flowered Bookmark

Recently I got out my layered flower die from Papertrey Ink, and made a couple of flowers for a card idea. There was one assembled flower leftover, and I decided it would make a nice topper for a bookmark.


 I used a MFT die for the bookmark layers, embossing the bottom layer with a folder for some nice texture.

I don't know what it is about bookmarks, but I sure like making them. This one is going into a box until I decide who to gift it to.  

Thanks for stopping by today!


Tuesday, 19 February 2013

Birthday Gifts

While I haven't been making as many cards as usual, I have been busy in my studio doing little things. I have made quite a few bookmarks and other little things that I just haven't posted. For example, I had fun decorating packages for my friends birthday gifts.  We had a joint birthday 'party' here as the three of us celebrate birthday's somewhat close together.


So - nothing too fancy, but it still took me a whole evening to get them finished. The bookmarks (other than the one I shared here) took awhile to make as well, but most of them won't end up shown here on my blog. I am having fun though!

Thanks for stopping by today.