Showing posts with label Masculine Cards 2012. Show all posts

Monday, 24 December 2012

Masculine Christmas Cards

It's Masculine Card Monday, and I have two cards to share today! Both are the larger, 6.5 x 5" size and were made from the bottom half of a 12x12" patterned paper with glossy accents.


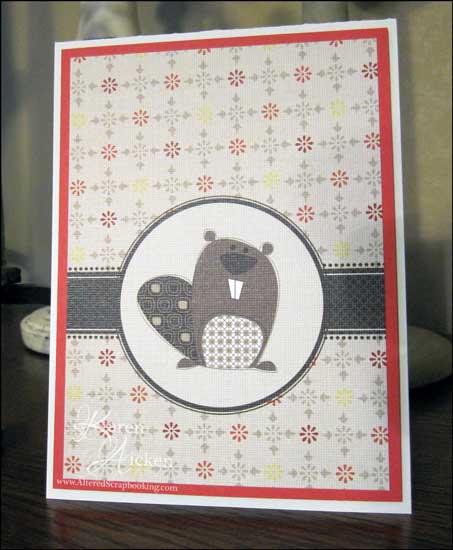
The first card uses the left side of the patterned paper; the plaid strip, scalloped circle and deer are all part of the pattern and they are completely embossed and shiny. So pretty in real life!


 I cracked open my set of Stampin' Up rub-ons for the words. Love that they come in both brown AND white! I added a little bling to this card with tiny red self adhesive gems.


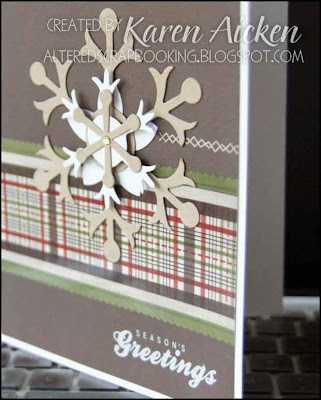
This 2nd card uses the right side of the patterned paper strip, with the plaid piece being the embossed & shiny element. I also used the Stampin' Up die snowflake die, cut from both kraft and white card stocks.


To give the snowflake a bit more substance, I layered it over a punched 5 petal flower in white (SU), and two punched circles. One light green gem sits at the center of the top snowflake.


Yay - two more cards to add to my box for next year's Christmas cards.

It's Christmas Eve, and I wanted to wish all of my blog friends and visitors a very Merry Christmas - or best wishes for however you celebrate this week.

Thanks for stopping by.

Monday, 10 December 2012

Photo Birthday Card

Today's share is my final 2012 card for Masculine Card Monday. It's the birthday card I made for my husband and I used a meaningful photo as the main element.


The 4x6 photo was printed using my Epson Picture Mate Charm (LOVE that little printer). I cut two 4x6 panels of cream card stock and layered them to the back of the photo to make it nice and sturdy. Then I popped it up on the black card base.


I  stamped Happy Birthday (PTI) on a scrap of coral card stock, then trimmed it into a flag shape with a MFT die. It was matted with a cream flag and they were both popped up with foam tape.

I think he will love this photo card ... and we will both enjoy having it on display.

Thanks for stopping by today!


Tuesday, 16 October 2012

Sweet Bird Card

I have another Quick and Easy card to share today - but I love it. Remember back in July when I was working on the EIGHTY cards I gave my Mom for her 80th birthday? This was one of them.


K&Co makes the patterned paper and 3-d sticker ... it was from a Tim Coffee line, and one of the few paper stacks that I loved enough to buy two of them.  :-)  Just look at the texture on the paper!


No greeting on the front of this card, so she can use it for several different occasions when the time arrives.

Thanks for stopping by today.


Sunday, 16 September 2012

Leaf Get Well Card

When I first thought about making a card for the latest challenge at the Dynamic Duo's Blog, I wanted to use this leaf stamp. When I opened up my 'Leaves' stamp drawer though, the tree that I used for my Design Team card (see yesterday's post) was on top and I went with that instead.

Yesterday I thought I'd make another card for the challenge, this time a fairly quick one:


The leaf stamp is one I've had for years - my favourite way to use it is with a rainbow ink pad, so this was a stretch for me. Simply stamping it in black? I don't think I've ever done that with this image, but you sure see it's detail this way!

I pulled out my deckle edges scissors for this card too - another old tool but one I used to LOVE using. Haha, this was a nostalgic card to make -- who uses deckle scissors anymore? Who uses any of those fancy edged scissors that were all the rage a few years ago?


Banners, pennants and flags - now THAT is a popular trend these days and one I am happy to jump on.  I read someone's blog (?) and she said she has a little bowl on her stamping area filled with nothing but 1/2" strips of card stock scraps that she uses for flags and banners. Brilliant!  I now have a little glassine bag that I tuck my scrap strips into. Just a few, as we all know there is no shortage of white strip scraps when you are card making!


Supplies: 
Card base - 4 x 6
Coloured card stock - Pear Pizzaz and Basic Black (Stampin' Up)
Button and twine - Papertrey Ink
Word stamp - Gina K
Leaf Stamp - Rubber Stampede
Black Ink - Momento
Green Ink - Lucky Limeade (Stampin' Up)

Thanks for stopping by today!

Saturday, 15 September 2012

Dynamic Duo's Challenge 20

It's time for another colour challenge at Dynamic Duo's  where I'm happy to be one of the guest designers for September. This week the colours are Lucky Limeade and Basic Black with the option of doing a Halloween Theme.

Last November I picked up several packages of ADORABLE Halloween K&Co 3-d stickers on clearance. Can I find them? NO.  I wasted way too much time searching through the studio for them, and finally decided to forgo the whole Halloween idea and instead make a card for our Son-In-Law.


His thesis was published, and we are very proud of him!

I thought I had ordered Stampin' Up's Lucky Limeade card stock, but it turns out I only ordered the ink pad. So I used my SU Pear Pizzaz instead (love).

The tree (Hero Arts) was stamped in black on a green rectangle, which was matted with kraft card stock. I embossed the black die cut label (Stampin' Up) with the Swiss Dots embossing folder for some texture, and ran a Pear Pizzaz panel through with a wood grain embossing folder.  After matting the wood grain panel with kraft, I popped the black label up with foam tape, then popped up the tree panel as well.


The twine sits below the stamped rectangle, which I'm hoping will help with the bulk when mailing this card. I will still line the envelope with a card stock panel though.

The words were stamped in black on a narrow strip of the green, which was attached to a scrap of kraft card stock. Then I punched it out (Stampin' Up) and yes - used MORE foam tape to attach it at the bottom of the tree image.

 Here is a peek at the inside.  I added a kraft panel inside the A2 Pear Pizzaz card base, and stamped the tree again in black. We will write our message to him inside, so I didn't add any word stamps.


This fun shade of green paired with black are perfect Halloween colours, so I wanted to at least do a little treat holder:


I used a black and green print patterned paper from my stash to make a simple 'sour cream container', with crimped edges. I always like that look, it helps keep the container sealed, and it's good to haul that crimper out of the drawer once in awhile.  Inside are a couple of nuggets wrapped with a piece of Pear Pizzaz.

I punched a label (Stampin' Up) out of Pear Pizzaz, penned the EEK and added a creepy black flocked spider sticker. The stickers were added to the chocolate nuggets as well. NOT exactly my choice of Halloween images (ug) but those sweet K&Co sticker packages are hiding really well!
Be sure to check out the wonderful submissions from the Dynamic Duo Design Team, as well as the other two Guest Designers for September!

Karen Aicken (GD)   That's me!!

Monday, 20 August 2012

Masculine Gift Wrapping Ideas

I mentioned that my Mom celebrated her 80th Birthday this month, but what I didn't say was that my Dad turned 84 the day before Mom turned 80. So the Birthday Party at our house was for him too! (If you want to see the card I made for him, click HERE).

What do you give a man who has everything?  Well, everything except an income?  We give cash and some favourite candies. That way he has $$ he can use for anything he wants (usually lunch or dinner out) and sweets for whenever he wants.  All the food bases were covered, ha ha.


I pulled out a couple of sheets of patterned paper from my stash - I've had these for YEARS! First I cut a seed-packet envelope (Papertrey Ink die)  to tuck the $$ into.  It needed something on the front, so out came my Tim Holtz ATC die.

I know, I know. I'm perfectly capable of cutting a 2.5 x 3.5" rectangle and rounding the corners and why-on-earth would I purchase a die that does that???  Well I will tell you how I justify almost every single Sizzix type die purchase.  'Because It Can Cut Through Chipboard!!'.  Am I going to make ATC's out of chipboard? Probably not very often - but THAT is not the question. I CAN, so therefore I bought the die.  :-)   And I use it a fair bit -- and one of these days I will make a chipboard one just to say I did.

Anyhow, I cut the ATC from white card stock, stamped it with that fun balloon/cloud/gift stamp (Michaels $1.50 bin) with a Papertrey Ink Surprise Inside stamp over the cloud and popped it up with foam tape. 


I cut a small bag (Tim Holtz die) out of the same paper. This die purchase didn't need to be justified -- I love it and know I will get a lot of use out of it. When I popped the envelope inside though, it kind of disappeared ... and since I wasn't tying the bag onto a larger gift I had to add something to make it 'stick out' of the top of the bag.


A punched oval and stars did the trick, along with the PTI stamp ... 'PULL HERE'.  I decorated the front of the bag with a Tim Holtz bookplate, which cut when I cut the tag for the large box of treats. You can see that tag (stamped and water coloured) in the top photo.


Finally, I added some different candies into an opaque gable box, wrapped it with a strip of the same patterned paper, hand cut a tag and stamped it with the same birthday image. A little water colour on the tags and I was done.


He enjoyed his gifts, I enjoyed wrapping them -- it was win win!  We didn't ask him to open his treats at the party though or he wouldn't have had any to take home with him!

Thanks for stopping by today.


Monday, 30 July 2012

Leafy Masculine Card

For Masculine Card Monday here on my blog, I have a card to share today that I made for my Dad's upcoming birthday.


Since I will be handing him the card with his gift, I was able to make it a full 6" square. The patterned paper (K&Co) with the blue leaves inspired the card. I used a Tim Holtz' tattered leaves die to cut the leaves, then embossed them with a Stampin' Up embossing folder.


A woodgrain embossing folder was the perfect touch on the kraft card stock strip. I guess I didn't take a photo of the inside, but there is a strip of the blue leaf patterned paper attached over the matted white panel, and another die cut, embossed leaf there as well.

The words on the front of the card are by Fiskars. With all the layers, this is one hefty card - I'm glad I don't have to pop it in the mail!

Thanks for stopping by today!

Monday, 23 July 2012

Masculine Birthday Card - FTL120

Considering they are on sketch #200 at the Clean And Simple Stamping Blog,  this is an old sketch of theirs.  (#120).


I used it and papers from my scrap bin to make a couple of masculine birthday cards. However, since I've have now made almost all the masculine cards I'll be needing this year, I'm spreading the photos out so I will have a few more Masculine Card Monday's for you!


SUCH a versatile sketch - I really enjoyed using it. Plus, what a great way to use up scraps!  All the cards I made were A2 sized, but it would be very adaptable to larger cards as well.


The sparkly leaf is by K&Co ... I have a hard time passing up leaf embellishments. Or birds. Or butterflies. Or ...     Well, pretty much anything by K&Co.  ;-)

Thanks for stopping by today!


Monday, 2 July 2012

Three CAS Masculine Cards

Today I have three CAS masculine(ish) cards to share for Masculine Card Monday. They are all 4.5 x 6" cards, made with a patterned paper stack I've had around for ages. I cut the design area I wanted from the 12x12" sheets, matted them with coordinating lightly patterned paper, and mounted them to the front of the card bases.


I prefer not to add sentiments to the fronts of my cards, but if needed - I can add ones to these cards when I go to use them them. They aren't 'fancy', but will work well for a get-well card or such.

Thanks for stopping by today!

Tuesday, 26 June 2012

Aqua Pennant Birthday Card


I still enjoy using the Pennant Parade (SU) stamp and punch set. I had a scrap of the blue patterned paper in my scrap bin, so used it to make this birthday card for my stash.  I used a small hole punch on each side, barely nipping the edge. It's enough for the string to nestle in and not slide off the front of the card.


The card is 4.5" x 6", and I think it has enough of a masculine feel to work for Masculine Card Monday!

Thanks for stopping by today.

Sunday, 17 June 2012

Father's Day Card #5

I am giving my husband one of the masculine cards I made in April (Cactus Silhouette Card) for Father's Day, so below is the 5th additional Father's Day card I have made this year. My Mom needed three to hand out, and I need three as well.

This one is going to our son-in-law.


This is that crazy bird DORKY, which is a Stamps By Judith image. This time I used wing-tip shoes and the same hat as yesterday's dog card. The grass is also a Stamps By Judith image. I used masking and everything was stamped onto the white 5" panel.  Colour was added with pencils and odourless mineral spirits.


For the inside (without the words, as I added those afterwards) I stamped Small Dorky twice onto the shoes and added colour.


You can see that while I haven't been able to participate in the challenges I normally like to, I have been busy in my studio!

Thanks for stopping by today.

Saturday, 16 June 2012

Father's Day Card #4

There is a new sketch over at the Clean And Simple Stamping Blog this week (FTL195), but I'm afraid I am still swamped and just cannot make anything extra this month. But do check it out - it looks like it could be lots of fun!

Today's share is the 4th Father's Day card I made this year; this one is for my Dad. (The first three were for my Mom to give out).


The card base is 5x7, and the dog, tie and hat stamps are from Stamps By Judith.  I just adore this funny dog image.  He was stamped in black then coloured with pencils and odourless mineral spirits. I did the same thing with the hat and tie then fussy cut everything out.


The hat and tie were attached to the dog image, then the dog was popped up over the stamped grass (Impress) with foam tape. I also added Glossy Accents on his nose. Below is a peek at the inside, without the words I penned & stamped added afterwards.


Thanks for stopping by today! 

Saturday, 9 June 2012

Father's Day Card #3

I am going to TRY to stay away from challenges this month. June is going to be crazy busy around here, and while I will be in my studio I need to be focusing on items other than challenge cards. Come July I'll get back at it. Please forgive me for not keeping up with my comments on your very often blogs this month.
 
This is the third (of 3) cards I made for my Mom to use for Father's Day.  Yes, it is another dog themed card.   And yes, it is another dog stamp from 'Stamps By Judith'. 

We are a dog loving family, what can I say?  :-)


The card base is 5.25" square white card stock and I added some patterned paper scraps from my stash. After stamping the dog I used Stampin' Up's Water Colour Wonder crayons. After it was dry, I used two more 'Stamps By Judith' stamps - the hearts, and orange ink. Also, foam tape!


I had some fun with the inside on this one.  First, I used a Stampin' Up label punch to punch a shape out of scrap paper. Then I used the negative image as a stencil and sponged orange ink through it to create the label shape on the card.  The letters were die cut (Sizzix) out of green card stock, and I added some doodles after the letters were stuck down.

The little Hero Arts dog house stamp was coloured with Copic markers, punched out with a square punch, then attached inside the card after inking the edges.


Thanks for stopping by today!

Thursday, 7 June 2012

Father's Day Card #2

I am still trying to stay away from challenges this month.  I even managed NOT to play with the Freshly Made sketch this week, ha ha. June is going to be crazy busy around here, and while I will be in my studio I need to be focusing on items other than challenge cards. Come July I'll get back at it. Please forgive me for not keeping up with my comments on your very often blogs this month.
 

I had SO much fun making this card!  This is the 2nd (of three) Father's Day cards that my Mom asked me to make for her to give out.


The dog stamp is one of the ones I picked up at the Mesa Rubber Stamp Show in March, and is from 'Stamps By Judith'. I just adore her critter stamps.  :-)  The dog was stamped with Ranger Archival Black ink, then coloured with Stampin' Up's Water Colour Wonder crayons and a damp brush. I used Copic markers for his collar, and when the image was good and dry I hand trimmed it out.


The dog house stamp is another one that I've had in my collection for a good many years. It was stamped on red card stock, some shading added with Copic Markers, and I used an Xacto knife to cut away the door area. I backed the door with a piece of patterned paper using foam tape, in fact there is a LOT of foam tape on this card. But it is going to be hand delivered and not go through the mail.

The dog was popped up on it with foam tape as well. The card base is kraft card stock, and it is 5.25" square. The dotted paper was a share from a friend, and after attaching the strip of patterned paper I wrapped it with twine and a threaded button.

Here is a peek at the inside:


The corners are a Stampin' Up punch, and that little dog house stamp is by Hero Arts. I coloured it in with Copic markers and added a scrap of the dotted patterned paper from the front.

Thanks for stopping by today!

Wednesday, 6 June 2012

Cabin in the Woods Card #2

I am going to TRY to stay away from challenges this month. June is going to be crazy busy around here, and while I will be in my studio I need to be focusing on items other than challenge cards. Come July I'll get back at it. Please forgive me for not keeping up with my comments on your very often blogs this month.

My Mom asked me to make her three Father's Day cards, and I was happy to comply.  After making Monday's card, I picked up the Stampscapes cabin stamp to clean it. I could still see the two-toned ink on it and I just had to get one more image out of that inking ...


First I inked up the brushstroke stamp (BJ's Rubber Stamps) with a rainbow ink pad, and stamped the cabin stamp onto the RUBBER of the brushstroke one.  Then I stamped the background brushstroke onto the panel of white card stock.  This gives a reverse image - the cabin is facing the opposite way to the way it would if you stamped it right onto the card.  So this technique doesn't work with text!


The card was finished off the same way as Mondays 'Cabin In The Woods' card, although I used Stampin' Up's 'Old Olive' for the A2 card base instead of Baja Breeze.  This card is artsy enough for my husband, without being 'too much'.  So I now have one of my Mom's Father's Day cards finished!

I see that there is a new sketch up at the Freshly Made Sketch Challenge Blog, and it really appeals to me. Maybe the only way to stay away from the challenges is to stop checking them out.  :-)

Thanks for stopping by today.