Saturday 31 December 2011

Square Birthday Card

I mentioned earlier this month how much I liked the sketch FTL171 at the Clean And Simple Stamping Blog. Here is another card I made using it:


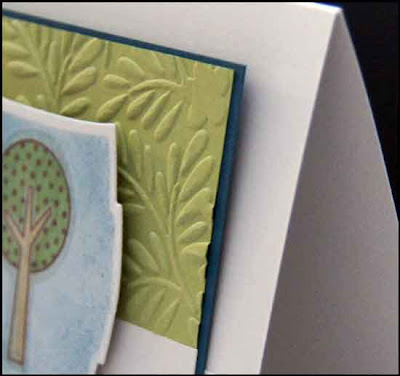
This is a large 6" square card. The tree image was stamped with brown Momento ink and coloured with Copics, then cut out with a Nestability die. I left the die in place and stippled ink through the opening, to give it some additional colour.


The top green cardstock (Stampin' Up Pear Pizazz) and the bottom white portion of the card were embossed with an embossing folder, and the split colour panel was matted with (Stampin' Up's) Not Quite Navy. I used the same colour ink to stamp the words (Stampin' Up) then coloured the bottom words with a Copic marker.


Since these cards have to be hand delivered to avoid the additional postage required when mailing a square card, I added lots of foam tape.  I love using foam tape! I'm also loving my big 6.5" square envelopes!!


Thanks for stopping by today and wishing you all, a Happy and Healthy New Year.

Friday 30 December 2011

Masculine Birch Tree Card

I used this wonderful birch tree stamp to make a couple of Christmas cards, so wanted to try it out for a masculine card as well...


I stamped the image in brown on a blue card stock scrap, matted it with brown heavy paper and wrapped it with twine. I ran the front of the folded card through the Big Shot with a Cuttlebug embossing folder, lightly swiped the raised edges with an ink pad, then popped up the tree image with foam tape.


I never like seeing the reverse of the embossing on the inside of the card, so I lined the card with a slightly smaller kraft card stock folded card.  Lately I haven't been adding verses to the inside of my cards, instead handwriting a penned greeting and note. But if I chose to add a stamp to the inside - I can at a later date. This card will go into my stash for next year.

Supplies:  
A2 Card
Kraft card stock - Michaels
Tree image - Impress
Brown heavy paper - Bazzill
Twine
Foam Tape

Thanks for stopping by today!

Thursday 29 December 2011

Mens Loom Knit Hats

I'm back!

I had a rough couple of days, but I think I was just exhausted. When we were walking the dogs yesterday, DH suggested we invited people out for New Years Eve and I just wanted to stop walking, curl up into a ball and have him leave me there in the snow.

Not a good sign.

He just gave me That Look when I said NO. He just does not understand how much effort it is to host company for a weekend. I usually don't even bat an eye at it - but when my reserves are down it can get to be a bit much. And I was completely OUT of reserves by yesterday.

However, I rested and knit and sat by the fire. I had a nap, and we had easy meals ... with my Mom (my parents are staying with us at the cabin for a few days) looking after meal clean up and setting the table etc (Thanks Mom) ... I am feeling pretty much back to normal and peaceful again. 

With no desire to sleep outside in the snow so people would  Leave. Me. Alone.    Whew! I really don't like to feel like that.

I haven't been able to get into my studio -- between guests, errands, visiting, visitors, and the fact that it looks like a bomb went off in there ... but I do have some loom knit hats to share today.

I gave everyone a loom knit hat / toque for Christmas this year. It was fun choosing the yarn(s) for each person, and changing each hat just a little. Of course, the earlier ones are far more basic than the latter as I learned new stitches and tried new things on my own.


Some of these have double knit brims for extra warmth, some have longer brims that can be rolled up as needed, or pulled down to keep the ears and back of the neck warm.  

Everyone seemed to like them, so that made me happy. 

Thanks so much for stopping by today.

Wednesday 21 December 2011

Happy Holidays Sketch Card

I love the First Day Of Winter.  Not because I love being cold, or that Winter is my favourite season ... but because it is the shortest day of the year.

That means, tomorow will be just a little longer.

The next day will be a little longer and on and on until the First Day of Summer. (Which is NOT a day I celebrate.)

Yeah for longer daylight hours -- even a minute or two makes a difference in my happy little world.

I have ANOTHER card to share today, from the sketch at the Clean And Simple Stamping Blog. (FTL-171)


I used Paper Tape for my patterned paper, and since this is a CAS card (Clean And Simple), and has MUSIC on it - it also qualifies for the challenge at the Less Is More blog, Theme Week 46 "Music".

I found the glittery word stickers on clearance at Michaels, and I thought they would work with my label punch. Ha ha - couldn't wait and had to stick one on this card right away.  :-)


I think this is it for me now, until after the holidays. It's been a busy week - on top of being behind with Christmas prep's, our Brandi girl needed to have a lump cut out of her side. She is healing well - when  I am home I have her wear one of my tank tops creatively pinned so it fits her. It seems to be enough to keep her from chewing at the stitches, and allows her to move around freely or curl up in Jasper's kennel. When I go out, she still has to wear her head cone ... so I'm hoping I can stay home tomorrow and keep her comfy in the bright orange tank top.  Too funny. She is one Tough Old Girl, that's for sure.

Thanks so much for all the support and comments since I started up this new blog. I wish you all a Merry Christmas, or Happy Holidays, or a great week - depending on how you celebrate this time of year. I'll be back after the holidays.

Tuesday 20 December 2011

Another Sketch Card


I made another card following sketch FTL171 at the Clean And Simple Stamping Blog. Becuase I was using a scrap of patterned paper (the glittery trees) I enlarged the top section of the sketch.  This one will go towards my 2012 Christmas Card Stash, since I have sent or handed out all our cards this year.


I finished my shopping yesterday (can't believe I am so far behind this year) so now I can start with some of the cleaning/tidying and even baking that is still on my 'to do' list.

Supplies: 
Baja Breeze and Old Olive card stock - Stampin' Up
Snowflake die - Sizzix
Word stamp - Stampin' Up
Foam Tape
Scrap of patterned paper (MME?)


Thanks for stopping by today!

Monday 19 December 2011

Bird and Trees Christmas Cards


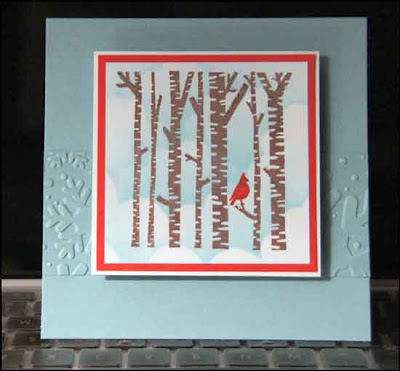
I have a two nearly identical cards to share today ... one is a 5-1/4" square card and one is an A2 size. I love this birch tree stamp, and want to use it more often in the New Year. The bird is a chubby little sparrow, and I turned into a cardinal with the help of a very fine point red Sharpie marker.  I held my breath when I was using it, in case I messed up the card but it worked out the way I wanted it to!


I used a hand cut stencil, a cosmetic sponge, and dye ink to sponge the clouds on the white center piece, then overstamped  it with the birch image and brown ink. Finally, the bird in red and some glitter glue for seasonal sparkle.

I embossed a strip of card stock with an embossing folder, and added it to the card base before popping up the stamped image with foam tape.


Supplies: Card Stock - {Baja Breeze} Stampin' Up, red & white from Office Depot. 
Stickles Glitter Glue
Stamps - Impress
Memory Box and Stampin' Up Ink
Sizzix and ?? embossing folders
Foam tape

Thanks for stopping by today!

Sunday 18 December 2011

Belated Birthday Card


Well it's happened. 
I actually forgot a family birthday. After all these years, my SIL's birthday just went right by the radar, and I cannot believe I didn't think to send the oh-so-pretty card I made for her months ago.  So - I decided I'd better get a different card off to her PDQ.

There is a new sketch at the Clean & Simple Stamping Blog ... FTL171 that is perfect.


What a FUN sketch! 
And Easy. 
And Addictive. 


I actually made two cards from this sketch, and can think of several more I want to try. This one deviates from the sketch in that I made an A2 sized card rather than a square. 

I even inked up a belated birthday stamp - one that came in a set and I didn't think I'd ever use.  While I was glad to have it for this card, I don't mind if I don't ever have to use it again.

Supplies:
Soft Stone card stock - Papertrey Ink
Pear Pizzaz card stock, circle punch and word stamp - Stampin' Up
Patterned paper from my scrap bin
Momento Bamboo Leaves ink
Bird die - Memory Box
Paper Tape - unknown
Spellbinders Circle Die
Foam Tape

Thanks for stopping by today!

Friday 16 December 2011

12 Tags of Christmas - Tag #12

Well here is is - my final tag for Tim Holtz '12 tags of Christmas' 2011.

Whew.

Wow.

I learned so many different techniques over the 12 days, and have to extend my kudo's to the thousands of people who managed to keep up and get a tag made and posted every day. I am going to take a blog break for a day or two as I'm way to behind now with my Christmas preparations. These tags took such a long time to make but I am so glad I participated.

Tim's final tag was very much an 'altered' tag, and I decided to go in a completely direction. I have a entire container of embellishments etc to do an altered look ... but it just wasn't speaking to me.  Also, I really wanted to use his rosette die on at least one tag.

What I'm taking away from this experience? In a random order:

1. A glue gun can be my friend. It doesn't take THAT long to heat up, and it's worth it to adhere some weighty embellishments etc.

2. Distress ink IS embossable. I know Tim has said it, and I heard it -- I just never bothered to try it. Way cool.

3. I am going to do more heat embossing. I haven't bothered with it in a long time. A really long time, and it can add so much to a project. I forgot how much I like that raised, shiny look.

4. Archival ink is a great way to 'condition' your clear stamps. Bought myself a pad in black.

5. Self adhesive foil paper & glossy card stock makes a great 'paper' for die cutting. And it can be coloured with alcohol inks!

5.  Alcohol inks are fun. Again, I haven't used them in a very long time and it was great pulling them out again.

6.  It was amazing to be a part of something so big. I was checking Tim's blog even before my feet hit the floor in the morning, so I could see what he came up with and I was always surprised to see how many people (overseas, mostly) had already completed a tag and posted their thumbnail pictures. It was really interesting to poke around in the thumbnail gallery and check out other artist's blogs. So many people and so many different interpretations on Tim's original tags. Amazing.

7. OMGosh, Master Tim Holtz is even more creative/fabulous that I could even dream of. I do check his blog every so often, but these 12 tags are something else. What a gift he gives us every year. And if I thought MY tags took a long time, I can't even imagine how much time he puts in every single day of the 12 days. Thanks, Tim!

8. I will be watching and waiting for December 1st 2012, to see what he will come up with next year, but I know I won't participate unless I am waaaaay more organized for the holidays than I was this year.

Now, onto my final tag:

I used the Tim Holtz tag die to cut my tag base out of red print paper, and a vintage looking paper with the poinsettia. They were attached together, and all edges inked.

A dollop of Crystal Effects in the center of the bloom, covered with clear glass (no hole) beads gives the image some texture and dimension, as well as the red glitter glue smeared over the petals with my finger.
I really REALLY wanted to use my rosette die for some of his tags this year, and was a little disappointed that Tim refrained from using them on his. So - I used it on this final tag. I love how sturdy the rosette's are. The sparkly embellishment is from my stash.


I decided I wanted to display the tags, so picked up an 18" x 24" canvas at Michaels, added straight pins then hung the tags. I was thinking it would work like a corkboard but of course there is no thickness to the canvas and the tags promptly fell off as the pins leaned.  I taped the pins at the back - meanwhile some have slid - so I am going to carefully adhere some cork in behind the canvas so I can display them LINED UP. I like my 'ducks all in a row', thank you very much.  But who knows when I will have a chance to photograph it and upload the picture so ... this is all I have for right now.

Thanks for stopping by - I'll be back in a day or two!
Thursday 15 December 2011

12 Tags of Christmas - Tag #11

Here is my Tag #11 for Tim Holtz '12 Tags of Christmas'.  His tag was bright and cheerful, and used funky images.


I did the same thing -- but with entirely different imagery than his. He did the COOLEST technique with shrink plastic (see the holly cluster at the top of his tag?), and while I have the melting pot and the UTEE required, I didn't have the clear shrink plastic. I'm gonna try this though - sooooo cool!  (Thanks Tim)


I cut Tim's tree out of chipboard backed patterned paper, which is Prima's 'North Country'.  The chipboard die cuts are from the same line.

I covered a die cut tag with Tim's music printed tissue paper, making sure to wrinkle it as I adhered it. Then I swiped it with Distress Ink and heat set it, finally running it through the Big Shot with a Sizzix  snowflakes embossing folder. The snowflakes were inked with brown Momento ink and a sponge.


I used some paper tape under the area where I was going to attach the tree, then wrapped the tree trunk with Pear Pizzaz seam binding (Stampin' Up).  The red and green bling was sitting on my stamping area so I added that as well.


Finally, I took a silver star brad, pressed it into a Versamark ink pad, then embossed it with red powder. I added green, red, and blue grosgrain ribbons to the tag top.

Thanks for stopping by today!

Wednesday 14 December 2011

12 Tags of Christmas - Tag #10

Here is Tim's Tag #10, or you can see it HERE:


Sue sent me a package of Tim Holtz fragments to play with, but I didn't have these faceted ones. His tape transfer technique is one I've done a lot so I didn't feel like doing it again on my tag, which is shown below:


I used some vintage looking stickers, and adhered them to the back of 3 Tim's fragments with Crystal Lacquer.  Once they were dry, I trimmed the excess with a craft knife (not scissors - thanks Tim!).


My tag base is sparkly holly print paper by My Minds Eye, and I wrapped some of Tim's tissue tape around the base. Edges were inked as well. The fragments were attached with a glue gun and outlined with Stickles.


I used the banner part of Tim's Regal Crest die, cutting it twice. I trimmed the ends off one banner, inked all the edges, stamped polka dots on the top one (Stampin' Up) and popped it up with foam tape onto the full banner.


The flower started out as a white ribbon flower - I purchased a bag of these little gems at some point, and I thought one would be nice added to the snowflake. I pressed the ribbon petals into a green dye ink pad, then spritzed the flower with Glimmer Mist. The colour bled and ran through the ribbon and it turned out SO pretty!  The snowflake is a plastic one from the dollar store (I've had them for a couple of years) - it is white with white glitter embedded on it. I rubbed 2 different colours of Stickles onto it, and when it was dry I attached the ribbon flower.


How about those letters! I cheated a little by using them here, as I used a technique Tim showed on his Tag #12. I wouldn't have known about this cool technique if I wasn't behind a couple of days with my tags.. Foil tape (which I attached to kraft card stock and inked with alcohol inks) was cut out with hit Chip Block die strip and the pieces look just like 'German Scrap'. I'm gonna LOVE doing this!!

Thanks for stopping by today.

Tuesday 13 December 2011

12 Tags of Christmas - Tag #9

I don't know what happened to yesterday. I finished my Tag #9 in plenty of time to share on my blog - but I had almost NO computer time. No downtime, actually - I was busy all day. The good news is that I got our Christmas letter written, printed off, and about 50 of my hand made cards written/addressed/stuffed. I also got another dozen or so ready to hand deliver, so it was a productive day for sure. And SUCH a relief to see them all slide into the mail slot at the post office.

Usually my cards are in the mail on December first, so this has really been weighing on me. To celebrate, I finished Tag #10 and Tag #11 last night too!  Below is my Tag #9:


Here is Tim's, and you can also see it HERE:


I liked his 'double embossed' background, and knew I had the perfect background paper in a MME Christmas paper stack. Already embossed and sparkly.  :-)  I really like how he did his candle - he used his Halloween spooky candelabra and trimmed off the 2 side candles to make a single candlestick. Brilliant. And I love how he clustered his Festive Greenery around the base to make it even more festive. 


I don't have any of Tim's Halloween dies, so I got out my Bird and Birdcage and used the bird /wing only. I love this die set and haven't used it in awhile. All the papers are from MME, and I used Tim's Festive Greenery die for the clusters. Everything was inked and Distress Stickles added. I used a Sizzix die to cut the Primitive Star, ran it through my crimper, smeared it with Distress Stickles (Rock Candy), then wrapped it with some silver crimped wire. I wrapped the same wire around the birds neck, added Distress Stickles to the wing, and a pearl for her eye. The pearl was coloured with a Copic marker to make it blend in better.


Three tiny jingle bells were strung on silver wire and I threaded Stampin' Up lace and narrow ribbon through the tag hole. I knew just what I wanted to do, so this tag came together very easily.

Thanks for stopping by today!

Sunday 11 December 2011

12 Tags of Christmas - Tag #8

Tim's Tag #8 for the 12 Tags of Christmas is below, or can be seen HERE:


 Yeah, I won't be jumping on THAT bandwagon. Classic Tim Holtz or not. Steampunk is very popular in many circles right now, and even though I have lots of images and embellishments that would work perfectly (including a ticket and pointing finger) - I just decided to look at the tag as a sketch of sorts and do my own thing.


I cut the tag shape from (MME) sparkly snowflake background paper, and then punched and die cut snowflakes and Tim's snowflake edge out of another sheet from the stack ... a sparkly music background one.

The flourish is done with kraft glassine ... leftover from yesterday's tag. The holly die that I used for my Tag #7 has one holly leaf and this pretty flourish on it. I cut one full sheet of glassine, and then arranged smaller pieces on just the holly area to get more leaves. So this pretty, decorated flourish was sitting on my stamping table just waiting to be used. I attached it with Tim's Tiny Attacher. Love that thing.  


The snowflakes were stacked with foam tape in between them, then I worried I might not be able to get the pearl brad through all those layers. But it worked fine! I added a little Distress Stickles to the top snowflake for some more shimmer.


The snowflake border is so much fun to use, so I'm always happy for a chance to pull it out. Distress stickles were added to it as well, and a row of self adhesive pearls.


Finally, I used Tim's Chip Block die strip to cut the letters for PEACEFUL. I have been waiting and waiting to order the little alpha die from Paper Trey Ink and it has been out of stock. So I got tired of waiting and bought this one instead. I covered the letters with Glossy Accents once they were glued in place, but decided to add some Martha Stewart Glitter to them as well. The word doesn't stand out too much in the photos, but does in real life. Besides, I was going for something softer than the black JOY on Tim's tag.

I added some fuzzy fibres from my stash to the top and ... another tag done!

Thanks for stopping by today.

Saturday 10 December 2011

12 Tags of Christmas - Tag #7

I'm still plugging away with Tim Holtz 12 Tags of Christmas. I completely underestimated how much time these take each day -- but I'm so happy with the tags I have already finished I hate to throw in the towel now.  You can see Tim's Day 7 Tag HERE, and mine below:


I kept very close to Tim's tag, while still doing it with my own spin. He used kraft glassine to create his holly leaves, and Sue had sent me some to try out. (Thanks Sue!)  I followed his directions and I can see how much FUN that surface is going to be to play with.


I love the little cluster at the bottom of the tag - and yes, you may notice that there is some of Tim's dies in there. I caved and purchased his Festive Greenery Die strip. The flourishes were cut out of red card stock then spritzed with glimmer mist.  The pine cones were punched from kraft card stock using one of my old punches, swiped with a Versamark pad and heat embossed with white embossing powder. I also took 3 large gold brads, rubbed the tops into the Versamark pad and embossed them with red embossing powder. Once they cooled I added Distress Stickles. 


The word stamp is by Stampington & Company, stamped in green Colorbox pigment ink onto cream specklestone paper and heat embossed with gold sparkle embossing powder. It was hand trimmed and the edges inked before mounting to the (My Minds Eye) sparkly printed paper tag.


The little gold ball is from a package I picked up at our dollar store. It is a filigree, with a jingle bell inside. So the tag jingles when it is moved. Fun! The ribbon and lace is by Stampin' Up.

Thanks for stopping by today.

Friday 9 December 2011

12 Tags of Christmas - Tag #6

Wow - half way through Tim Holtz' 12 Tags of Christmas 2011. I have to tell you, this one really made me think. I'm going to show you Tim's Tag #6 here, instead of sending you off to his blog. Maybe you will see why I was struggling:


I was having trouble getting past those colours and seeing the Really Cool Enameling technique. So, I checked out the thumbnail gallery of what some other stampers came up with, and decided I could do it after all.

My way.

In colours I feel comfortable with.


And I think it's my new favourite! I followed his steps, attaching sticky-backed silver foil paper to GLOSSY card stock. Then I deviated a little. Well, more than a little. I didn't want the tag to look like my Tag #3 which was also enameled ... so I used alcohol inks and Tim's blending solution and dabbed colours all over the sheet. Then I cut out the coloured sheet using Tim's tag die, and ran it through the Big Shot with a Sizzix snowflake embossing folder.

I painted over the surface with Tim's Picket Fence dauber, then sanded it off with a sanding block. It looked really cool and I was finally thinking that I was going to like the way it turned out.


After I wiped off the sanding grit, I swiped the surface with a Versamark ink pad and embossed the whole thing with clear embossing powder. And repeated the process once the first layer cooled - it got really hot with the base being the metal!

Instead of a the painted and enameled wreath, I cut one of Tim's deer out of really heavy sparkly white card stock, and popped it up with thick foam tape. Some K&Co snowflake stickers, bling and a punched (Martha Stewart) snowflake finished it off.


I tied the top of the tag with sheer ribbon and ... done. I love the way this looks, and I really like the enameled metal. Without the painting and sanding and inking first.  But it is all about being inspired and making things your own, so I feel like this tag is a success.

Thanks for stopping by today!