Sunday, 31 July 2016

Six Holiday Tags

Good morning friends

Today's share is another set of holiday tags. I'd been working on a couple of Christmas cards and realized that one of the patterned papers in the stack had rows of snowman that would work perfectly on my open holiday tag die.

I cut the tags from a green printed paper in the stack, then popped up the fussy cut snowmen on the centre solid strip. The reverse has a 'to & from' stamped on the back.


Supplies:
Patterned paper - Recollection
Ornament die - Hero Arts
Fun foam
Baker's Twine


Thanks for stopping by today

Saturday, 30 July 2016

C4C 347 Stand-Up Pull Card

Good morning friends

It's Saturday and that means a new challenge at the Crazy 4 Challenges Blog.  Our hostess for July is Joanne Grzelak and the Guest Designer is Alexis Crossland-Smith Scrappin’ Sistah

Here is Joanne's challenge this week:  I love the ocean (thus the name of my blog).  Spending time there brings me peace and joy. Make a card depicting the type of place that brings you peace and joy.

I couldn't figure out what to make for the longest time. I always say that Arizona is 'my happy place', so I was trying to figure out a SW style card. Then, as we were driving home one day and I said to hubby - "I'm so glad we moved out here (to the country) - I love living here".  I've said that to him literally hundreds of times, but this time I went 'AH HAH ... now I know the theme for my C4C card! It's impossible not to feel peace and joy living in the foothills of the Rocky Mountains.

I used the Rectangle Pull Card by Karen Burniston for Elizabeth Craft Designs to create a Stand Up Card ... below is the card folded flat and ready to put in the envelope.


It was time to give the Tim Holtz Treeline a little love, so I combined it here with the Western Edges (Karen Burniston) and her Cloudy Day Stencil.


Carole at PaperPastimes in Calgary was good enough to hand deliver my Show Samples of Karen Burniton's newest release to Els at the Trade Show in Salt Lake City, and when I dropped them off to her I managed to pick up two new word stamp sets. This card uses one of them for the 'C'mon get HAPPY'.


You can see how the card stands for display, which is a cool feature of this type of card. It's always fun to find different ways to use the dies you may already have, as shown here with the Rectangle Pull Card. The cool thing about the coloured Soft Finish Card Stock at Elizabeth Craft Designs, is that it is white on the reverse side. Perfect for making a card like this!

Check out the C4C blog to see how the Crazies have been inspired by the challenge. We'd sure love to see your take on it, so be sure to stop by the Crazy 4 Challenges blog and link up your creations. If you are uploading to an online gallery, please use the keyword C4C347.

Supplies:
Rectangle Pull Card, Pop it Ups - Karen Burniston (Elizabeth Craft Designs)
Western Edges, Pop it Ups - Karen Burniston (Elizabeth Craft Designs)
Cloudy Day Stage it Stencil - Karen Burniston (Elizabeth Craft Designs)
Soft Finish Card Stock in True Green and white - Elizabeth Craft Designs
Word stamps - Taylored Expressions
Treelike die - Tim Holtz
Fun foam
Fine Point Tweezers - Elizabeth Craft Designs
Copic markers
Clear Double Sided Adhesive, 1/8" width  - Elizabeth Craft Designs

Card size - 5 x 6"


Thanks for stopping by today


Friday, 29 July 2016

Pa's Grandparent's Day Flip-It Card

Good morning friends

It's Flip-It Friday here on my blog, and today's share is the card I made for my Dad for Grandparent's Day. Since he lives in an assisted living home, he get's his own card!


I was really just goofing around with some bits and pieces and a stamp set I've had for awhile but hardly used.


Supplies:
Patterned paper - My Minds Eye
White card stock
Triple Circle Flip-It's - Sizzix
Stamps - Stampin' Up
Tomboy Markers
Brown fine point marker - Le Pen (Marvy)
Stickles

Card size - A2


Thanks for stopping by today


Thursday, 28 July 2016

Little Girl Love Note

Good morning friends

I found this journal card none of my paper stashes, so added it with scalloped borders to a folded white card. I've tucked it away as a Love Note for Olivia. Next I will have to make some boy ones, as I always send each of Grandkids a Love Note, not just Olivia.


On a personal note, little Olivia is not doing well and testing shows that the disease (Pulmonary Hypertension) has started to progress. They are back to bi-weekly visits to the Children's hospital and will work with the cardiologists & specialists adjusting medication dosages.  We will be babysitting her brother's for most of these appointments. Olivia is in a lot of pain as a side effect of the increased medication and is needing oxygen a fair bit these days. It must be frightening when you can't breathe ... and for a 5 year old, even more so.

Pulmonary Hypertension SUCKS.


Supplies:
Patterned paper - Echo Park
White card and envelope - Michaels
Sticker - Echo Park
Stitched Scalloped Border - My Favorite Things

Card size - 5-1/2 x 6"


Thanks for stopping by today


Wednesday, 27 July 2016

Pretty Floral Birthday Pop-Up Cards

Good morning friends

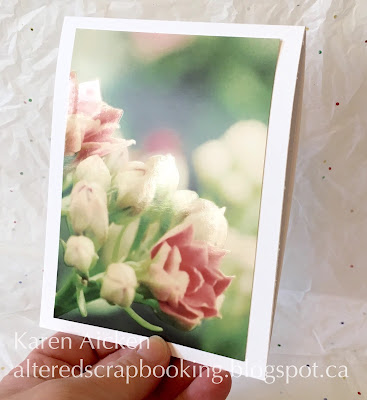
I have been enjoying a lovely photograph 12 x 12 patterned card stock stack I found with my friend B when we were out shopping together in Arizona. I cut this sheet down to make two pretty Pop-Up Cards for a little gift.


It's hard to see in the photos, but the pattern is glossy with shiny embossed bits. So pretty!


The cards are nearly identical - just nice and clean and crisp.


Supplies:
Patterned paper - DCWV
White card stock
Blueprints #11
Scalloped Stitched Border - My Favorite Things
Words - Stampendous
Elizabeth Craft Designs Clear Double Sided Tape - 1/8"
Lorna Label Pop-Up, Pop it Ups - Karen Burniston (Elizabeth Craft Designs)
Butterfly punches - Stampin' Up
Glitter Dots - Elizabeth Craft Designs

Card Size - A2


Thanks for stopping by today


Tuesday, 26 July 2016

Woodland Holiday Cards

Good morning friends

The last time my friend B came for a play date (hubby's went golfing) she brought along her new Woodland embossing folder for me to play with. I embossed a few panels on white card stock, but also tried Kraft and really liked it.

Once I'd added gold and silver metallic Pan Pastels, I'd decided I liked it enough to order one for myself!


Since I'd embossed 4 Kraft panels, I made 4 identical Christmas cards but only photographed one. The deer was die cut from patterned paper with gold foiled bits I added a 'snowy' edge from Kraft - white and cream looked awful. I used the Beach Edges by Karen Burniston for that, and the little bow on the deer is from the Sleigh Gift Card Pop-Up.  I used the MISTI to stamp the words inside each of the cards, so each one would stamp without any 'oopses'.


Below you get a better idea of the foiled accents on the deer.


Supplies:
White card stock
Kraft card stock
Patterned paper - Recollections
Red card stock
Woodland embossing folder - Stampin' Up
Metallic Pan Pasatels
Hair Spray
Deer die - Tim Holtz
Beach Edges, Pop it Ups - Karen Burniston (Elizabeth Craft Designs)
Sleigh Gift Card Pop-Up (bow), Pop it Ups - Karen Burniston (Elizabeth Craft Designs)
Stamp inside - Taylored Expressions
MISTI
Fine point tweezers - Elizabeth Craft Designs

Card size: 5 x 6"


Thanks for stopping by today


Monday, 25 July 2016

Accordion/Concertina Challenge Card

Good morning friends

Welcome to the second Designer Challenge of July ... this time the challenge came from Kelly Booth:  "Stretch it out!" - use any of the Accordion dies for a project of any theme.


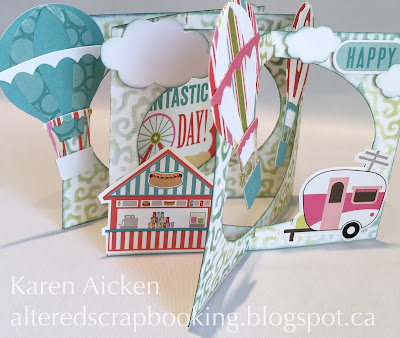
I was looking at the different Accordion dies and trying to decide which one to use for the challenge. I knew I also wanted to use the Hot Air Balloon and all of a sudden I remembered "Shelly's" Concertina idea. LOVE it when you can use your dies more than one way. (More on Shelly's cards below).


This is the card ready to be put in the envelope. It folds completely flat!


After I cut the four Accordion Ovals from white Soft Finish Card Stock, I used the Petite Flourish Stage-it Stencil to add some colour before assembling. I picked a scrapbook kit from my stash and had fun choosing different patterned papers for the Hot Air Balloons.


There were some coordinating stickers that I added to white card stock and fussy cut, and I also added some clouds from the All Seasons Tree. The Hot Air Balloon Pop-Up comes with  cloud dies as well, but for this card I liked the chubby clouds from the All Seasons Tree set.


Finally, I added two of the printed cards that would normally be used for Pocket Scrapbooking to the back of the card. You can see the one from the front of the card and the other is adhered to the back of it so you see it from the back.


A while ago, Shelly Hickox made THIS awesome concertina card and then another for an Elizabeth Craft Designs post. I was INSPIRED I tell you, and made THIS ONE for a Designer Challenge in November 2015. (Shelly credits Karen Burniston as coming up with the method of using the Accordion dies to create a concertina card, which is totally brilliant).


Karen Burniston will be posting on HER BLOG tomorrow (Tuesday) so be sure to check it out. The Designer Challenge Team is linked on the right of my blog, if you want to see what they've come up with for this challenge.


Supplies:

Accordion Oval, Pop it Ups - Karen Burniston (Elizabeth Craft Designs)
Hot Air Balloon Pop-Up, Pop it Ups - Karen Burniston (Elizabeth Craft Designs)
All Seasons Tree, Pop it Ups - Karen Burniston (Elizabeth Craft Designs)
Stage it Stencil, Petite Flourish, Pop it Ups - Karen Burniston (Elizabeth Craft Designs)
Soft Finish Card Stock, White, 100# - Elizabeth Craft Designs
Patterned paper - Carta Bella (and stickers)
Fun foam
Fine Point Tweezers - Elizabeth Craft Designs)

Card size: - just over A2 because of the overhanging balloons. Would fit easily in a 5 x 7" envelope.


Thanks for stopping by today

SaveSaveSaveSaveSaveSave

Sunday, 24 July 2016

Roses Thinking of You Card Duo

Good morning friends

My Mom had asked for some Thinking of You cards, so I came up with these two. I like the look of cutting the shadow layer from the card front and layering the word layer inside the card. Then it's visible from the front AND when you open the card.

I had some of this glossy roses print paper leftover so used it along with some red card stock.


For the second card, I wanted to use the shadow layer cut from the first card so cut a second 'thinking of you' from red card stock and adhered it to the shadow layer then to the stitched panel. There was enough of the roses patterned paper to die cut a cup from the Cup Pop Stand (Karen Burniston for Elizabeth Craft Designs). I cut a second cup from white fun foam (because that is what I had) and went around the edges with a red Sharpie marker. I like the 'shadow' effect it gave the cup. A few 'splashes' from Joset's Ice Cream Cone and my card was finished.


Supplies:
Patterned paper - Scrapbook Customs
Blueprints #24 - My Favorite Things
Thinking of you - The Stamps of Life
Red card stock
White card stock
Clear Double Sided Adhesive, 6" width - Elizabeth Craft Designs
Cup Pop Stand (cup), Pop it Ups - Karen Burniston (Elizabeth Craft Designs)
Ice Cream Cone (drips) - Elizabeth Craft Designs
1167 Peel-Off Border - Elizabeth Craft Designs
Fun foam
Red Sharpie
Butterfly punch - Stampin' Up

Card size - all, A2


Thanks for stopping by today

Saturday, 23 July 2016

C4C 346 - Picnic Connection

Good morning friends

It's Saturday and that means a new challenge at the Crazy 4 Challenges Blog.  Our hostess for July is Joanne Grzelak and the Guest Designer is Alexis Crossland-Smith Scrappin’ Sistah
Here is Joanne's challenge this week:  July is National Hot Dog Month, probably due to the number of picnics that occur at this time of year. Let’s have a picnic ‘connection’ on our cards this week.

I have had these stickers in my stash for a couple of years so this challenge was the perfect time to use them The gems fell off the stickers where the BBQ controls would be ... so I added some glitter dots instead. 

The card base is the Hanging Charm Pull Tab by Karen Burniston for Elizabeth Craft Designs. It folds completely flat for mailing ...


... and when you pull the tab the BBQ stands up for display and reveals the stamped greeting.


Usually I make cards for specific people, but I didn't have anyone in mind when I made this card. So the back of the card was left blank and that way I can add what I want when I go to send the card.


Check out the C4C blog to see how the Crazies have been inspired by the challenge. We'd sure love to see your take on it, so be sure to stop by the Crazy 4 Challenges blog and link up your creations. If you are uploading to an online gallery, please use the keyword C4C346.

Supplies:
Hanging Charm Pull Tab, Pop it Ups - Karen Burniston (Elizabeth Craft Designs)
Just a Note clear stamps - Karen Burniston (Elizabeth Craft Designs)
Fitted Frames Stitched Rectangles - Elizabeth Craft Designs
Clear Double Sided Tape, 1/8" width - Elizabeth Craft Designs
Stitched circle - My Favorite Things
Black card stock
White card stock
Patterned paper - Paper Patch
Stickers - Sandylion
Black Glitter Dots - Elizabeth Craft Designs
Border stamp - The Stamps of Life
Copics

Card size - 5 x 6-1/2"


Thanks for stopping by today


Friday, 22 July 2016

Father's Day Oval Pull Card

Good morning friends

It's Flip-It Friday here on my blog, and I have a Z-Fold Father's Day card to share today using the Oval Pull Card by Karen Burniston for Elizabeth Craft Designs.

I had just received my Stampin' Up order and wanted to use this cool airplane stamp so this is what I came up with.


The Oval Pull Card comes with optional Slot and Slider dies and I chose to use them here to animate the plane. I added some pen lines on the card, including the little heart trail on the slider arm. There is a similar stamp in the set, but I wanted to doodle this one.

As you pull the sides of the card, the notch releases and you get a glimpse of the inside and how the Slot & Slider work.


Supplies:
Patterned paper - Echo Park
White card stock
Oval Pull Card, Pop it Ups - Karen Burniston (Elizabeth Craft Designs)
Pull Card Edges, Pop it Ups - Karen Burniston (Elizabeth Craft Designs)
Printer
Colored Pencils - TriColor, Koh I Noor
Fine line black pen
Fine point markers - Staedtler
Bling - Jolee's
Stamps - Stampin' Up

Card size - 6" square


Thanks for stopping by today

Thursday, 21 July 2016

Snowman Card Duo

Good morning friends

It's Throwback Thursday here on my blog, and I have a couple of Christmas cards that I made last year but didn't get posted.

I used scraps of paper from my Pop-Up card on December 16th (click HERE) for the first card. The second card has a fussy cut snowman that is on an Action Wobble.


Supplies:
Patterned paper - Recollections
Cream card stock - Papertrey Ink
Green cad stock - Papertrey Ink
Blueprints #23 and #24 - My Favorite Things
Stickles
Action Wobble

Card sizes - A2


Thanks for stopping by today

Wednesday, 20 July 2016

Hogs & Kisses Birthday Card

Good morning friends

Today's share is the birthday card I made for my parents to give our Daughter In Law for her birthday. I had so much fun making this card - the stamps in the set just crack me up.

The card base is the Bigz Circle Flip-It, with an extended left edge.


I also added some doodles and a cheery stamp inside.


She is a Vet Technician, and loves animals. This card is going to make her laugh for sure.

Supplies:
Heavy white card stock - Michaels
Pig stamp & Die - Simon Says Stamps
Copics
Stickles
Blue card stock - Papertrey Ink
Patterned paper - MME
Circle Flip-Its (Bigz) - Sizzix
Scrap of green card stock
Lorna Label Pop-Up (banner), Pop it Ups - Karen Burniston (Elizabeth Craft Designs)
Hot Air Balloon (Clouds), Pop it Ups - Karen Burniston (Elizabeth Craft Designs)
Black pen - Uniball
Stitched Circle - My Favorite Things
Inside words - Papertrey Ink
Glitter Dots - Elizabeth Craft Designs
Fine Point Tweezers

Card size - 5-3/4 x 5"


Thanks for stopping by today
Tuesday, 19 July 2016

Moose Hello Card

Good morning friends

Today's share is a quick card that is on it's way to Sri Lanka, to a little boy we sponsor through World Vision. We had been driving home from the Farmers Market and there was a moose in a field off the highway so I was inspired to use this Moose stamp. It was one of my purchases from the Mesa Rubber Stamp Show (Stamps by Judith) - honestly, I could buy every one of her animal stamps. LOVE them.


The 'hello' was die cut from a metallic card stock, and I added a glaze pen on the eyes and nostrils. It's showing up in the photo as a glitter, but it is a clear raised finish.


I wrote a note inside, and thought he might like one of my completed Zentangle tiles so that went in as well.

Supplies:
Moose - Stamps by Judith & Heather
Water Colour Pencils - Derwent
Sakura Glaze Pen
Cream card and envelope - Michaels
Hello die - My Favorite Things
Metallic card stock - Stardream
Clear double sided adhesive, 4" width - Elizabeth Craft Designs
Patterned paper - We R Memory Keepers

Card size - 5 x 6-1/2"


Thanks for stopping by today


Monday, 18 July 2016

Ethan's Robot Birthday Card

Good morning friends

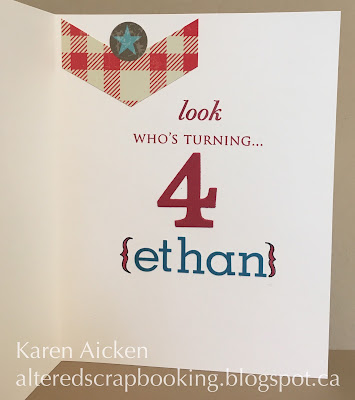
Today's share is the birthday card I made for my parents to give our Grandson Ethan for his birthday this month.


This large robot sticker was in the same package as the patterned paper, so I attached it to white card stock then fussy cut it out. The robot is attached to the front of the card with an Action Wobble.


I used more stickers for the inside so it would all coordinate, as well as stamping.


Supplies:
Patterned paper  and stickers - My Minds Eye
Action Wobble
Red card stock
Elizabeth Craft Designs Clear Double Sided Tape - 6" width
Letter Stickers - Echo Park
Fine Point Tweezers - Elizabeth Craft Designs
Marker - Stampin' Up
Card and Envelope - Michaels

Card size - 5 x 6-1/2" 


Thanks for stopping by today

Sunday, 17 July 2016

Frosty Christmas Cards

Good morning friends

Today I have a couple of Christmas cards to share today. I had this paper stack out to make a different project and there were smaller leftover pieces in the front of the stack so I used my Blueprints dies to cut diagonal panels. Once they were cut and adhered to the front of the cards, the rest was easy peasy.


I believe the printed embellishments are for pocket scrapbooking, but I fussy cut them out and adhered them to the card fronts with fun foam for good stability. After all, these cards will sit in my card box for several months.


I added some metallic gel pen details and punched snowflakes to this first card.


The second card also got a punched snowflake and metallic gel pen accents.


Inside both cards is the same holiday stamp from Verve. I adore the fonts on this set!


Into my holiday stash ... not sure if these are for us to send or if they will end up in my Mom's pile, as I make their holiday cards as well. But either way - two more Christmas cards finished!

Supplies:
Heavy Cream card stock - Papertrey Ink
Blueprints #18
Patterned paper - Recollections
Fun foam
Clear double sided adhesive, 1/8" width - Elizabeth Craft Designs
Metallic Gel Pens - Sakura
Words inside - Verve
Snowflake punch - Martha Stewart

Card size - A2


Thanks for stopping by today