Friday, 31 August 2012

Turquoise Loom Knit Scarf

**Edited to add ... I have started a new blog, called Knitting With Looms to feature my loom knit pieces. That way I can elaborate more on the knit posts without boring the paper crafters, and the knitters won't have to wade through a bunch of cards.  I won't delete or move the posts here on knitting, but I won't add any more here.**

Today I have some knitting to share as it's been awhile since I have posted anything non paper related. But my looms have been busy all summer.

Last weekend I enjoyed the sunshine out on our newly enlarged cabin deck, with my Knifty Knitter loom and some beautiful artsy yarn from the yarn shop in Canmore (Knit and Caboodle).  You can see our little Cooper watching for squirrels in the photo.


At a meeting I attended in June, a lady was wearing this sideways knit scarf/cowl/poncho. I loved it and she explained her technique to me. Last month I ordered a fabulous custom made piece from Stephanie at 'Rock, Paper, Scissors, Etc' at Etsy. I have long admired her knit pieces, and when it came - I was surprised to see that it was also a sideways knit item.

I decided to attempt one myself - with no pattern - and was SO pleased with it, I tried a second piece with this beautiful turquoise yarn. ( I'll share the first one another day). This one is more scarf/cowl and less poncho, and in a completely different stitch than my first.


The yarn has a metallic fleck in it, which you can sort of see in the photo below.


Here it is more spread out over the shoulders, and you can get a better look at the stitch pattern.


 Amazing how a circle of plastic with some pegs and some gorgeous yarn can make such a lovely accessory!

Thanks for stopping by today!

Thursday, 30 August 2012

Hybrid Card for Freshly Made Sketch 50

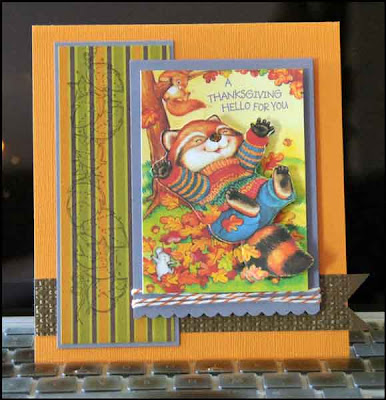
I wanted to make a cute card for our Granddaughter for Thanksgiving, but I don't have any cute (toddler) stamps. I thought about firing up my Cricut, but then I remembered that I have a Hallmark Card Studio installed on my Very Old Windows Laptop.  Perfect!

I also checked out the latest sketch at the Freshly Made Sketch Challenge Blog, and decided to combine it with the Hallmark image.


I chose not to use the embellishment from the top left in the sketch though.

Two full images were printed onto heavy computer paper, then one was glued to white card stock for stability. I fussy cut the little raccoon from this second image to layer onto the full printed one. But - I didn't use foam tape, I used one of my Action Wobbles!!!


I think Olivia will get a kick out of  this 'boinging' racoon.  I know I do.  :-)


The card started out as 6" square, but when I was laying out the pieces I decided to trim off 1/2" from the right side. It worked much better for the sketch that way. I was able to use my new Wisteria Wonder card stock for the matted layers, and a textured embossing folder (Stampin' Up) on the brown banner. Also, I added some orange Bakers Twine.


This was such a fun sketch to use, and I can see lots of different ideas for it. 

Thanks for stopping by today!


Wednesday, 29 August 2012

Cards for Dynamic Duo's Challenge 17

I love the monochromatic challenges at the Dynamic Duo's, and since I have a brand new package of Wisteria Wonder card stock and a fresh ink pad this was the perfect challenge!


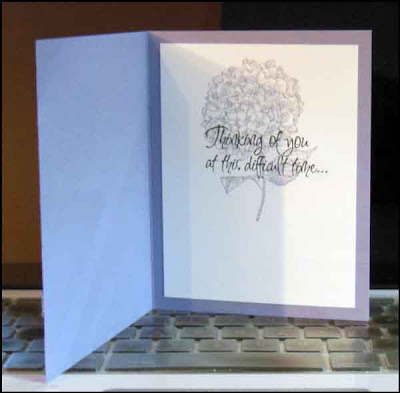
I had ordered the Wisteria Wonder (Stampin' Up) since I am severely lacking in the purple department. I hoped that the soft colour would replace their retired Almost Amethest, which I loved. The package arrived yesterday, and I do like the card stock colour. The ink colour though? Not so much. It seems really flat. Maybe I just need to play with it some more, but all I could think of to make with this colour was a sympathy card. Two, in fact.


I don't have any Concord Crush, so had to play around a little to come up with a darker shade of purple. Remember I don't have much to work with in that colour. Poking around in my stash I was able to come up with the dark colour for this card, and even had a matching ink colour!


It's hard to see the dark purple card base in these photos - and the photos are a little blurry. I took them THREE times and still had no luck. Time to break out the good camera.

The butterfly was stamped with Wisteria Wonder on white card stock, then punched out and popped up with foam tape. The fancy label was also cut out of the Wisteria Wonder, inked with the darker purple ink, and layered with a punched oval.  Words by Verve. The colour is a plum, like the card base - not the brown it appears to be in the photo below.


I added some flat sticker gems to give the card a little shimmer and shine but still keeping it serene and mail friendly.


I stamped the flower (Stampin' Up) in Wisteria Wonder ink on scrap paper, then again on the white panel inside the card. I repeated it with the butterfly (Stampin' Up) to give a lighter impression, then overstamped with the words (Verve) in the dark plum ink.


For the 2nd card, I stamped the flower in Wisteria Wonder on white card stock, then cut it out with a Stampin' Up label die. As I said, I found the ink colour a little flat, so I added some shading with a purple pencil.


I used the Word Window and Modern Label punches, as well as the small word stamp to put the sentiment on the card front. The background image was stamped with purple ink on a Wisteria Wonder panel, matted with white and wrapped with a Wisteria Wonder ribbon. All those supplies are by Stampin' Up.


I used a Sakura gel pen to dot the center of the flowers and give this card some shimmer as well.


Here is a peek at the inside:


This inside was done the same as the first card, but these words are by Stampendous.


I've had this stamp set for awhile, and have only used it a couple of times. So I was happy to get it out again for these cards.

Thanks for stopping by today!

Tuesday, 28 August 2012

Some Exciting News and a card for Merry Monday Challenge 30

Today is the day!!!  Today is the day I get to share my exciting news ... I am one of the (three) Guest Designers at the Dynamic Duo's challenge blog for September. Waa Hoo!!!! Lesley even made us the following banner to put on our blogs.


I have a rather simple card to share today - using the latest Merry Monday sketch from Always Playing With Paper.


I used the larger white card bases from Michaels, so my card is about 5 x 6.5".  I also used a printed tag from a paper stack by My Mind's Eye.  Wrapped it with a little Bakers Twine (love) and some punched out letters from the same stack. The fun thing about using a paper package, is everything coordinates without a lot of fussing on my part.
 

The sweet felt embellishment is from the Stampin' Up Clearance Rack. I'm getting a lot of use out of those for my cards this year!


The tag is popped up onto the printed paper panel, which is also popped up. I used Stampin' Up's Dimensionals for this - as they give it the dimension without too much height. I've mentioned before how much I love them - and any time I place a SU order - I order more. Whether I need them imminently or not!


I added some Stickles to the letters for holiday sparkle, then outlined each of the letters with my Sakura gel pen.  A little notched polka dot banner finished off this card - simple, but cute and still mail friendly. And right into my large card stash!!

 Thanks for stopping by today.


Monday, 27 August 2012

Card for the Freshly Made Sketch 49

Good morning everyone!  We had company this weekend, and I just couldn't break myself away to sit at the computer and update my blog.  So today I'm uploading the card I made to upload on Friday.

I had wanted to play with sketch #49 at the Freshly Made Sketch Blog - but this card fought me every step of the way. I finally decided to cut my losses, call it done and move on.  Now I see that some of the photos are blurry too! Sheesh.


Since this card would be going through the mail, I decided not to do a square card and instead went with a 5x7 creamy card base.  I die cut (Sizzix) several different leaves to layer onto the strip but they looked too crowded so I culled them down to three. The strip originally had a cream base matted with the burnt orange - but I couldn't get it to look good so finally just turned it over and went with the burnt orange strip. I should have known then that this card was not going to work out well.


The leaves were layered with foam tape (patterned paper over card stock) and I added some glitter glue for pizzazz.  

There was this leaf just sitting there so I broke away from the sketch and popped it up above the sentiment with foam tape. It sort of blends into the patterned paper background, which is what I wanted. I didn't glitter this one.


Finally, I added a white panel to the card inside (since the card bases are somewhat flimsy) and added a leftover card stock leaf die cut to the inside. I will add a verse closer to Thanksgiving and when I know who I'm sending this one too.  


 In browsing around my favourite challenge blogs today, I see that two of my cards last week were chosen for special mention. Waa Hoo!  After the struggles and my lukewarm feelings  towards today's share, this news came at a great time. 

Lisa, on the Design Team at the Dynamic Duo's blog - chose THIS card for an honourable mention.


and Bonnie on the Design Team for Merry Monday's chose THIS one.  Thanks so much, ladies!!!!


It's always such a great feeling when a card you make for someone makes them happy. But to have your cards chosen by your peers - that REALLY makes my day. 

Thanks so much for stopping by today.


Thursday, 23 August 2012

Hannah's Gift Wrapping & Card

Yesterday I shared the birthday card I made for my parents to give Hannah, our son's long-time girlfriend. Today I have the card I made for her from us, as well as a peek at the decorating I did for her gifts.


Hannah loves riding horses, so knew I wanted to make her a horsey card.  :-)   The horse (Southwest Stamps) and the words (PSX) were stamped on vellum.


The background (Judi-Kins) was stamped on the card base and envelope. The black layer is crumpled tissue paper, and the vellum was attached just in the center with vellum tape. When it is burnished in really well it really does become invisible!


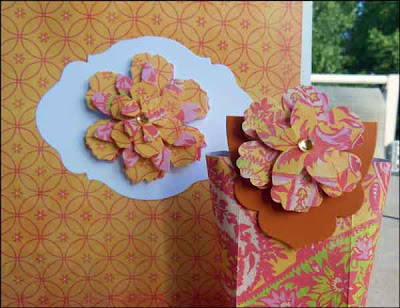
I attached a piece of patterned paper to a white gift bag.  The flower was cut out of coordinating papers and the Tim Holtz Tattered Florals die. I added the flower to the center of the Stampin' Up large die, which was cut out of white card stock. It looks SO pretty in real life!


I used another piece of patterned paper to create a "2 4 6 8" box.  (You score your 8-1/2" piece of paper or card stock at 2", 4", 6", and 8".  You can find full directions on the Splitcoast Stampers Resource Forum).

A Stampin' Up die cut was folded in half and attached to the front and back of the little box (after the gift was added) and then I made another paper flower to decorate this topper. I went with flowers, since a whole horsey style giftwrap would have felt too masculine.

Thanks for stopping by today!

Wednesday, 22 August 2012

Pink and Yellow Birthday Card

Our son's long-time girlfriend is celebrating a birthday this week and this is the card I made for my parents to give her:


The card is 5.25" square, and fits into a 5.5" square envelope. I used papers from K&Co ... of course!


The paper has a beautiful white flocking on it - I love the additional texture this gives the decorated card. A Spellbinders die was used for the fancy label, and punched ovals, and the words are by Papertrey Ink.


 I also put a strip of the patterned paper inside the card. I'm loving my Papertrey Ink birthday stamps - it's been so long since I've had new and different birthday words.

Thanks for stopping by today!

Tuesday, 21 August 2012

Merry Monday Challenge #29

I had an idea of what I wanted to do as soon as I saw this weeks sketch for Merry Monday's at the Always Playing With Paper Blog.

I used the larger format cards from Michaels (5 x 6.5") and made two cards for my stash. They aren't 'Bright and Cheery', but I do love snowflakes for the holidays. Especially sparkly ones!


I started with this pretty kraft/white snowflake print paper from a stack by Recollections. I did a quick flip through the package last year ... saw all the kraft and prints and knew I'd love that paper stack. Well it is more for scrapbookers than card makers, with full 12" borders and feature designs. Not so good for cards. This paper had cute country style mittens all the way across the top -- layered prints so it would be difficult to cut them apart and use them as embellishments. So - into the recycle bin with the border and I cut down the rest of the sheet for these cards.


The 3/4" paper strips were trimmed from the same snowflake print paper, embossed with a Sizzix embossing folder, then swiped with white distress paint. I matted them with 1" white card stock strips then attached them to the patterned panel.


These rub-ons' are from a fabulous Stampin' Up Clearance Blitz last year - I finally cut into the package. I used the white ones on these cards, and the brown ones on the envelopes. Love that they come in white and brown - which is so much softer than black. 

The (dollar store) sparkly snowflake stickers were layered with a punched label shape (Stampin' Up) and foam tape.


I don't often put ribbons on my cards to keep them mail friendly. (Ahahaha - that doesn't stop me from buying ribbons though!)  This one seemed to need the ribbon so I will attach a 5 x 6.5" piece of white card stock inside the envelope to allow it to feed through the post office machinery.

As for that paper stack? I used my Tim Holtz Tag die to cut out some of the larger images last year and used them on Christmas packages. For the ones that are just too big for the die, I plan on hand trimming them into 12" tags (!!!!) and using them on larger gifts, as well as attaching trimmed sheets  to plain kraft gift bags. Next time I buy a paper stack, I will pay more attention to how big the designs are!

Thanks so much for stopping by today!

Monday, 20 August 2012

Masculine Gift Wrapping Ideas

I mentioned that my Mom celebrated her 80th Birthday this month, but what I didn't say was that my Dad turned 84 the day before Mom turned 80. So the Birthday Party at our house was for him too! (If you want to see the card I made for him, click HERE).

What do you give a man who has everything?  Well, everything except an income?  We give cash and some favourite candies. That way he has $$ he can use for anything he wants (usually lunch or dinner out) and sweets for whenever he wants.  All the food bases were covered, ha ha.


I pulled out a couple of sheets of patterned paper from my stash - I've had these for YEARS! First I cut a seed-packet envelope (Papertrey Ink die)  to tuck the $$ into.  It needed something on the front, so out came my Tim Holtz ATC die.

I know, I know. I'm perfectly capable of cutting a 2.5 x 3.5" rectangle and rounding the corners and why-on-earth would I purchase a die that does that???  Well I will tell you how I justify almost every single Sizzix type die purchase.  'Because It Can Cut Through Chipboard!!'.  Am I going to make ATC's out of chipboard? Probably not very often - but THAT is not the question. I CAN, so therefore I bought the die.  :-)   And I use it a fair bit -- and one of these days I will make a chipboard one just to say I did.

Anyhow, I cut the ATC from white card stock, stamped it with that fun balloon/cloud/gift stamp (Michaels $1.50 bin) with a Papertrey Ink Surprise Inside stamp over the cloud and popped it up with foam tape. 


I cut a small bag (Tim Holtz die) out of the same paper. This die purchase didn't need to be justified -- I love it and know I will get a lot of use out of it. When I popped the envelope inside though, it kind of disappeared ... and since I wasn't tying the bag onto a larger gift I had to add something to make it 'stick out' of the top of the bag.


A punched oval and stars did the trick, along with the PTI stamp ... 'PULL HERE'.  I decorated the front of the bag with a Tim Holtz bookplate, which cut when I cut the tag for the large box of treats. You can see that tag (stamped and water coloured) in the top photo.


Finally, I added some different candies into an opaque gable box, wrapped it with a strip of the same patterned paper, hand cut a tag and stamped it with the same birthday image. A little water colour on the tags and I was done.


He enjoyed his gifts, I enjoyed wrapping them -- it was win win!  We didn't ask him to open his treats at the party though or he wouldn't have had any to take home with him!

Thanks for stopping by today.