Friday, 24 February 2012

Vintage Tag

Today, for a 'Fancy Card Friday' post, I have the tag I sent to Sue for our February 1st exchange. For those that are new to my blog, my friend Sue lives in a city a couple of hours away from me. We pop something in the mail to each other the first of each month - since we both really appreciate the efforts that go into something hand-made.

Now, with the wedding etc Sue gave me a pass for February. Which was totally sweet of her. But - I NEEDED to think about something other than wedding stuff, so I spent a few minutes when I could in my studio and came up with this tag:

I used the Tim Holtz tag die and some vintage ephemera from my stash and made an EASEL TAG. Easel card have been around for awhile, but I've never made one. Simply because people would wonder what all the folds were and I doubt they would know to stand up the front without instructions. If I have to send instructions with a card, I'd rather do something else. Something CAS.

I knew Sue would know what to do with it.  :-)


I made the easel base a little wider than the tag itself (artistic liberty) using kraft card stock, and added inked patterned paper panels to each section. The beautiful bookplate die is on the same one as the tag and I was happy to have the opportunity to use it again. I love that cut.

I inked the patterned paper butterfly oval with Distress Inks, then clear embossed it before attaching it behind the patterned bookplate. The buttons come from Papertrey Ink and were attached with Crystal Effects.  It was popped up on the panel with foam tape, so the tag bottom can tuck in at the top edge and it keeps the tag 'standing' - thus the name Easel Tag.

Here are a few more shots:


I hand trimmed some of the ephemera (Hot Off The Press), and used one of my Tattered Flowers from the baggie of stockpiled blooms I mentioned earlier this week. Two of the images I hand trimmed were inked and tucked in behind the paper flower.

I did decide to take Sue up on her offer of a free pass though - for March. I will have to come up with another cool idea for her for April first though!

Happy Friday everyone - thanks for stopping by today. 

Thursday, 23 February 2012

Pretty Birthday Card


When I first got my Tim Holtz Tattered Flower die, I made flowers. Lots and lots of flowers. Where they sat in a baggie.

In my quest to Use Stuff Up - I pulled out one of those flowers and used it as a focal point on this birthday card. 


The flower has buttons and glitter glue added to the centre, and the label is a SU punch. The words (Verve) were stamped with Momento brown ink, and the papers were from my scrap bin. With a whole baggie of 'Card Candy flowers', I should be able to make up quite a few similar cards very quickly. 

Should the need arise - I wouldn't want to deplete my hoarded stash too quickly. ;-)

Thanks for stopping by today!


Tuesday, 21 February 2012

Sparkly Baby Cards


Hopefully you can see the raised, sparkly words on this printed paper. It is so pretty, I thought I'd use it to make up some baby girl cards. The cards are 5 x 6.5", and the paper was matted with pink card stock then wrapped with pink footprint ribbon before attaching them to the card blanks.


Easy Peasy, but still sweet. I can add a small tag to the bow with a little safety pin when I go to use the cards - or send them as is.

No stamping on these ones (unless I add the tag mentioned above and stamp words or a tiny baby related image on it), but they still fit my New Years Resolutions by NOT being an A2 sized card. 
Thanks for stopping by today!


Monday, 20 February 2012

Masculine Get Well Card

I have a quick One Layer Card to share today for my Masculine Card Monday:


Two stamps and a recessed panel card, coloured with good quality pencil crayons. Done!

Word stamp - Stampin' Up (Discontinued), Sick Man stamp - Art Impressions. Both I've had for quite  few years.

Thanks for stopping by today.

Sunday, 19 February 2012

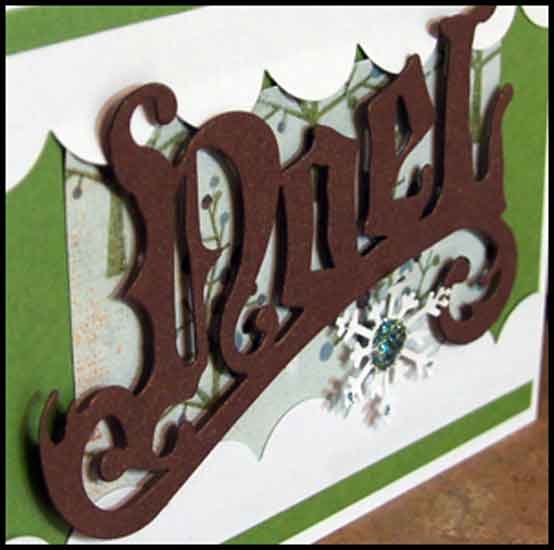
Noel Card

When I first bought the NOEL die by Tim Holtz, I had to try it out as soon as I came home. There was just something about it that made me happy.


Sitting on my stamping area was a piece of heavy bronze Stardream (think pearlized) card stock, so that is what I used for my test cut. Gorgeous. Then, into the pile it went.

The rest of the card was put together using other bits and pieces from that 'scrap' pile, and the pretty green is also pearlized card stock! The scallops were cut with my Cricut.


Another card for my 2012 Christmas Card stash!  Thanks for stopping by today.

Friday, 17 February 2012

Butterfly Journal

While our Craft Sale is long over, I still have some photos of projects that I haven't shared yet. Today's post is a Butterfly Journal.


Most of the journals I made for the sale had a ribbon bookmark attached, with a bead at the end. This one didn't need any other embellishments.


Both the papers and 3-d stickers are by K&Co. The label was cut with my Cricut and embossed with a Sizzix embossing folder before inking. These were 5" square journals, with not-so-nice chipboard covers that were just begging to be altered. I love a nice heavy cover, ha ha.


Thanks for stopping by today!

Thursday, 16 February 2012

Spiral Pop Up Card

I have another masculine card today - early for my Masculine Card Monday, but I just have to share.

Today's card was also inspired by the new interactive dies at Papertrey Ink.  When I saw their die to make this spiral pop up, I immediately thought of my Sizzix die. It is supposed to be used to make 3-D flowers, but it works perfectly for this application too!


I started with a 4-1/4" square card (which fits into a standard A2 envelope). The star is a Sizzix die, and I ran it through the Big Shot with a Swiss Dots embossing folder. The teal strip (which looks blue in the photo) was textured with a SU embossing folder. 

The circle was stamped with teal ink and punched out with a SU 1" circle punch. Then the pretty fabric brad was attached through all the layers. The tiny tag is a Tim Holtz die. I hand wrote 'Happy Birthday' on it and tied it around the brad with orange Bakers Twine.


Now for the fun part ... the inside!


Just look at all those floating stars!   Now this IDEA isn't new at all, but I haven't made one of these in years and years. It was really fun - and I'm so proud of myself to do something other than butterflies or snowflakes. Both of which I immediately think of when I see this type of card.  I am going to have so much fun with this idea -- and want to try cutting the spiral out of clear acetate which would REALLY make the attachments float.


The word is a Gina K stamp (stamped in teal), and the label is a My Favorite Things die. This card is being packed away for our SIL's birthday next month. While it's a little juvenile, I think he will enjoy the cheery colours. And then he will hand it to our Granddaughter who will love playing with it until it's a heap of scraps.  :-)

Thanks for stopping by today!