Showing posts with label Tim Holtz Tag Die. Show all posts

Monday, 2 September 2013

Father's Day Wrap-Up

Good morning Friends and Followers!   Today for Masculine Card Monday, I thought I'd share a few pictures of the Father's Day gifts we gave my Dad.

First up, is this paper gift bag. I have a whole swack of these white gift bags, just waiting to be decorated.  I love adding patterned paper to these and making matching tags.  For Dad's bag (which was filled with candy, chocolates and imported biscuits) I added a canoe print paper.  I cut a Tim Holtz tag out of kraft paper, and attached a strip of leftover print paper down the side. Easy Peasy but still nicely coordinated.


I made an envelope using the Score Pal and another sheet of the patterned paper (Colorbok), and added Sizzix die cut letters to spell DAD.


Inside the envelope was some $$ for him to treat himself, and it was all packaged up as well.  The PTI panel was die cut then embossed. I use this die a fair bit - I love how it can hold a gift card, or the PTI gift card envy ... the curved slots cut with the A2 sized die.


In this case, I chose to make a gift card holder to put the $$ in, die cutting it out of kraft and layering another piece of canoe print paper to the front. Also a Tim Holtz bookplate for a fun touch.


Thanks for stopping by today!

Saturday, 17 November 2012

Snowflake and Gingerbread Man Tags

Can you tell how much I liked making these punched snowflake tags?  Here are another two - and then I promise to move onto something else.  These were made the same as Wednesday and Thursday's tags.  The exception is the one on the right - I messed up stamping on the tag and used a piece of gingerbread man/ heart print patterned paper to cover the mistake.


 The gingerbread man was stamped and die cut (Stampin' Up) from white card stock then attached to a leftover small scalloped red tag.


I stamped Happy Christmas  (Stampin' Up) in red on a scrap strip of white card stock, notched the ends with scissors, and attached it to the tag with foam tape in the center. The edges were glued down to the tag so the banner has a bit of a curve.  The heart was punched out using the Stampin' Up heart trio punch (the smallest heart).

On the other gingerbread man, I attached 3 flat red 'beads' to his belly.


Thanks for stopping by today!

Friday, 16 November 2012

Snowflake and Tree Tags

These tags were made the same as the ones yesterday, although I used a tree stamp & die set (Stampin' Up) for the decoration.


The trees were stamped with a green rainbow ink pad and I added some festive colour to the dots with pencils. I like them OK - but I prefer the penguin tags from yesterday so I only made two of these tree ones.


The To/From (MFT) was stamped on scrap white card stock, then punched out with a Stampin' Up label punch. The label was attached to the red card with two sided tape.

Thanks for stopping by today!


Thursday, 15 November 2012

Snowflake and Penguin Tags

I always like it when I can use my Tim Holtz tag die, and I got a new stamp set that I ADORE. So you can imagine how happy these tags make me.  :-)


I can't take credit for the original idea, I saw similar tags online and since I had a great snowflake punch I knew I could adapt the idea. Each tag is made of two base layers - a white one and a red one and they are held together with red twine and bakers twine.


 I punched the snowflake (Martha Stewart) out of the white tag, then placed a gem in the center on the red backing tag.  'No Peeking' (MFT) was stamped at the bottom edge in red.


 The penguins were stamped twice onto scrap white card stock - once in black and once in red. The black penguin was fussy cut, as was the red hat and scarf. Then they were attached together with Stampin' Up Dimensionals. I've mentioned before how much I love these - they give height without giving too much height. Love 'em.


Finally, I stamped the To/From label (Fiskars) onto scrap white card stock with red ink, cut them out and attached them to the red tag.

These were fun to make and they just make me happy - they could easily be my favourite tags so far!

Thanks for stopping by today.

Wednesday, 24 October 2012

Cheerful Gift Tags

I've had these chipboard stickers in my stash for a couple of years, and now I've used up the package to make these cute 'girlie' gift tags for the holidays. Yeah!


This first tag uses the Tim Holtz tag die as the card base, and a Stampin' Up label die for the white layer. The tag was cut out of patterned paper and backed with white card stock.


The To/From stamp is from MFT.


Stampin' Up label dies were used for these next two tags as well - again, backed with white card stock and the To/From was stamped on the back side.


This final tag is my favourite - I added a snowflake from my stash (I have a whole little box of punched and die cut snowflakes leftover from other projects). I think it will be a perfect tag for Olivia's Christmas gift!


Thanks for stopping by today!

Monday, 22 October 2012

Deer Christmas Tag

I have a quick Christmas tag to share today:


Everything was in my "Odds & Sods" pile, including the scalloped edge and ribbon scraps. The three glittered stickers were in the K&Co sticker package that I used on those rosette tags I posted last week.


I cut two Tim Holtz tags, one from the blue patterned card stock and one from white. They were attached together and then the bottom was trimmed off to accommodate the scalloped edge.  MFT's To/From were stamped on the back of the tag and it was done!


I didn't work on too many challenge cards this week, and next week looks like it could be another 'tag week' too.  There will be no shortage of Christmas Gift Tags at our house this year - and I will have a bunch to give as gifts as well. 

Thanks for stopping by today.


Sunday, 21 October 2012

Snowy Christmas Tags

I have a couple of more tags to share today - these ones are larger tags, made with the Tim Holtz Tag Die as the base.


I got the embellishments from a K&Co package, added some pale blue and pearlized card stock, embossed panels and a few other goodies from my stash.


While I like the tied ribbon at the top, there was really no way to attach the tag to the gift. So I tied a white string around the bottom knot at the back. The tag can still be tied to a gift bag or taped to a gift, but you can't see the string once it's hanging. 


The To/From label is stamped using a Fiskars stamp.


Both tags were made with two layers, so they are nice and sturdy.

Thanks for stopping by today!


Monday, 20 August 2012

Masculine Gift Wrapping Ideas

I mentioned that my Mom celebrated her 80th Birthday this month, but what I didn't say was that my Dad turned 84 the day before Mom turned 80. So the Birthday Party at our house was for him too! (If you want to see the card I made for him, click HERE).

What do you give a man who has everything?  Well, everything except an income?  We give cash and some favourite candies. That way he has $$ he can use for anything he wants (usually lunch or dinner out) and sweets for whenever he wants.  All the food bases were covered, ha ha.


I pulled out a couple of sheets of patterned paper from my stash - I've had these for YEARS! First I cut a seed-packet envelope (Papertrey Ink die)  to tuck the $$ into.  It needed something on the front, so out came my Tim Holtz ATC die.

I know, I know. I'm perfectly capable of cutting a 2.5 x 3.5" rectangle and rounding the corners and why-on-earth would I purchase a die that does that???  Well I will tell you how I justify almost every single Sizzix type die purchase.  'Because It Can Cut Through Chipboard!!'.  Am I going to make ATC's out of chipboard? Probably not very often - but THAT is not the question. I CAN, so therefore I bought the die.  :-)   And I use it a fair bit -- and one of these days I will make a chipboard one just to say I did.

Anyhow, I cut the ATC from white card stock, stamped it with that fun balloon/cloud/gift stamp (Michaels $1.50 bin) with a Papertrey Ink Surprise Inside stamp over the cloud and popped it up with foam tape. 


I cut a small bag (Tim Holtz die) out of the same paper. This die purchase didn't need to be justified -- I love it and know I will get a lot of use out of it. When I popped the envelope inside though, it kind of disappeared ... and since I wasn't tying the bag onto a larger gift I had to add something to make it 'stick out' of the top of the bag.


A punched oval and stars did the trick, along with the PTI stamp ... 'PULL HERE'.  I decorated the front of the bag with a Tim Holtz bookplate, which cut when I cut the tag for the large box of treats. You can see that tag (stamped and water coloured) in the top photo.


Finally, I added some different candies into an opaque gable box, wrapped it with a strip of the same patterned paper, hand cut a tag and stamped it with the same birthday image. A little water colour on the tags and I was done.


He enjoyed his gifts, I enjoyed wrapping them -- it was win win!  We didn't ask him to open his treats at the party though or he wouldn't have had any to take home with him!

Thanks for stopping by today.


Tuesday, 31 July 2012

You Matter Challenge Card

I'm supposed to be vacuuming. And ironing. Or doing any of the other things on my large to-do list.

I took Jasper to Doggie Daycare this morning, so I could get these badly needed chores done without a 'helpful' Sheltie.

I came home and went down to my studio.  :-) 

I haven't had time to play in far too long, so today I wanted to participate in the Dynamic Duos challenge.  The card I made is for Sue's August first, so SUE - DO NOT LOOK ANY FURTHER AT THIS POST. 


Sorry for the greenish tinge on the photos. I saw a card in the recent Stamp-It magazine, which totally inspired me to work with the Dynamic Duo colours.  I equate the Stampin' Up's Crumb Cake with Kraft card stock, and  you know how I love to use Kraft card stock!


I used the Stampin' Up's Pennant punch, along with Kraft, chocolate brown and cream (the neutral) card stocks. The brown and tan patterned paper is by Prima.


The flowers were cut from the same colours, then stitched together with cream satin ribbon (Papertrey Ink) and a brown button (also PTI).  The dotted line stamp is by Impress.


I added a brown ribbon to the tag, as well as the circle reinforcement from the Tim Holtz Tag die. This Kraft tag was hand cut though, and is not a die cut. The card is 5 x 7" and has a lovely deckle edged envelope to go with it.


Finally, a peek at the inside. I did add copper metallic bits to the (Tim Holtz) bookplate which doesn't qualify for the DD challenge ... but I figure it doesn't matter if there are additional colours inside the card.  The stamp is from the bargain bins at Michaels and I really like using it. This time, I inked the words separately and stamped them on different pieces to add interest.

Now, I guess I have put it off long enough. I should go vacuum. OR ... I could walk Cooper and Brandi in the sunshine. Hahaha - guess it's just not the vacuum's lucky day.

Thanks for stopping by.


Friday, 6 July 2012

Accordian Folded Tag

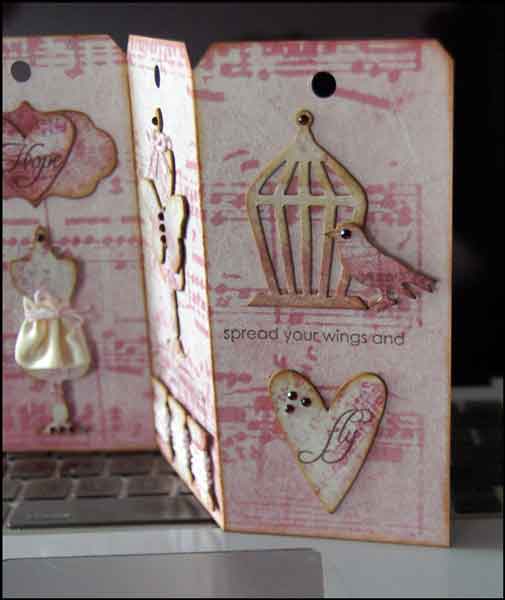
Today I have a 'Fancy Card Friday' post, showing the accordian fold tag I made for Sue for our June First mailing to each other. I used the Tim Holtz tag die, and the pink patterned paper & ink is also by Mr. Tim.

Warning, this is a photo heavy post!


I cut a separate tag for the front, trimmed it slightly smaller, then used the Papertrey Ink slider die to form a sliding track for the butterfly. All the remaining dies are also by Tim Holtz. I added some stamped words too, and inked the edges of the dies..


I used my Papertrey ink envelope die (which is the perfect size for an ATC!) and stamped an ATC to go with the tag.


Thanks for stopping by today.

Wednesday, 25 April 2012

Baby Gift Bags

I decided to decorate a white gift bag to add our gifts for our daughter's baby shower. I got the bag/bow/tag finished, and when I went to put the gifts in ... it didn't all fit!!  So I had to make a 2nd gift bag, bow and tag.  :-)   I used a paper stack by DCWV as I love the little bit of sparkle on the papers.


Isn't this paper bow cute? I loved the die (PTI) as soon as I saw it on their pre-release, and I am so happy with it. I've used it a couple of times and every time I'm pleased with the results.  The tags were decorated with images cut out of the background paper, and I used orange/white bakers twine as well.


The tags were cut using the Tim Holtz tag die - it is such a great size for decorating.  The labels were cut with a MFT label die, and the little birds were punched out of the paper with a SU 3/4" circle punch.


It's a photo heavy post today for sure!  Thanks for stopping by.