Wednesday, 31 October 2012

Happy Halloween!

I made this card for the Dynamic Duo challenge earlier this month, but never did get it uploaded. I thought today would be a good day to finally share it!


The CUTE Halloween  3-d stickers from K&Co that I bought last year are hiding really well in my studio - I don't know if they are ever going to turn up again. Sheesh. So instead, I chose to use one of my not-so-cute stickers, but still kept it Clean And Simple.


Happy Halloween, and thanks for stopping by today!


Tuesday, 30 October 2012

Halloween Cards

I made Olivia and Ethan these fun Halloween cards:


I never did find all my CUTE Halloween stickers, so I used Hallmark Card Studio and my Very Old Windows Laptop to print off the panels, printing the animal images twice.


One dog image was backed with card stock, then fussy cut to pop up on the original panel. I added Glossy Accents on the nose and eyes to give the dog some character, and shading with pencils.


The Crocodile one is for Ethan, and was done the same way:


I used Stampin' Up's Tangerine Tango for the card bases - I love that shade of orange!


The cards were easy enough to do, but they sure weren't quick. They turned out pretty cute though and I was happy to give them to the kids!

Thanks for stopping by today.

Monday, 29 October 2012

Halloween Goodies

Even though our children are grown, I still like to give them (and now the Grandkids) a little Halloween treat:


I used the 'Tags, Bags, Boxes and More' Cricut cartridge to cut the little boxes, then trimmed 1/4" strips of Tangerine Tango to thread through the slits for handles.


A scalloped circle and hand trimmed "eek" tag (SU) was attached to each handle with ribbon, and I wrote their names on the back. I coloured the spider with pencils.


Thanks for stopping by today!


Friday, 26 October 2012

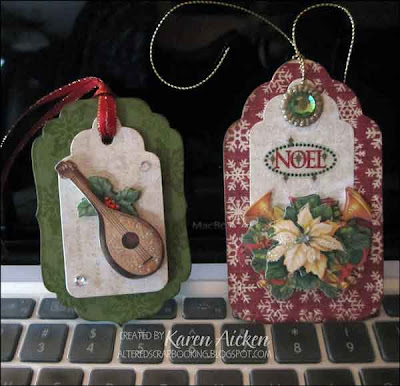
Pretty Gift Tags for Christmas

Finishing off my week of (almost all) Gift Tags, here are two more!


These ones are much smaller than the Tim Holtz tags, but they will still be very useful. The scalloped tags are from a Sizzix die, and the green tag base was cut from a Spellbinders die. Each tag is cut with two layers so they are nice and sturdy.  The embellishments are from a K&Co package.


I have been really enjoying creating these gift tags, and have lots more in the works to share. But first I have to package up the ones I made for Sue for her November 1st mailing, so it will be back to sharing cards for a little while.

On a side note, I had my dentist appointment this week and Anne was THRILLED with her little package:


Thanks for stopping by today!


Thursday, 25 October 2012

Sparkly Christmas Cards

I have a couple of  sparkly Christmas cards to share today. The patterned cards and word strips came from a Christmas Card kit that I found on clearance  a long time ago. I had pretty much used up everything in the kit by the time I made these cards.


I Cricut cut the white labels, but I do not remember which cartridge.  The sparkly embellishments are by K&Co.


The cards are A2 sized and are completely mail friendly.

Thanks for stopping by today.


Wednesday, 24 October 2012

Cheerful Gift Tags

I've had these chipboard stickers in my stash for a couple of years, and now I've used up the package to make these cute 'girlie' gift tags for the holidays. Yeah!


This first tag uses the Tim Holtz tag die as the card base, and a Stampin' Up label die for the white layer. The tag was cut out of patterned paper and backed with white card stock.


The To/From stamp is from MFT.


Stampin' Up label dies were used for these next two tags as well - again, backed with white card stock and the To/From was stamped on the back side.


This final tag is my favourite - I added a snowflake from my stash (I have a whole little box of punched and die cut snowflakes leftover from other projects). I think it will be a perfect tag for Olivia's Christmas gift!


Thanks for stopping by today!

Tuesday, 23 October 2012

Pine Cone Gift Tag

I have friends coming over this morning and I have several tags cut out and ready to assemble while they use my Tim Holtz Rosette die to make some tags and ornaments of their own!

I used a Stampin' Up label die for the base of my Pine Cone Gift Tag cutting two of them ... one white and one kraft. The the kraft layer was embossed with a folder before attaching the white back, and I attached a red punched label folded over the top of the tag as sort of a reinforcement.


The Victorian looking pine-cone element came from a K&Co package, as did the transparent Dec 25 circle. I added a pop dot to it and some Distress Stickles to the pine-cone piece. I like the way it curled a bit when the glitter dried.


As with yesterday's tag, I added a string to the bottom back of the ribbon to allow it to attach to a gift. The To/From was stamped with a Fiskars stamp.


I have started to add my name to my postings. I saved a couple of tag images from the internet to my computer to use for inspiration. Several don't have names on them though, so I can't give the designer or blog proper credit. The ones that have names, will be easier to track down.

Thanks for stopping by today!

Monday, 22 October 2012

Deer Christmas Tag

I have a quick Christmas tag to share today:


Everything was in my "Odds & Sods" pile, including the scalloped edge and ribbon scraps. The three glittered stickers were in the K&Co sticker package that I used on those rosette tags I posted last week.


I cut two Tim Holtz tags, one from the blue patterned card stock and one from white. They were attached together and then the bottom was trimmed off to accommodate the scalloped edge.  MFT's To/From were stamped on the back of the tag and it was done!


I didn't work on too many challenge cards this week, and next week looks like it could be another 'tag week' too.  There will be no shortage of Christmas Gift Tags at our house this year - and I will have a bunch to give as gifts as well. 

Thanks for stopping by today.


Sunday, 21 October 2012

Snowy Christmas Tags

I have a couple of more tags to share today - these ones are larger tags, made with the Tim Holtz Tag Die as the base.


I got the embellishments from a K&Co package, added some pale blue and pearlized card stock, embossed panels and a few other goodies from my stash.


While I like the tied ribbon at the top, there was really no way to attach the tag to the gift. So I tied a white string around the bottom knot at the back. The tag can still be tied to a gift bag or taped to a gift, but you can't see the string once it's hanging. 


The To/From label is stamped using a Fiskars stamp.


Both tags were made with two layers, so they are nice and sturdy.

Thanks for stopping by today!


Saturday, 20 October 2012

Gingerbread Man Tags

I could SEE these cute Gingerbread Man tags in my head, so had to make them up. I stopped myself at making 4, ha ha.


I have had this ginger coloured card stock in my stash for years, and I thought it would work perfectly with the die. I inked the edges of the front as well. Since I like my tags to be really sturdy, I'm doing them in either two layers or adding a punched piece to the back for writing on. On these four tags, I cut the fronts from the ginger card stock and the back from white. The To/From was stamped in red before assembling.


The buttons were stitched right to the gingerbread man tummies with bakers twine. That way I don't have to worry about them popping off if the glue freezes with mailing parcels this winter. Once they were finished, I decided to glitter the white 'icing' with stickles.

I think that similar ones would make ADORABLE tree ornaments - and I have a few ideas floating around in my head for those.

Thanks for stopping by today!

Supplies:
Gingerbread Man die - Sizzix, Tim Holtz
Buttons - Large, Stampin' Up. Small from my stash
Bakers Twine
Ink - Ranger, Tim Holtz Distress and Stampin' Up (red)
To/From stamps - MFT
Ribbons - Creative Packaging, Stampin' Up, Michaels
Ginger Card Stock - custom order many years ago
White card stock - Office Depot


Friday, 19 October 2012

(Warning - long post)  Well THIS is cool!   Melissa at "Oh, Smudge!" nominated me for the Liebster Award!!


Award


ABOUT THE AWARD

This award was designed to be a blog award in the pay it forward fashion. Once you've been nominated, you award it to blogs that you like that have fewer than 200 followers, to encourage new visitors to visit these new blogs.


RULES FOR ACCEPTANCE


Thank the person who gave you the award and link back to their blog. Post the award onto your blog. Give the award to five bloggers who you appreciate that have fewer than 200 followers. Leave a comment on their blog letting them know that you have given them this awesome award!


PAY IT FORWARD

Here are the five wonderful blogs that I'm nominating:


Tracey - In My Creative Opinion

Elma - Elborgi's Stempelwelt

Aimee  - Aimee's Creations

Carolyn  - Kings On Paddington

Jennifer  - Ladybug Designs

Be sure to check out these blogs, if you haven't before.

The interesting thing, is Melissa chose Martha at Martha's Creations  and of course I went to check out her blog. She does AMAZING tags and tag cards! How is that for good timing, considering the tag craze I've been on the past week.  :-)

Speaking of tags:


I made two very similar Christmas gift tags using two foil decorated word panels that were fussy cut from a sheet of K&Co Christmas paper.


I stamped a (Fiskars) To/From stamp twice onto scrap white card stock, cut them out and attached one to the back of each tag.  The red print on the back of the tag is also foiled in areas!


The 2nd tag has a strip of the foiled red print paper across the center, and I used bakers twine and a button instead of red sheer ribbon. The base tag layer was cut using a Stampin' Up die. I am LOVING this die set.


Thursday, 18 October 2012

Gift Tags!

I have a new obsession - making gift tags!

Up until recently, I have put little or no effort into gift tags. Lately though, I have stepped it up a little for wedding and shower gifts ... and I did make some nice large tags for many of our Christmas gifts last year.

Costco usually has a big box of fabulous Christmas tags, and I would look at them thinking I would never put that much effort into making a gift tag.  Some years I even bought the box of tags and used them on our gifts thinking how flippin' CUTE they are, but still not wanting to make any of my own.

I had a bit of a Epiphany last week though - I mean, everyone looks at the gift tag on a gift. Always! It started when I made the gingerbread men cards (see THIS post). I was holding onto one of those patterned paper gingerbread men, thinking they would make really cute ornaments or tags. Something clicked in my brain and ... well ... I made Sue some tags for her November 1st mailing.

Then I made a couple of Christmas tags. And a couple more. And a couple more after that and now I'm hooked! I have more than enough Christmas stickers and embellishments in my stash to make dozens and dozens (and dozens!) of Christmas tags. They can be as layered and as bulky as I want - I can use brads, buttons, ribbon - I'm having a blast!  Of course, I'm making some simple ones too as there is room for all kinds and styles of Christmas tags.


The tags above were made with the (retired) Embosslit die from Stampin' Up I love that the word MERRY is raised.  :-)  I used a scalloped Spellbinders die for the red card stock mat layer, embossing the largest one with the Swiss Dots embossing folder.  To/From is hand written on the back side.

Before I had the Tim Holtz Rosette die, I tried making my own rosette with a scoreboard and some Christmas paper. It turned out larger than I anticipated, so I put it aside. When I finally got the rosette die, I made one and layered onto the large rosette with a sparkly ric-rack trim and a 3-d K&Co sticker.


It made a beautiful, large rosette tag!  I added a punched label on the back with a handwritten 'to/from'.  (Sorry for the blurry picture below - it's SO pretty in real life!)


In addition to giving my fabulous dental hygenist a few Christmas cards, I thought I'd include a couple of Christmas tags as well.


I used the middle size tag from the scalloped tag die (Sizzix), cutting three cream tags for the front and 3 kraft tags for the back.  I scored a line on the kraft tag (see picture below), added adhesive ABOVE the score line and attached the tags together.


The 'to/from' is handwritten inside.  Now I have to find a cute way to package the cards and tags!

Thanks for stopping by today!