Showing posts with label Elegant Edges Cartridge. Show all posts

Friday, 11 October 2013

'Simple Pleasures' Flip-It Card

Good morning friends!

It's Friday, so I have a Flip-It card to share today.  I made this one in the early summer -- when I got this new stamp set I just had to play with it.


The frame was Cricut cut using the 'Elegant Edges' cartridge and I was pleasantly surprised at how easy the flower was to stamp and fussy cut.


I penned the words on the inner circle and stamped a few more flowers & leaves.  It turned out so pretty!


Supplies used:
Stamps & butterfly punch - Stampin' Up
Patterned paper - from my stash
Spellbinder Circle Dies
Stephanie Barnard (Sizzix) Circle Flip-It Die


Thanks for stopping by today.

Thursday, 12 September 2013

Butterfly Shaped Card & ATC Trio

Hello Friends and Followers - fair warning that I have a photo-heavy post today. 

This is what I put in my friend Sue's 'September First' envelope.  (For those that don't know, Sue lives in a city a few hours away from mine and we pop something in the mail to each other on the first of each month).


First up is the ATC trio ... made using a bunch of bits and pieces from my studio. I don't keep track of supplies when doing ATC's.


Next up is the shaped card. It was Cricut cut using the Elegant Edges cartridge. I had SO much fun designing this card using the Cricut Craft Room - it was the first time everything cut exactly as it was supposed to! The card is about 6" across.


The labels are a Sizzix die, words on the front by Hero Arts. Lots of foam tape and glitter glue on this Card!


Here is a peek at the inside:


We agreed to keep things simple, but she has had a very hectic summer and once again I really wanted to send her something special. Next month I'll go back to simple.  :-)


Thanks for stopping by today!

Friday, 8 June 2012

Sue's May First Card

Since I haven't done a "Fancy Card Friday" in awhile, I thought today would be a good day to share the card I sent to Sue for our May first mailing:


It's a large, 6" square card. Since I was tucking it into a magazine for her, I didn't have to worry about the square envelope going through the mail on it's own and that freed me up to decorate it with LAYERS.  In fact, the whole project is full of layers!


I border punched a strip for the bottom of the envelope, and used a 'My Favorite Things' die set for the name label. All papers are by K&Co (who else??).  :-)  A couple of Martha Stewart punched butterflies and the envelope was finished.

The card itself was inspired by one by Kimberley Crawford in a stamping magazine.  I used the Elegant Edges cartridge to Cricut cut the fancy label shape with all three layers.


Once the label was cut and assembled, I used a Spellbinders die to cut the butterfly from the center then popped it up onto the shadow layer with foam tape.  It doesn't show up in the photo, but I outlined inside the label details with my Sakura glitter pen for just a touch of shimmer and shine.

The words (Wordsworth) were stamped with brown ink then punched out with the Modern Label Punch (Stampin' Up). I adhered it inside the cut out butterfly with a Martha Stewart paper banner piece and a tied button. The pretty ribbon is from Stampin' Up - another one of my Clearance Rack deals from last year.


The inside has layers as well. Since the butterfly I cut out of the front was cut with a die 'shadow' that came with a coordinating topper, I attached the shadow inside the card and cut the topper out of a leftover piece of patterned paper from the front of the card and layered the two together.


Attaching the butterflies together just at the center, allows the wings to be lifted for a little dimension.

It was a really fun card to make, and I enjoyed dusting off my neglected Cricut for this one.

Happy Friday, and thanks for stopping by today.

Tuesday, 15 May 2012

Freshly Made Sketch Card #2

Here is my 2nd card for the Freshly Made Sketch #34.


This time I kept the sketch in the same orientation, and used 3 tiny butterflies (SU embosslet) in place of the gems.  The label was Cricut cut with the Elegant Edges cartridge and I used my PTI Smoky Grey ink again. I like it even more than I did with the first card!


This card is 5x7, the creamy yellow card base (and matching envelope) are from Walmart; the 3-d butterfly sticker and all the papers are by K&Co.


I believe the words are by Stampendous. Another sympathy card for my stash. I will have missed posting this on the Freshly Made blog, but still wanted to share the card while it was 'fresh'.

Thanks for stopping by today!

Friday, 11 May 2012

Freshly Made Sketch #34

We were away for a few days (I had my posts scheduled). Even though our home coming flight was really delayed and we didn't get home until 3am (!!!) I managed some time in my studio yesterday.

There is a new sketch at the Freshly Made Sketch blog, and I really wanted to play along. I actually made two cards and will post the 2nd one in a few days.

I rotated the sketch for this first card and kept the sentiment into the top circle.  Here is the sketch, followed by my card.


I really wanted to use some of my new PTI dies, but they didn't work for the sketch. Instead I used their Aqua Mist card stock. I love the soft shade, and thought it would well for a sympathy card. I need to replenish my stash of those, I'm afraid.


Three different embossing folders were used on the panels, and the labels were Cricut cut with the Elegant Edges cartridge. Words by Technique Tuesdays and the 3-d butterfly sticker is by K&Co. The card is 4-1/2" x 6", and a soft grey textured card stock. I was able to mat the panels with white card stock and still keep the soft look I was going for. I used scalloped scissors for the border, and iRock gems as per the sketch.

In my PTI order there was an ink pad - their Smoky Shadow. This was the first time I used it - on the front of the card. I was disappointed it it - it seemed so dark, almost black. The 2nd time I used the ink was to stamp the words inside the card. That is all it took - I LOVE that colour. It is so much softer than black. My new favourite ink colour!  I'm wishing I'd ordered a re-inker too, ha ha.


Happy Friday - thanks for stopping by today.

Saturday, 3 September 2011

Love Birds Card (and hike pictures)

It's been a busy couple of days ... we had overnight guests Thursday night, and Friday morning they went with Gregg up to Sunshine Meadows for a hike. It was quite a cold day, especially in the higher elevations. They got rained on, hailed on, and snowed on.  But they still thought it was GORGEOUS, with all the flowers in the meadows blooming. Here are photos of the three lakes up there ... you can see how high up they were, and the snow on the ground.  (The bottom photo has 2 lakes in it)


I don't have anything new to share, so will share a card I made a few weeks ago.  I found the stamp in the $1.50 bin at Michaels and thought it would make a sweet Anniversary card.

I Cricut cut the mat & shadow using the 'Elegant Edges' cartridge. I hand cut scraps of the green print patterned paper to attach behind the white mat and show through the little vine cut out.

The gems were attached with my iRock, and I tied the patterned paper mat with Stampin' Up's (fabulous) seam binding in Pear Pizzazz.  LOVE that colour.

The birds were coloured with Copic markers, and the matted panel was popped up with foam tape.


That pair of guests left Friday afternoon, and the next group rolled in that night. And they brought our little granddaughter!  :-)   We got to babysit today while they attended a wedding at the Silvertip Golf course.  !! 

Everyone is gone now, but our son just called and they will be coming to visit tomorrow.   I doubt I'll get to post again now until Monday.

Thanks so much for stopping by today.

Monday, 15 August 2011

Baby Rattle Card w/ Gift Bag and Knit Baby Hat

Well I have a photo heavy post for you today! A friend of our daughters had a baby girl last week. J has been friends with H since kindergarten so of course I wanted to celebrate Abigail's arrival with a hand made gift.


I chose a really soft yarn, and knitted (!!) a newborn size beanie. Then I crochet the sweet loopy flower to add and was so pleased with how it turned out.
I found a sparkly pink button in my stash and added that to the flower center for a bit more sparkle.

The down side, is that I have turned into a "knitted hat mad woman". It's just CRAZINESS! I have several hats almost finished for our Christmas craft sale ... just have to figure out how to make some pom poms.  Haven't done those in years either, ha ha. I have also finished 2 hats for our little Granddaughter - who is now 3 months old.  !!

Now the gift needed to be wrapped ... and my last Stampin' Up Clearance Rack order had arrived with these cute little brown/tan glossy card stock gift bags. It was the perfect size for this hat and the pink tissue paper. But it needed to be dressed up a bit ...

Sorry for the bad photo ... it looks like there is a crease in the dotted flap, but it is just a shadow. I was in a big hurry to take the photo before I brought the gift to my daughters.  I used a Sizzix die to cut the flower layers from pink card stock, inked the edges and adhered them all together with foam tape. The Boho Flower punch was also in my Stampin' Up order ... so I used it as well. I have wanted that punch for a long time, so am going to be able to put it to good use.  Here, it is the flower center.


 I added a sweet paper pink rose (Michaels) to the flower center.

Of course I wanted to make a special card ... and chose the rattle from the "Sugar and Spice" Cricut cartridge.

  
I cut the base layer twice, as I knew I wanted to use lots of foam tape on this card. I ran the top base through my Big Shot with a Sizzix plaid embossing folder for a bit of texture. The little duck seemed to need something - so I painted it with Twinkling H20's for some yellow shimmer. When it was dry, I added a tiny pink gem with my iRock tool. 
I wanted a pink card base, so used the "Elegant Edges" cartridge for the scalloped heart panel.A pink satin bow ties it all together.  :-)


Here is a peek at the inside:  I actually ended up outlining the little bird (a leftover piece from the rattle) with a Sakura gel pen and added a sparkle eye after I took this photo.  The stamp is one I have had for years, by PrintWorks.  Oh, and the little 'Welcome' stamp on the front is by Hero Arts.
Just for fun, I ran the envelope through with the same Sizzix plaid embossing folder, and added some punches to the front and back. (Punches by Stampin' Up, as is the 'Sweet One' stamp).


Whew! That's it for today - thanks for stopping by.

Friday, 12 August 2011

Square Thank You card


The challenge this week at the Cricut Cardz Challenge Blog, is:  This week's challenge is "Straight from the Heart"! Make a thank you card using hearts, and any cartridges or colors you’d like, but NO pink or red.

I had several ideas rolling around in my head, but they all involved a PINK or RED heart.  Hmmmmm. Since I'm still on a kraft card stock kick, I decided to go with kraft and blue, rather than kraft and pink.

The card is a 4.25" square card (so it fits into a standard A2 envelope with no additional postage), and the image was Cricut cut using the 'Elegant Edges' cartridge at 3.75".  I cut the top layer from a blue print, the backing layer from kraft, and the shadow from white. I hand cut a small scrap of white to attach behind the heart on the blue printed layer.

The white gems were added with my iRock tool (love that thing), and I popped the image up with foam tape. The words are a favourite Stampin' Up image. When I removed the blue layer from the Cricut cutting mat, there was a perfect little blue print heart leftover. So - I glued it to a white panel inside the card. 


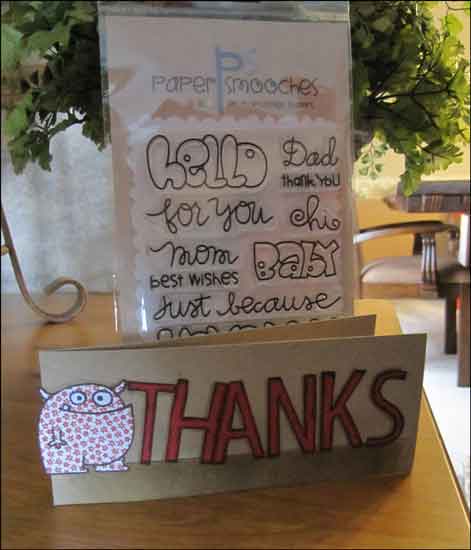
LOOK what was in my mailbox this week!!  New stamps from Paper Smooches ... I won them as Blog Candy on Jenny's "Crafting In The Country" blog. She sent them to me from Britain along with this cute little card.  So fun!!


Thanks for stopping by today!

Saturday, 6 August 2011

Fruity Challenge Card

The challenge this week at the Cricut Cardz Challenge Blog, is "Tuitti Fruitti"! Make a card using fruit, and you may use any cartridges, colors or occasion you'd like."   Also, there is a new sketch at the Clean And Simple Stamping Blog ... so I was able to combine the challenges for this card by taking artistic license.  ;-)


I used my new Stampin' Up stamp set (Pursuit of Happiness) - and it says "Everything will be OK in the end ... if it isn't OK, it isn't the end".  

The  Elegant Edges cartridge was used for the citrus piece in behind.  Patterned paper is all by K&Co.  A real CAS card ... and I think I will play more with this sketch.  I have other ideas and there are great cards on the blog from other participants. 

Anyhow, this is as 'fruity' as I get these days.  :-)  Sorry the pictures are so skewed again. I was trying to take them outside and outrace the wind that kept blowing the card over. 


Thanks for stopping by today!