Friday, 28 February 2014

Butterfly and Flowers Flip-It Birthday Card

Good morning friends!

It's Flip-It Friday here on my blog ...


I was happy to see how nicely the butterfly from the Pop it Ups Butterfly Pivot fit on the Majestic Flip-It die. It's nice and dimensional, but still lightweight. It will be going into my donation box for Seniors Secret Service.


I like to add a punched label inside my Flip-It cards, so they will have a place to add a signature - but it's hidden from view when the card is closed.


I thought I would also share the packaging I did when I brought my Dental Hygenist her gift of Flip-It Cards.   I put them in a cellophane envelope, and used the 'Get a Handle On It' die to make the little handle and ribbon. I used paper from from the same paper stack as the cards so it all coordinated, and Anne just LOVED them.


Supplies used
Majestic Flip-It die - Stephanie Barnard (Sizzix)
Majestic 2 Framelits - Stephanie Barnard (Sizzix)
Patterned paper - Dovecraft
White card stock
Birthday words - Just Rite
Label punch - Stampin' Up
Butterfly (body, lacy overlay, base layer) - 767 Butterfly Pivot Pop it Ups, Karen Burniston (Elizabeth Craft Designs) 
Get a Handle On It Die - Papertrey Ink


Thanks for stopping by today!

Thursday, 27 February 2014

Ducky It's a Boy card

Good morning friends!

I have a baby boy card to share today - one of several I made using a 12 x 12" scrapbook kit by Echo Park. I was going for rather nontraditional colours for these cards, and I think they turned out pretty cute.


This card is 4-1/2 x 6" and I used one of the journal cards from the kit for the front. I added the hand lettering and a stamped & fussy cut baby duck.


The inside was trimmed slightly smaller and cut with the Lucy Label Pop it Up die.  I tied it blue seam binding around the top edge before I attached the inside to the backing card, and a strip of light patterned paper as an area to add a note and signature.


You can chose whether or not to use the extra bump at the top of the pop up and for this one I wanted to use it. All the label layers come with the Lucy Label Pop it Ups, and I added a 'sweet boy' sticker to the smaller one.


Congratulations was stamped on one of the smaller labels and popped up on the larger one with foam tape. To get the Lucy Label a different colour & pattern than the background paper, I ran it through again with a smaller piece of the blue striped paper. Trim away the excess bits and it fits perfectly on the pop up.


Supplies used:
Lucy Label Pop Up - 779 Pop it Ups, Karen Burniston (Elizabeth Craft Designs)
Patterned paper, stickers and journal card - "All About A Boy" (Echo Park)
Seam binding - Really Reasonable Ribbon
Black brad (on duck, for eye)
Duck stamp - unknown


Thanks for stopping by today!


Wednesday, 26 February 2014

Snow Dog Thank You Card

Good morning friends!

It seems that every time we went to Arizona for a holiday, Calgary got hit with brutal cold and lots of snow. Every single time since October.  Good for us, but not so nice for our neighbor who has diligently shoveled our sidewalk when we were away. Every single time.

I wanted to do something nice for them, even though they insisted they didn't mind at all. So I made a snowy card and included a Tim Hortons Gift card.


The front was kept simple, letting that pretty snowflake paper take center stage. I added a large punched snowflake and a Glitter Dot. You know I love those Glitter Dots!


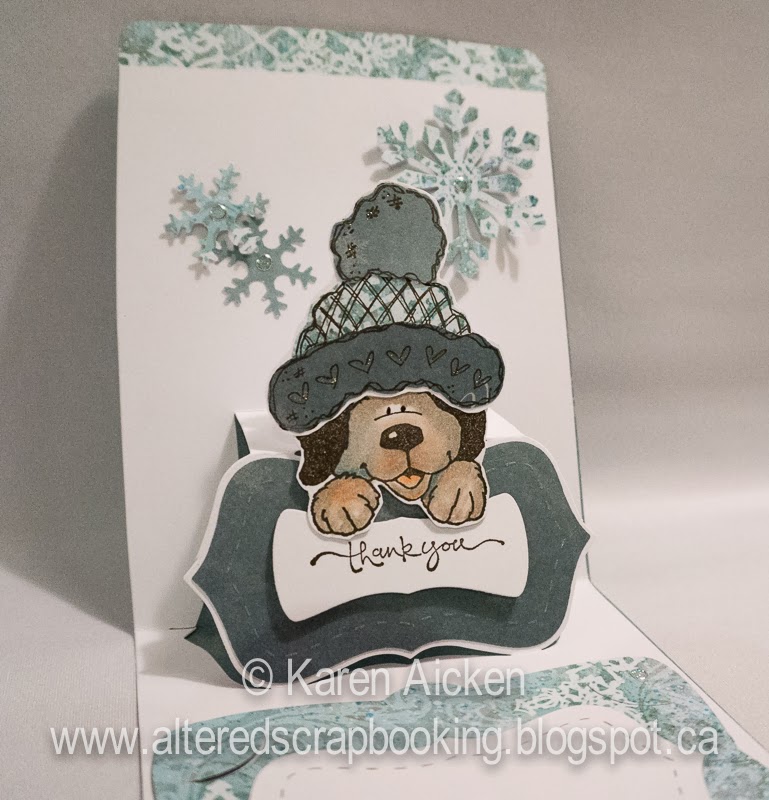
Here is a peek at the inside - they are dog lovers too so I grabbed a winter hat stamp and one of my (many) dog images.  The card was made with the A2 Pop 'n Cut base with the Sassy Label insert.


The gift card holder was cut from the same paper as the front of the card and attached inside, and I used the coordinating Framelits to decorate it and the Sassy Label.


Haha - this dog image is one I've had for several years but this is the first time I have him wearing a winter hat.  :-)  The hat was stamped on three different patterned paper scraps and paper pieced. The dog itself was stamped and coloured with pencil crayons blended with mineral spirits.  I added a few more punched snowflakes ... and ... Glitter Dots.


Oh, and I coloured the hearts on the hat with my Sakura Stardust pen for a little more shimmer.


They liked their card so much, they ordered 10 Pop Up Thank You Gift Card Holders for them to give out in their office!

Supplies used:
A2 Pop 'n Cut base with Sassy Label insert - Karen Burniston (Sizzix)
Framelits - Sassy Labels and Stitched Frames - Karen Burniston (Sizzix)
Gift Card Holder - Karen Burniston (Sizzix)
Patterned Paper - K & Co
White card stock
Large snowflake punch - Martha Stewart
Small snowflake punc
Glitter dots - 7018, Elizabeth Craft Designs
Winter Hat - Stamps by Judith
Thank you stamp - Stampin' Up
Dog face -unknown

Thanks for stopping by today.
 

Tuesday, 25 February 2014

Bright & Cheery 50th Birthday Card

Good morning friends...

I am still so VERY excited to be one of the design team members for Elizabeth Craft Designs! I am looking forward to using more and more of their wonderful products, sharing them here and on the Elizabeth Craft Design Blog. We are in the process of getting the dates worked out for the DT to start posting there and I will let you know when they are ready to start.

I'm already ADDICTED to the ECD Glitter Dots, and I used quite a few of them to make this card for a special friend.


Because we were bringing the card to the birthday party, I was able to make it a full 6" square and add a bulky grosgrain ribbon bow to the front.  The papers and letter stickers were in the same 12 x 12" scrapbook kit by October Afternoon.  I added turquoise Glitter Dots to the die cut label.


The inside top & bottom edges were with the Agatha Edge die, and I added the scrolls from the same die set as the edges. Then I added lots of those pretty turquoise Glitter Dots on both scrolls.


This was my first time to use these candle dies and I have to say I LOVE them. I think they will make great cards for Seniors Secret Service too.


The little yellow felt flower was leftover from a different project and sitting in my 'Odds & Sods' pile. 


The card size was 5-1/2 x 6", and it fit into one of my lovely square envelopes. I added hand lettering on the envelope and brought it to the birthday party.

Supplies used:
Lots of Pops, 778 Pop it Ups - Karen Burniston (Elizabeth Craft Designs)
Candle Die, 732 Candles Die set, Elizabeth Craft Designs
Turquoise Glitter Dots, 7018 Elizabeth Craft Design
Agatha Edges - 782 Pop it Ups - Karen Burniston (Elizabeth Craft Designs)
Patterned paper & stickers - Farm Girl, October Afternoon
Ribbon - Stampin' Up
Felt flower - stash
Ovals (including stitched edge) - Oval Accordion, 772 Pop it Ups - Karen Burniston (Elizabeth Craft Designs)
Label - Karen Burniston - Sizzix
Ovals and stitched edge dies - Oval Accordion, Pop it Ups - Karen Burniston (Elizabeth Craft Designs)
Felt flower - my stash
Ribbon - Stampin' Up
Label die - Karen Burniston (Sizzix)
'5' and '0' dies - Sizzix
Word stamps - Papertrey Ink

Thanks for stopping by today.

Monday, 24 February 2014

Camera Birthday Card

Good morning friends!  I have a Pop 'n Cut Birthday card to share today for Masculine Card Monday here on my blog.


I made this for our Son-In-Law, who is a photographer and celebrated his birthday this month. I found the 3-d Camera sticker and knew exactly what I wanted to do with it!


This is another card I made back in November, with dies from Karen Burniston's older 'Snippets' collection and this wonderful chalkboard print paper. The cool chevron border die was one of the dies in the collection as well. 


I cut the inside using the Square Pop 'n Cut base with ornate edge, then trimmed it a little smaller to fit inside the folded card.  Since we were hand delivering the card, I didn't have to worry about extra postage for a 6" square envelope.  Some hand lettering and I was done!

I updated my blog sidebar yesterday, with the Elizabeth Craft Designs Design Team's crafty blogs, and you will notice there is some overlap with the Karen Burniston Designer Challenge team. It's fun to see some familiar faces there. Looking forward to March, when we will begin posting projects on the Elizabeth Craft Designs blog!

Supplies used:
Patterned paper - We R Memory Keepers
Square Pop 'n Cut base with Sassy Label Insert - Karen Burniston (Sizzix)
Camera 3-d sticker - K & Co
Chevron Border die - Karen Burniston (Sizzix)

Thanks for stopping by today!


Sunday, 23 February 2014

New Design Team at Elizabeth Craft Designs

Woo Hoo - this is a VERY exciting day. They have announced the FIRST EVER Design Team at Elizabeth Craft Designs, and I'm one of the lucky ladies on the team.  Check out this post on the ECD Blog to meet the talented ladies I'll be working with.

Double High Katie Label Pivot Card

Good morning friends!

I loved making this card - I used the Double High technique that Karen Burniston shared on THIS blog post at the Elizabeth Craft Designs Blog. I couldn't wait to try it out. I mean, a 5x7" card? More Pivot area to decorate? Using the same Katie Label Pivot die and Big Shot that I already own? What's not to love!


I used a beautiful printed and textured card stock from my stash, with a deckle edge. As per Karen's instructions, I cut it to 10" wide and 7" tall and scored the 10" side at 5" to give me a folded 5 x 7" card. Then I scored the 7" side at the 3" mark and folded that down to the back. I lined up the Katie Label Pivot as instructed and ran it through the Big Shot. Unfold, push the pivots as you fold the card closed and ... ta dah.


Even though this was a fairly heavy weight card stock, the Katie Label Pivot die had no trouble cutting through both layers with one pass. I've said before I'm becoming more and more a fan of Elizabeth Craft Design Peel-Offs so I used one to decorate the front pivot.

I pressed the Peel-Off onto 90# water colour paper and coloured the image with Tombow Markers, a plastic palette and a wet brush.  I also added my favourite dots stamp around the image in a light blue.  Once my colouring & stamping was done, I cut it out with one of the circle decorator dies that come with the Circle Accordion die set.  The charcoal mat was also cut with one of those dies. Then I die cut out another two identical circles and the 'Happy Birthday' to assemble on the 2nd pivot.  Below you can see the designs, that pivot to the inside when the card is opened:


I cut two strips (which I will cut wider the next time I make this card to better hide the fold lines) with the Agatha Edge die, attached them on either side of the inside edges, then added a pretty border Peel-Off sticker.   I also added a couple of Agatha Edge scrolls, cut from a textured cream card stock. I wanted to bring some of the colour from the tulip pivot onto the Happy Birthday one, so I added a bright orange Glitter Dot above the 'i' in birthday. Then I stamped it with the dots stamp in blue ink.


Finally, a view from the top and the back. I added die cut circles to the backs of the pivots, to hide those fold lines but didn't decorate them since they are on the back of the card. You sure COULD though, if you had a theme going you wanted to carry right through the card.


I will be doing this again for sure. For SURE!  I am going to try folding down 2-1/2" instead of 3" the next time, and I'd like to try it with a square card as well.  Sometimes you just want a bigger card, and you know I like my cards to be mail friendly. This will mail in a regular envelope for a single stamp.

Supplies used:
768 Katie Label Pivot - Pop it Ups, Karen Burniston (Elizabeth Craft Designs)
Patterned card stock - Club Scrap
Cream textured card stock - Club Scrap
770 Circle Accordion (Circle layers) - Pop it Ups, Karen Burniston (Elizabeth Craft Designs)
782 Agatha Edges - Pop it Ups, Karen Burniston (Elizabeth Craft Designs)
Tulip Peel-Off - 0356, Elizabeth Craft Designs
Orange Glitter Dog - 7018, Elizabeth Craft Designs
Tombow markers
Water colour paper
Dot stamp - Stamps by Judith
Happy Birthday Die - 783, Elizabeth Craft Designs
Border Peel-Off, 1063, Elizabeth Craft Designs

Thanks for stopping by today!

Saturday, 22 February 2014

Trouble is ...

Good morning friends!

I did a little shopping at Paper Pastimes while I was waiting for the ladies to arrive for my Pop it Ups demo this week. Ha - that's what happens when you are a keener and arrive waaaaay early.  Carole had a nice selection of the Funnybones stamps, so I went a little wild. Yes I did.  I had to use this one right away, and paired it with some Tiddly Inks stamps and of course - a Pop it Ups die.  Below is the card front - I typically keep the fronts of my pop up cards fairly simple, since all the WOW is on the inside.


Here is the inside ... that little dog tied to the balloons is SO cute.  I thought it paired perfectly with the sentiment, which reads:  "The trouble with trouble is, it starts out as fun." How true is THAT?


Once again I used the foliage from the All Seasons Tree die set as clouds, adding them to the Lucy Label Pop Up. I swiped the embossed clouds with white ink to make them stand out a bit more.


The dog was stamped on 90# water colour paper, coloured with Tombow Markers and a blending pen, then fussy cut. After I took this picture, I ended up pulling the dog off the card and using a craft knife to cut in between the balloons, then re-attaching it.  I stamped the words then cut them out with a label from the Fancy Label Accordion set. I love how all the dies in the collection work together. The little banners on either side are from the Lots of Pops die set.


Here is a look at the dies I used for this fun card ...


Supplies used:
779 Lucy Label Pop Up, Pop it Ups - Karen Burniston (Elizabeth Craft Designs)
781 All Seasons Tree (Clouds), Pop it Ups - Karen Burniston (Elizabeth Craft Designs)
771 Fancy Label Accordion (Label), Pop it Ups - Karen Burniston (Elizabeth Craft Designs)
778 Lots of Pops Pop Up (Banner), Pop it Ups - Karen Burniston (Elizabeth Craft Designs)
Cloud embossing folder - Darice
Dog/balloon stamp and balloon stamp - Tiddly Inks
Word stamp - Funnybones
Card stock - Papertrey Ink
White pigment ink - Colorbox

Thanks for stopping by today!