Showing posts with label Peel-Off's. Show all posts

Saturday, 31 December 2016

Happy New Year Pivot Card

Good morning friends

When I was putting away the Christmas embellishments, I found a package of New Years stickers! I made yesterday's card with them but wanted to use the rest of the sheet and not store them for another year.  This is what I came up with:


Remember to follow me on my new blog - Painted Mountain Cards starting tomorrow January 1 2017. I'd love to see you there!

Happy New Year, everyone

Supplies:
White card stock
Katie Label Pivot, Pop it Ups - Karen Burniston (Elizabeth Craft Designs)
Silver metallic card stock
Stickers - Jolee's Boutique
7051 Glitter Border Peel-Off - Elizabeth Craft Designs
Gel Pens - Sakura
Glitter Dots - Elizabeth Craft Designs
Gold metallic card stock

Card size - standard A2

Thanks for stopping by today

Tuesday, 27 December 2016

Holiday Cards - From Bits & Pieces

Good morning friends

***NOTE:  I will be moving my cards and paper crafting to Painted Mountain Cards in the New Year. I will leave this blog open, as there are frequent hits from Pinterest and over 5 years worth of cards etc to reference.

The name of the game has been to USE THINGS UP as I worked on our Christmas cards this year. I had several pieces die cut and ready to mount onto card bases, so I combined those pieces with some stickers etc from my stash and made these three cards. I still have some Christmas cards to share this week, then I promise you I'll be onto something different.

This first one has a super sparkly card base - I keep forgetting I have these, and they are perfect for holiday cards. The tree is a glittered foam tree sticker from my stash.


I had two panels cut for these next two cards, but that was before I had stitched rectangle dies (which I love, by the way). I re-cut the panels with a Blueprints stitched rectangle then mounted them to the dark red card bases.


The vintage red snowflake paper was too pretty to throw away anything but the tiniest scraps. I used a couple of the smaller leftover pieces for these two cards as well as 3-d snowflake stickers from my stash.


This week I've had all my blog posts scheduled so I can spend time with friends and family.

Supplies:
Folded cards - DCWV
Blueprints #1
Blueprints #???  with bracket
Snowflake stickers - K & Co
Tree stickers - Michaels
Clear double sided adhesive, 1/8" width - Elizabeth Craft Designs
Stamps - Verve
Glitter Dots - Elizabeth Craft Designs
Cream card stock
Scalloped scissors
Bakers Twine

Card sizes - A2

Thanks for stopping by today


Wednesday, 14 December 2016

Birch Trees and Deer Christmas Pop-Up Card

Good morning friends

Today's share is another Christmas card using a Pop 'n Cut card base I cut a couple of years ago.


I added a glitter Peel-Off border to the front, and there is additional sparkle and shine right on the patterned paper.


Inside I added a brown die-cut deer to the Pop-Up portion, but no other decorations as I loved the tree printed paper and wanted it to take centre stage.


***NOTE:  I will be moving my cards and paper crafting to Painted Mountain Cards in the New Year. I've been toying around with the idea for a long while, and this seems like a good time to make the change. I will leave this blog open, as there are frequent hits from Pinterest and over 5 years worth of cards etc to reference

Supplies:
Patterned paper - Stash
Pop 'n Cut A2 base with Wavy Label Insert - Karen Burniston (Sizzix)
7010 Glitter Lines - Elizabeth Craft Designs
White card stock
Deer - Tim Holtz (Sizzix)
Stitched Ovals - My Favorite Things
Words - Papertrey Ink
Wavy Label Framelits - Karen Burniston (Sizzix)

Card size - A2

Thanks for stopping by today

Tuesday, 13 December 2016

Pop-Up Christmas Card Duo with Tags on the Front

Good morning friends

I have two nearly identical cards to share today. They were made from the same paper stack and have very similar insides. The only real difference is the tags on the front of each card are different - but also from the same paper stack. I added some Gold Peel-Off border stickers for some holiday sparkle as the patterned paper has gold foiled bits in it.


Inside I used the Anita Frames Pop-Up by Karen Burniston for Elizabeth Craft Designs - this Pop-Up makes a really WOW card.

I used a gold ornament Peel-Off on Silk Microfine Glitter then added colour with Copic Markers. The ornament embellishment is so sparkly and pretty! Then I stamped one of Karen Burniston's new Holiday stamps on the other side.


The Ring Frame Edges work as gold banners across the side edges, and I added gold Peel-Off borders as well.


***NOTE:  I will be moving my cards and paper crafting to Painted Mountain Cards in the New Year. I've been toying around with the idea for a long while, and this seems like a good time to make the change. I will leave this blog open, as there are frequent hits from Pinterest and over 5 years worth of cards etc to reference

Supplies:
Anita Frames Pop-Up, Pop it Ups - Karen Burniston (Elizabeth Craft Designs)
Clear Double Sided Adhesive, 1/4" and 2-1/2" widths - Elizabeth Craft Designs
0439 Christmas Ornament Peel-Off - Elizabeth Craft Designs
Copic markers
Holiday Clear Stamps, Pop it Ups - Karen Burniston (Elizabeth Craft Designs)
White card stock
1167 Peel Off Borders - Elizabeth Craft Designs
1241 Peel Off Borders - Elizabeth Craft Designs
Ring Edges, Pop it Ups - Karen Burniston (Elizabeth Craft Designs)
Red ribbon
Bakers Twine
Gold foil card stock - Stampin' Up

Card size - 5 x 6"

Thanks for stopping by today

Monday, 12 December 2016

Karen Burniston's December 2016 Designer Challenge

Good morning friends

It's time for the Designer Challenge, and here is Karen B's challenge to the team:
 "All I want for Christmas" - use your all-time favourite Pop it Ups die (the one you would want for Christmas if you didn't already own it) for a holiday card."


If you follow my blog, you know that my favourite Pop it Ups die is the Spiral Circle Pull Card, followed closely by the Lorna Label Pop-Up. But for this challenge, I decided to use the die that I would want for Christmas if I didn't already have it ... the Sleigh Gift Card Pop-Up. This is SUCH a versatile die, and completely generic if you don't use the sleigh. The sleigh makes great tags and card embellishments as well as fitting perfectly on the Pop-Up if you want to make a winter themed Gift Card Holder

This is the front of my card, using patterned papers and stickers/sticker borders as well as a pink sheer ribbon.


Inside you can see that I added a snowman to the pop-up that the sleigh would normally be adhered to, and a pail full of snowballs to the optional angled pop-up bump.


Below is a side view showing the gift card in the slot/notches that cut with the die.


The snowman was made with different sized circles (see the supply list below), the top hat from the Steam Punk Charms, and Chilly the Penguin's scarf. The snowman's nose is the little piece from the Wedding Charms that would give the groom a white 'shirt'.  The gold Holly on his hat was trimmed from a gold sparkle Peel-Off border, with red Glitter Dots for berries.


The Pail is from the Palm Tree and Pail, as well as the included coconuts to create a pail full of snowballs. So fun! A sprinkling of gold Peel-Off snowflakes was added inside the card for some holiday shine.


I love the 'A Gift For You' from the Gift Card Accordion, so used it here as well as the stitched label from the Lorna Label Pop-Up.


When the gift card is removed, the recipient also has a cute Pop-Up card to display.


***NOTE:  I will be moving my cards and paper crafting to Painted Mountain Cards in the New Year. I've been toying around with the idea for a long while, and this seems like a good time to make the change. I will leave this blog open, as there are frequent hits from Pinterest and over 5 years worth of cards etc to reference.


Supplies:

Sleigh Gift Card Pop-Up, Pop it Ups - Karen Burniston (Elizabeth Craft Designs)
Lorna Label Pop-Up (Label), Pop it Ups - Karen Burniston (Elizabeth Craft Designs)
Palm Tree and Pail, , Pop it Ups - Karen Burniston (Elizabeth Craft Designs)
Gift Card Accordion (A Gift For You), Pop it Ups - Karen Burniston (Elizabeth Craft Designs)
Steam Punk Charms (Hat), Pop it Ups - Karen Burniston (Elizabeth Craft Designs)
Wedding Charms (Men's shirt), Pop it Ups - Karen Burniston (Elizabeth Craft Designs)
Chilly the Penguin (Scarf), Pop it Ups - Karen Burniston (Elizabeth Craft Designs)
7051 Peel-Off's - Elizabeth Craft Designs
8530 Snowflake Peel-Off's - Elizabeth Craft Designs
Glitter Dots - Elizabeth Craft Designs
Patterned paper & stickers - Fancy Pants Designs
White card stock
Pink sheer ribbon
Stickles
Clear Double Sided Adhesive, 1/8" and 4" width's - Elizabeth Craft Designs
Red crd stock

Card size 5 x 6" (fits in a 5 x 7 envelope)


Thanks for stopping by today

Thursday, 8 December 2016

'From Our House' Holiday Tags

Good morning friends

I have decided to move my cards and paper crafting to Painted Mountain Cards in the New Year. I've been toying around with the idea for a long while, and this seems like a good time to make the change. I will leave this blog open, as there are still a lot of hits from Pinterest and over 5 years worth of cards etc to reference.

Onto today's share ...

I have 4 gift tags to share today, made using the Hero Arts tag die. I've managed to use it a fair bit this season so definitely feel the purchase is justified.

For these tags, I cut the tag from red card stock then adhered it to a slightly larger white stitched circle. 'To & From' was stamped on the back of the tags.


Here is a close up of one of the tags. I stamped the words from Karen Burniston's Merry & Bright stamps on a Blueprints banner, and added some gold glitter dots. Gold is so trendy right now and I'm loving it.


Supplies:
Stitched Circle - MFT Stamps
Decorative tag die - Hero Arts
Blueprints #28 (Stitched banner)
Glitter Dots - Elizabeth Craft Designs
Word stamp - Merry & Bright, Pop it Ups - Karen Burniston (Elizabeth Craft Designs
Bakers Twine
Red card stock
White card stock

Thanks for stopping by today

Tuesday, 6 December 2016

Glittery Snowman Pull Tab Card

Good morning friends

Today I have a pull tab card to share, using the Hanging Charm Pull Tab by Karen Burniston for Elizabeth Craft Designs. Actually, I used a number of ECD products on this card!


Sometimes I just want to colour a glittered Peel-Off. Els has great YouTube video's if you haven't seen the technique. She designed these Peel-Off's to coordinate with the Katie Label Accordion, so I used that die to cut the large white label then adhered the fussy cut, coloured sticker to that.


When you pull the tab the snowman stands up for display, revealing a silver Merry Christmas Peel-Off underneath. It shows up better in real life, as the silver catches the light.


I also added a small 'Thinking of You' Peel-Off to the tab which is hidden when the card is closed but revealed when the tab is pulled. You can see it in the photo below.


This is a flat, post-card style card but I did add a few flat decorations to the back. There's lots of room for me to write my message, and I used the same ECD border with Glitter Dots as I did on the front.


Note:  I have decided to move my cards and paper crafting to Painted Mountain Cards in the New Year. I've been toying around with the idea for a long while, and this seems like a good time to make the change. I will leave this blog open, as there's frequent hits from Pinterest and over 5 years worth of cards etc to reference.


Supplies:
Hanging Charm Pull Tab, Pop it Ups - Karen Burniston (Elizabeth Craft Designs)
Katie Accordion (label), Pop it Ups - Karen Burniston (Elizabeth Craft Designs)
2583 Snowman in Frame Peel-Off's - Elizabeth Craft Designs
343 Assorted Word Peel Off's - Elizabeth Craft Designs
1123 - Jewels 1 - Elizabeth Craft Designs
7018 Glitter Dots - Elizabeth Craft Designs
2576 Merry Christmas Peel Off - Elizabeth Craft Designs
642 Cool Diamond Silk Microfine Glitter - Elizabeth Craft Designs
Copic Markers
Clear Double Sided Adhesive, 6" width - Elizabeth Craft Designs
Soft Finish White Card Stock, 100# -  - Elizabeth Craft Designs
Fun foam
Tags & More 2 Deco (heart reinforcement) - Elizabeth Craft Designs
Fine Point Tweezers - Elizabeth Craft Designs
Red card stock
Patterned paper - Scrapbook Customs
Thick Bakers Twine

Card size - 4-1/2 x 6"

Thanks for stopping by today

SaveSave

Sunday, 4 December 2016

Four 'White on White' Christmas Cards

Good morning friends

I have decided to move my cards and paper crafting to Painted Mountain Cards in the New Year. I've been toying around with the idea for a long while, and this seems like a good time to make the change. I will leave this blog open, as there are still a lot of hits from Pinterest and over 5 years worth of cards etc to reference.

Onto today's share ...

I was hunting through my embossing folders for something specific, and these three snowflake ones caught my eye. I had my package of white pearl paper still out from a different project, so decided to make some white on white holiday cards.


These two are identical. I LOVE the way embossing folders work on pearlized card stock. I added some ECD Glitter Dots, and cut the label mat out of glitter paper. The words (outside and in) were platinum heat embossed.


This card got a die cut deer, as well as the heat embossed sentiment.


I had to add a small red Glitter Dot to the deer's nose.


Here is the final card with the heat embossed greeting on the front and a single Glitter Dot.


The inside of all four cards are the same as below.


Supplies:
Linen cards and envelopes - stash
Northern Flurry Embossing Folder - Stampin' Up
Distressed Snow Embossing Folder - Cuttlebug
Large Snowflake with Dots Embossing Folder - Sizzix
White pearl card stock - Gina K
Blueprints #24 - MFT Stamps
Glimmer Paper - Stampin' Up
Words were heat embossed with Platinum embossing powder
Words - Hero Arts
Fun foam
Deer - Papertrey Ink
Glitter Dots - Elizabeth Craft Designs
Words inside - Papertrey Ink
Clear Double Sided Adhesive, 1/8" width

Card size - all, A2

Thanks for stopping by today

Friday, 2 December 2016

Merry Christmas Flip-It Card

Good morning friends

It's Flip-It Friday here on my blog, and I have a Christmas Flip-It card to share today.


I love the 5 x 7" size of this Flip-its card set by Sizzix.


This card took just minutes to make, but the size and sparkly patterned paper make it look special.

Supplies:
Patterned paper - My Minds Eye
White card stock
5 x 7 Circle Flip-it Sizzix
Stitched Circle - My Favorite Things
Circle stamp & snowflake - My Favorite Things
Glitter Dots - Elizabeth Craft Designs
Wink of Stella
Words inside - snowflake - Verve
Card size - 5 x 7

Thanks for stopping by today


Wednesday, 30 November 2016

Pretty Seasons Greetings Pop-Up Card

Good morning friends

I loved the Winter Warmth Stamp/die set (MFT Stamps) when it was released last year. Finally in late October I decided I was going to break down and order it. And it's every bit as wonderful as I'd hoped. The fact that it matches this pretty patterned paper was serendipity indeed!

Also new to me are the Swirly Scribble dies from Stampin' Up. I'm loving them! Here, I used it as a wreath.


Inside I used the Anita Frames Pop-Up by Karen Burniston for Elizabeth Craft Designs. I cut the outer card extra wide, cut each edge with a stitched scalloped border then wrapped them around to the inside. I do this quite often - I like how it brings the pattern and colour from the front to the inside.


Yup - I love the images from the Winter Warmth set. They just make me happy.


Truth be told, I think this is one of my favourite Christmas cards this year!

Supplies:
Patterned paper - My Mind's Eye
Stamps/dies - MFT Stamps
Anita Frames Pop-Up, Pop it Ups - Karen Burniston (Elizabeth Craft Designs)
Word stamp on front - Hero Arts
Stitched circle - MFT Stamps
Stitched scallop border - MFT Stamps
Blueprints #12 - MFT Stamps
White card stock
Red card stock
Scribble circle die - Stampin' Up
Glitter Dots - Elizabeth Craft Designs

Card size: Standard A2

Thanks for stopping by today

Wednesday, 23 November 2016

Flocked Poinsettia Christmas Cards

Good morning friends

These cards have been in my 'in progress' pile for a few YEARS. The patterned paper has beautiful flocked poinsettia's - it doesn't show up well in the photos. But you want to reach out and touch them in real life.


I added Glitter Dots to the centre of each flocked poinsettia, and die cut the Merry Christmas from red velvet adhesive paper. The card bases are a pretty off white card stock with flecks colour throughout.


I made four identical cards, and they will go into my Mom's holiday card pile.

Supplies:
Patterned paper - unknown
Green card stock - Stampin' Up
Off White confetti card stock
Stitched Rectangles - Elizabeth Craft Designs
Dotted Scalloped Rectangles - Elizabeth Craft Designs
Glitter Dots - Elizabeth Craft Designs
Merry Christmas - Elizabeth Craft Designs
Red Velvet Self Adhesive paper - Elizabeth Craft Designs
Stamp inside - Verses

Card size - A2

Thanks for stopping by today

Monday, 21 November 2016

Karen Burniston's November Designer Challenge - Sparkling Gift Pull Tab Card.

Good morning friends

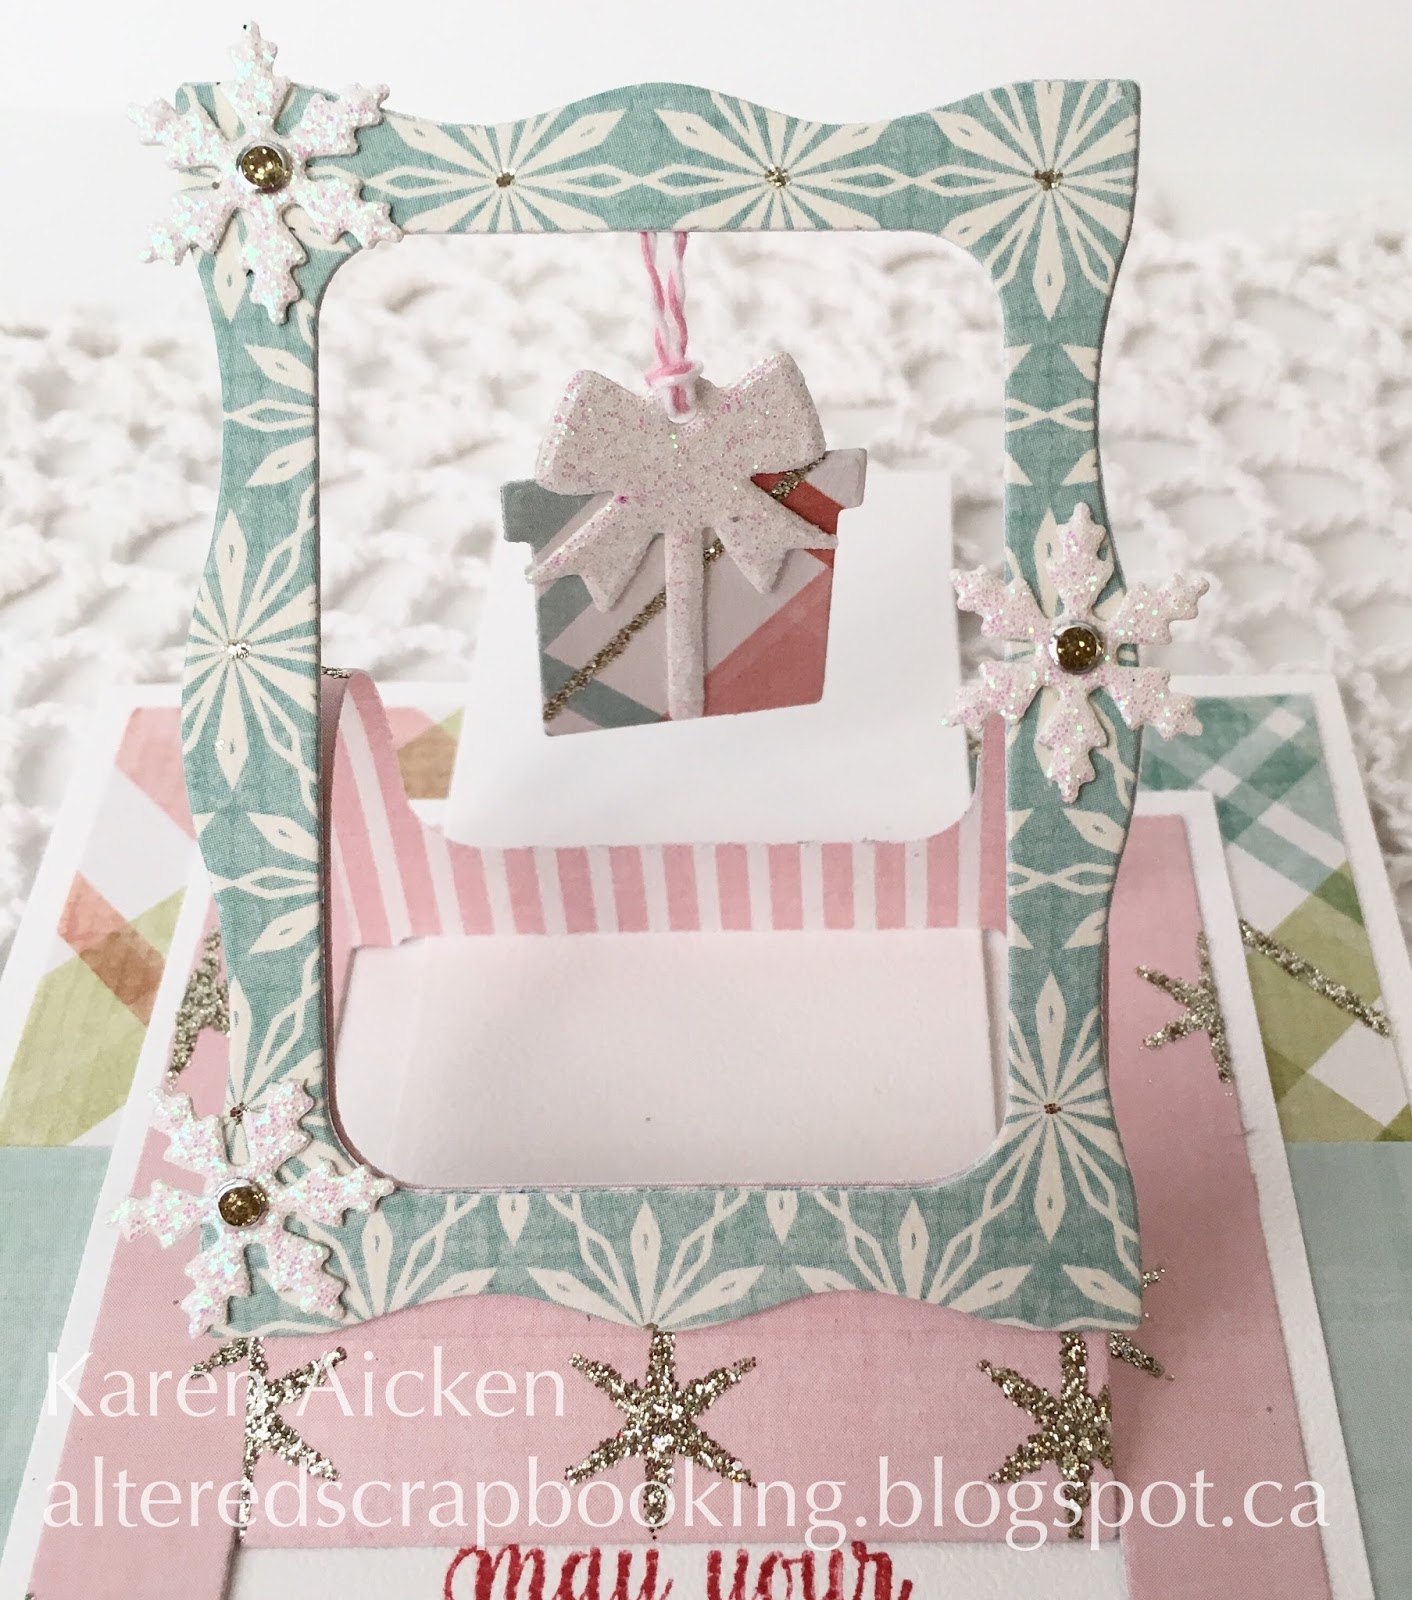
I actually had a different card made for the challenge, but when I got this one finished I decided use it as my challenge card instead. The theme of second November 2016 Designer Challenge is my choice ... "Charmed, I'm sure" - use any of the charm dies for a card of any theme.

I wanted to use one of the charms as intended, with the Hanging Charm Pull Tab. The Designer Challenge Team has already shown many different ways to use the charms, as have ECD customers. They are quite versatile! But they also make a great card when used with the Hanging Charm Pull Tab.  The card started with some festive, sparkly patterned paper and white Soft Finish Card Stock.


When folded flat, this card will fit in a standard invitation envelope and mail for a single stamp.


When you pull the tab, the frame slides up and the sweet little gift charm dangles in the opening.


The snowflakes and bow on the gift were cut from white glitter paper so they are super sparkly. I cut the gift and bow twice and adhered them back to back. That way if the charm spins around in the opening it looks pretty from either angle.


I like to make this type of card a flat, post card style. But I also like to decorate the back a little so here is the back of this Christmas card. There's lots of room for a handwritten message below the stamped words.


I hope you will check out the rest of the Designer Challenge Team - their blogs are linked on the right. Karen Burniston will have her post for the challenge tomorrow (Tuesday) on her BLOG.

Supplies:
Hanging Charm Pull Tab, Pop it Ups - Karen Burniston (Elizabeth Craft Designs)
Holiday Charms Pop it Ups - Karen Burniston (Elizabeth Craft Designs)
Holiday Clear Stamps Pop it Ups - Karen Burniston (Elizabeth Craft Designs)
Spiral Circle Pull Card (large snowflake), Pop it Ups - Karen Burniston (Elizabeth Craft Designs)
Soft Finish Card Stock, 100# - Elizabeth Craft Designs
Glittered, patterned paper - My Minds Eye
Glitter paper - American Crafts
Glitter Dots - Elizabeth Craft Designs

Card size - Standard A2

Thanks for stopping by today

SaveSave