Saturday 31 August 2013

Christmas Reindeer Card

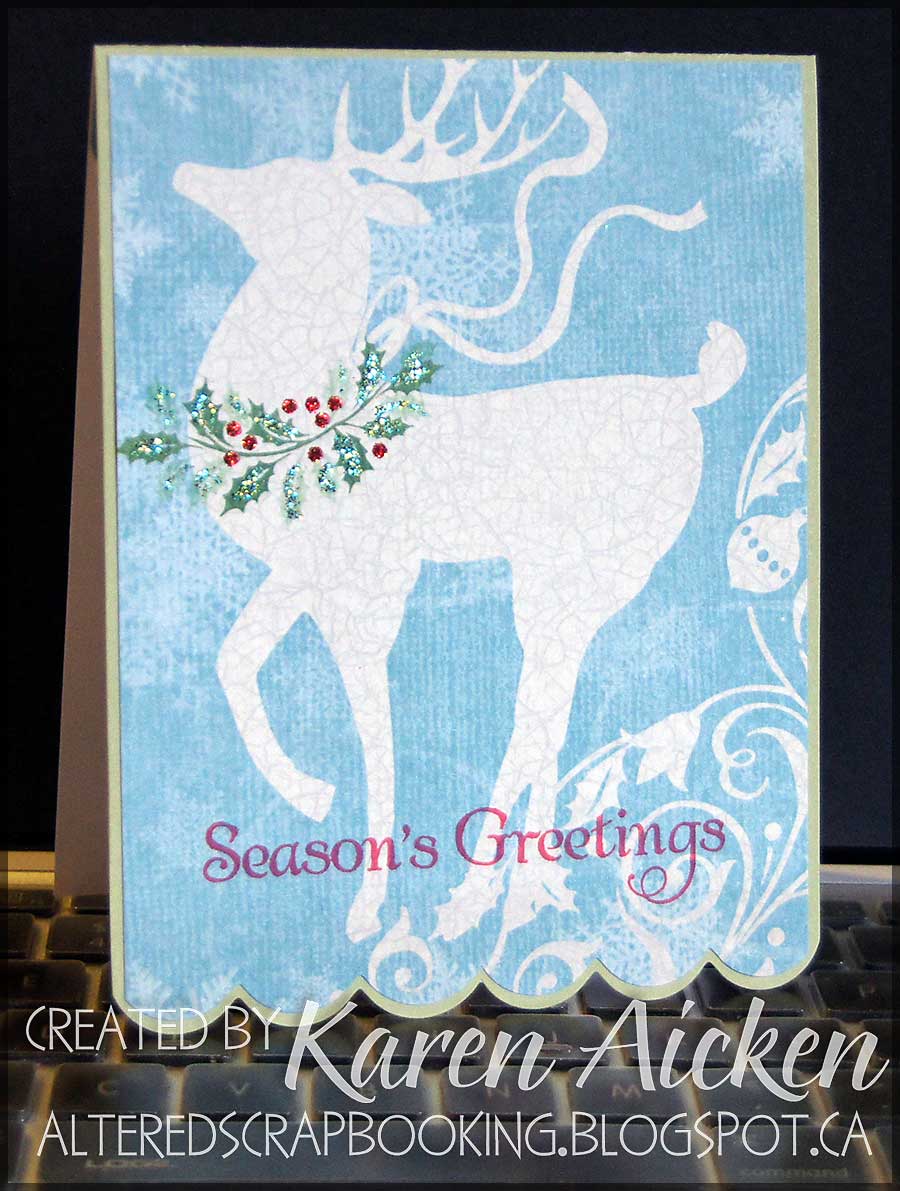
Today's share is another Christmas card ... this one was quick and easy to make. I cut a pale green scalloped card using Bazzill textured card stock and a Sizzix card base die.  The pretty reindeer image is actually patterned paper from one of my 12x12" Christmas paper stacks! I simply cut it out with the same die and trimmed it down so a border of the base shows around the edges.


A little bit of glitter glue, stamped words (SU) and the front was finished ...


I added a scalloped panel inside the card and stamped the words (MFT) in red.


The card is larger than A2, it's 4.5 x 6".  I was going to order some A6 envelopes in bulk when I stumbled on some at Staples!  Woot!

One more card for the Christmas card stash done.

Thanks for stopping by today.

Friday 30 August 2013

Poinsettia Flip-it Card trio

It's Friday, and I have three Christmas Flip-it cards to share today! To make them, I cut three out of cream card stock and three out of  2 different sparkly patterned paper.

(Remember you that you can always see my Sizzix Flip-it and Pop N Cut cards by looking on the right side of my blog under LABELS then scrolling down to the 'S' section.)

For the first two cards, two of the patterned paper Flip-it cards were cut apart  and trimmed to use for layering -  using half of each pattern on the two card bases.


 I added a punched label for a place to sign our names, and used the same Stampin' Up Christmas verse for all three cards.


The poinsettia embellishment was created with two different Tim Holtz dies and cut from red paper with an embossed & sparkling swirl pattern. I added it over an embossed label (Sizzix) to separate it from the background a little.


I liked the stability of having a card stock base, instead of just the patterned paper. While I like the ease of a single base layer - some patterned papers are just too lightweight and to me it feels like the card is only half done. That was the case with these papers but layering them onto the cream base solved the problem perfectly!


For the final card in the trio, I did things a little differently. I didn't cut trim the sparkling patterned paper for this one - instead cutting apart the cream base. The cream base sides were attached behind the patterned paper ones.


I think I like this one the best! It has all the stability of the layers, but a cleaner look. Depending on the pattern chosen, there is a place for both variations.


The inside was done the same as the other two cards.


Thanks for stopping by today!

Thursday 29 August 2013

Butterfly Sympathy Card

(Remember you that you can always see my Sizzix Flip-it and Pop N Cut cards by looking on the right side of my blog under LABELS then scrolling down to the 'S' section.)

Earlier this month I mentioned that I was working really hard to love this butterfly insert for my Pop 'N Cut dies. I made three cards that week using it, and here is the 2nd card.  (You can see the first one by clicking HERE).

I thought I'd try some softly coloured patterned paper and make a sympathy card. I do like the way it turned out!


I know now that I like the finished cards much better if that back spine is covered.


I sure get a lot of use out of the labels that are on the same die as the butterfly layers. Gotta love that.
 

While the butterflies are a little plain on their own, when you add a butterfly body/antenna I like them much better. These ones were trimmed from a Sizzlet butterfly die.


I am completely in love with my Pop 'N Cut dies and most of the inserts that I have. At least I want to play with this one a little more so that is encouraging. And I do like this card!
 
Thanks for stopping by today.
 

Wednesday 28 August 2013

Snail Mail Love Note

Our daughter & little family have been away on a summer vacation, and they come back TODAY! I made a 'love note' to send to Olivia & Ethan to let them know how much Gramma missed them, and had to use this adorable snail image from 'the Stamps Of Life'. 

I stamped it on two different patterned papers (Echo Park), fussy cut them out then paper pieced it together.  The background is stamped and sponged, and I attached the snail with an Action Wobble.


I love that it bobs and wobbles around when the card is moved, and I know the kiddies will love it too. I was using my cell phone for these pictures, and obviously moved it when I snapped the following shot. The rest of the card should be in focus with just the snail blurred as it wobbles around.


Just for fun, I stamped the envelope as well. I used the same snail set (snails2mail) for the envelope images and the lines are from the lines2journal set.


I have several ideas in my head using this snail set ... now I just need some time to play with it!

Thanks for stopping by today.

Tuesday 27 August 2013

Cheerful Butterfly and Flourish Card

I was actually making some Christmas tags yesterday, but I haven't taken any pictures so it will be later in the week before I get them posted. Meanwhile, here is a cheerful flourished butterfly card.


Just a quick little card - I like tying bakers twine around the center of the die cut butterflies to form antenna. 

Thanks for stopping by today!

Monday 26 August 2013

Hot Tub Anniversary Card

I have a humorous Anniversary card to share today ... made for my brother & sister in law.  They travel a fair bit and always enjoy the hot-tubs where they stay. 


The hot-tub and naked people stamps are images I've had for years - they are from Rubber Baby Buggy Bumpers, and it's fun to pull them out once in awhile. I added a punched heart on the Mr. so as not to offend people.  :-)  The sun stamp is hand carved, and the words are from The Stamps of Life ... the 'anniversary2celebrate' set.


The inside of the card is more subtle, using my Pop 'N Cuts with the Funky Label insert & Hearts Movers & Shapers.


The floating hearts were punched using a Stampin' Up punch, then attached behind the pop up platform with narrow strips of transparency. A fun look and one I will use again!


More words from the 'anniversary2celebrate' set were stamped on a Sizzix label that was attached to the inside.


Oh, and for the record my in-laws look NOTHING like the couple on the front.  I hear they had a wonderful anniversary, and I hope they enjoyed a chuckle when their card arrived in their mailbox.

(Remember you that you can always see my Sizzix Flip-it and Pop N Cut cards by looking on the right side of my blog under LABELS then scrolling down to the 'S' section. I have also added a Stamps of Life category).

Thanks for stopping by today.

Sunday 25 August 2013

Christmas Birdhouse Pop Up Card

Today's share is a Pop 'N Cut Christmas card that opens from the side rather than the bottom.


I kept the outside nice and simple, letting that BEAUTIFUL pearlized poinsettia print paper take center stage. I simply attached an acetate 'Merry Christmas' strip by K&Co.


The inside panel is also a lovely pearlized paper - it's just SO pretty in real life.  I added a couple of K&Co glittered embellishments, and the card was done.


It turned out really pretty, and I'm saving it for my Mother-In-Law. She has cardinals that come to her bird feeder (!!!) and I know she will love this card.

(Remember you that you can always see my Sizzix Flip-it and Pop N Cut cards by looking on the right side of my blog under LABELS then scrolling down to the 'S' section.)

Thanks for stopping by today!

Saturday 24 August 2013

Flip-It Card with extra flap!

I got on a bit of a roll yesterday, after taking an apparent stray kitten to the Humane Society. This absolutely beautiful calico kitten had been hanging around for the past week or so - Thursday the neighbors tried to catch it to take her in but she escaped.

Yesterday she was in our dog run and our three dogs - who were inside looking out the window - were NOT amused. The kitten was completely unconcerned. I brought her out some water, but she just wanted me to pet her. I tried explaining that I was not a cat person, but true to cat form she ignored me and kept showing me how beautiful she was so I would pet her. Too funny.  She was quite thin, but I didn't have any cat food.

The neighbor helped me pop her into Jasper's crate in my vehicle and off we went. Thankfully she had a microchip so we hope she will be reunited with her owners quickly. Which makes me think I should be having our dogs scanned the next time we go to the vet to see what information comes up!


Anyhow, I started making a bunch of Flip-It cards with the Sizzix Flip-It die for Christmas and just had to try this idea out. It worked like a charm!  I cut the red patterned paper 10" wide, and 5.5" high.  I scored 3" from the right side, folded the flap and lined up the fold just inside the right side of the die. Everything else cut with the die except this folded edge which is exactly what I wanted.


I added a strip of the red patterned paper to the folded flap, since the paper is white on the back side.  Then I cut a 4" wide panel of white card stock and scored it down the center at 2". I punched two snowflakes to tie in with the pattern, then attached it inside the fold. This gives me a nice place to pen a note and signature and it doesn't show when the card is closed.  I rounded the 4 corners with a punch.

Edited to note:  Next time I will cut a 3" wide decorative panel and attach it to the flap before running everything through the Big Shot. That will eliminate that white edge I have showing since I didn't want to cover up the curve for the circle to flip into.


I am so pleased with how this turned out, and will use the idea again when I have a longer note to add inside a Flip-It card. 

Here is a peek at the snowflake ornament embellishment.


(Remember you that you can always see my Sizzix Flip-it and Pop N Cut cards by looking on the right side of my blog under LABELS then scrolling down to the 'S' section.)

Thanks for stopping by today!

Friday 23 August 2013

Friendship Flip-It

It's Friday, and I have a Flip-It card to share today!  I made this one for a long-time pen-pal, who lives in Wisconsin. 


I know she doesn't get out craft shopping anymore, so she will be just tickled with the whole Flip-It idea. I am happy that I bought the coordinating Framelit dies after I played with this particular Flip-It for awhile - it makes layering so easy!


I added a scalloped cream panel to hand write a message on, as well as a scattering of 3-d stickers by K&Co.

(Remember you that you can always see my Sizzix Flip-it and Pop N Cut cards by looking on the right side of my blog under LABELS then scrolling down to the 'S' section.)
 
Thanks for stopping by today!

Thursday 22 August 2013

Cute Little Reindeer

I have quite a few Christmas cards that I made last year that didn't get posted, and I'm slowly wading through those photos.  This cute reindeer card is one of them ...


The reindeer was Cricut cut using 'Create A Critter' cartridge, and the snowflake background is all sparkly.


He is pretty cute, and one of these days I'll try cut a couple more and use a different background. Any of the Create a Critter cuts would be adorable on a Flip-It or Pop 'N Cut card!


Thanks for stopping by today.

Wednesday 21 August 2013

Birthday Matchboxes

Remember when I was SO excited that I found the Stampin' Up Matchbox die on their Clearance Rack? Well I actually do use it a fair but, but never seem to take pictures.  I did remember this time though. 


My Mom's birthday is the day after my Dad's, so I made them each up a matchbox that holds 4 Hershey Nuggets. I brought a huge bag of nuggets back from Arizona, since I can never find them here in Calgary.


While I was cutting, I made one for a friend and one for our son's girlfriend too. 


Just a sweet little somethin' somethin' to go with their birthday cards.

Thanks for stopping by today!

Tuesday 20 August 2013

'Cloudy Day' card

Hello and welcome to all my new followers - I'm so happy to see you here!

I missed posting a Flip-It card on Friday since I was concentrating on Christmas cards, so I have one to share today.  I still had the pink card stock out from yesterday's card, so used it to cut the Sizzix Flip-It Circle base then used the outline boot stamp from boots4rain at The Stamps Of Life. I seem to be drawn to the circle Flip-It base these days, and I'm so glad I added it to my collection.


I stamped the boots on patterned paper two times, then fussy cut them out.  The little buckle was stamped on afterwards, and colour added with copic markers.  Adding the orange and turquoise onto the patterned paper helped tie the colours in with the paper strips I wanted to use.

The background circle was stamped with a Posh cloud stamp using grey ink and stamping several times without reinking.


For the flip side of the circle, I used the same wonderful cloud paper as yesterday's card, and the same sun punch too! I am going to have to get more of this cloud paper, it's proving to be very versatile. 


The words are included in the boots4rain stamp set. You have to love it when there are coordinating words in a stamp set.


(Remember you that you can always see my Sizzix Flip-it and Pop N Cut cards by looking on the right side of my blog under LABELS then scrolling down to the 'S' section. I have also added a Stamps of Life category).

Thanks for stopping by today.

Monday 19 August 2013

'Bright and Cheery' Butterfly Swing Card

I am bound and determined to love the butterfly Pop 'N Cut insert. Not quite there yet, but I made three cards last week using it and by the last one I was at least liking it.  Ha, the first time I used it - thankfully on scrap paper - I folded it, looked at it for awhile, then figured I must me really REALLY tired, because I was not impressed and not entirely sure I'd even done it correctly!

A week later, well rested - I played a little with more scrap paper then tackled a card with double sided paper. You can see that card HERE. I did like the way it turned out, so that was more positive.

This week I decided to try it again using card stock and the A2 sized base. I fully intended on using embossing folders on this first card, but once I got playing with the patterned papers I decided to go with them instead.


You know I love my Sizzix Banners, so used them again here as I didn't want to put any words on the card front.  I also punched a circle, trimmed it and popped it up to hide the staple. Initially I thought the staple would be part of the design, but in the end I didn't like it.


I tied pink Bakers Twine around the layered butterflies for bodies/antenna.
 

Finally, here is a peek at the inside. I LOVE LOVE LOVE the cloud paper peeking out behind the butterfly opening.


The sun was punched out of a scrap, and I stamped the words above the die cut hills.


All in all, I'm happier with this die now, and have been taking lots of notes when I use it. So far I've learned that I really do prefer my cards with that opening covered ... and not with a visible opening down the spine. A solid covering. The cloud printed paper just makes me happy and I love the cheerful feeling from these colours and prints.

If you would like to know specifics on the supplies used, just leave me a comment and I will reply.  (Remember you that you can always see my Sizzix Flip-it and Pop N Cut cards by looking on the right side of my blog under LABELS then scrolling down to the 'S' section.)


Thanks for stopping by today!