Friday 30 November 2012

Snowflake and Button Cards

I have a couple of quick and easy cards to share today.


The word panel was cut from patterned paper, the same K&Co stack that the printed strips came from.


I punched the snowflake (Martha Stewart) from white card stock, and cut the buttons (Papertrey Ink) from a green card stock in the paper stack. The die cut buttons were tied with button twine (PTI) and attached to the snowflakes.


These cards are completely mail friendly!

Thanks for stopping by today.


Thursday 29 November 2012

Merry Monday #43

This weeks Merry Monday challenge at Always Playing With Paper is their last one of the year so I really wanted to play along. I've been so busy making Christmas tags and Wine Bottle Hangers I haven't participated in many challenges lately. Below is the sketch followed by my take on it.


I went with turquoise, red and snowflakes - all of which make me happy.


The three stacked snowflakes were cut using dies by MFT (My Favorite Things) - they cut SO nicely! Then I dabbed the centers with blue glitter glue for some seasonal sparkle. I stamped the Merry Christmas (Stampin' Up) on a scrap of white card stock, then cut it out with a MFT banner die. Since the die only notches one end, I re-inserted the strip back in the die and ran it through the Big Shot again to get a matching notch on the other end.


I have to get my cards addressed and in the mail soon - usually they are ready to go by December 1st!

Thanks for stopping by today.


Wednesday 28 November 2012

Flourish Wine Bottle Hangers

I have a couple more wine bottle tags to share today, almost identical. The first one went in to the set I gave to friends that had us over for brunch last month.


The words were stamped (MFT) on the bottom of the fancy label (MFT) and the chipboard flourish is by Prima.


The tag base was cut from a cherry red pearlized heavy weight Star Dream. I love the shimmer on that card stock.


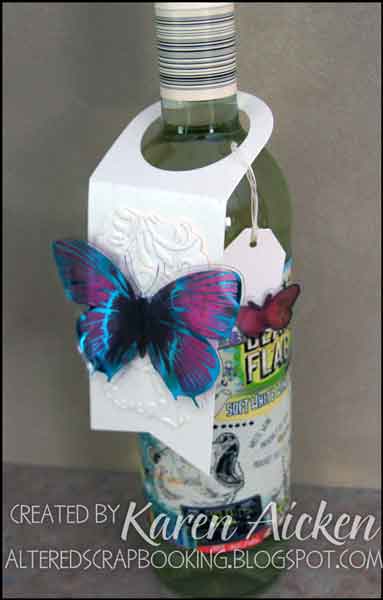
This is the 2nd wine bottle tag, the chipboard paisly was quite a bit larger so I didn't add a fancy label under it. This one went on the bottle of wine shown, and I brought it to our daughters house one evening when she was having us over for a belated Thanksgiving dinner.


The set of wine bottle hangers I gave to our friends were packaged up in this little gift bag. I made it from a white linen business envelope, with a pearlized panel on the front.  To make the gift bag using an envelope, I first sealed the envelope, then trim off the top edge. I scored 1/4" down the left and right side of the envelope, and across the bottom.  For a YouTube video showing the technique, see HERE.

I added the pearlized card stock panel to hide the envelope flap - and my envelope bag was done!


The fancy labels were cut with a Spellbinders die, and the stamp is by MFT. The wine bottle hangers fit perfectly in this size of bag!
Thanks for stopping by today!


Tuesday 27 November 2012

Christmas Card from the Dogs

We always give our vet and groomer a little Christmas gift and card. This year I decided to go with photo cards:


Earlier this fall, I bought an Epson Picture Mate Charm, which prints beautiful 4x6 photos. I love that little printer, and once this card was designed I simply printed out 2 copies on glossy 4x6 photo paper.

The digital scrapbooking kit I used is from Scrappers Guide. Both pictures were matted with red card stock, then attached to a folded white card base and I stamped a Christmas verse inside.

Now I need to shop for the gifts to go along with the cards.  :-)

Thanks for stopping by today.


Monday 26 November 2012

Framed Snowman Cards

I have had this Sizzix frame die for a couple of years, but haven't actually used it all that much. Mostly because I used to make mostly A2 cards and the frame just barely fit on it. The cards just didn't look balanced.

One of my 2012 New Years Resolutions was to make cards in different sizes, so the frame works much better on the larger sizes! I was flipping through one of my paper stacks recently, saw this glittery striped paper and knew immediately how cute the frame would look using it.


These cards are 5 x 6.5" and I added these sweet 3-D stickers inside the frames.


I found the stickers when visiting the United States last month, and just couldn't resist them.

Thanks for stopping by today!


Friday 23 November 2012

Butterfly Wine Bottle Tag

Are you ready for something non-Christmas? :-) This was one of the Wine Bottle Tags I made for a friend that had us over for brunch last month. They were my 'test' to see if people might like Wine Bottle Tags as a gift, and the response was completely positive. They loved them!


I used a K&Co acetate butterfly, a MFT label die (embossed with an embossing folder), and my PTI wine bottle hanger die.


I added a tiny tag (Stampin' Up punch) so they can write a message to the recipient of the wine bottle & tag.

While it's hard to see in the photos, the white wine bottle hanger, tag and fancy label are all cut from a white pearlized card stock.


Thanks for stopping by today!


Thursday 22 November 2012

Christmas Rosette Tags

I have a few more tags to share today.  :-)


These were cut with the largest Sizzix scalloped die and each tag is made with two layers. The top layer was run through the Big Shot with an embossing folder, and the back layer was stamped with To/From. The two layers were then attached together to create the base tag.


I used the Tim Holtz rosette die and Christmas patterned paper from my stash for the rosette's, and the 3-d stickers are by K&Co.


I love all the depth and sparkle on these tags - and I wouldn't have used this many layers on a card so it's fun to 'pile it on' for the tags.

Thanks for stopping by today!


Wednesday 21 November 2012

Sue's Sparkling Snowflake Tags

You can see the progression in my tag-making. The tags for Sue were the first ones I made, and I have continued to add and embellish them as I continue to make more. These snowflakes were the 'fanciest' I sent to Sue - the final set of 4 tags in the four sets I sent to her.


White on white, but the base snowflake (Sizzix), the circle (Stampin' Up) and the top snowflake (EK Success) are made from shiny, shimmery, Bazzill card stock. Beautiful stuff.


The simple white snowflake is from the new Stampin' Up snowflake die. The one I meant to order when I ordered the Victorian label die by mistake.  Haha, had to place another order so I could get that snowflake die!


I just could not capture the shimmer on these lovely tags ... but I tried!


I punched another circle from white card stock to pen the To/From onto, and used a fine cotton twine for hanging.

Once I was finished Sue's tags, I was HOOKED and as you can see by my Christmas Tags 2012 category (under Labels on the right of my blog) - I have continued making Christmas tags. All of them were inspired by the 4 sets of 4 that I sent to Sue.

I have no idea what I'm going to do for my December first mailing to her though!

Thanks for stopping by today.


Tuesday 20 November 2012

Sue's Snowman Tags

In Sue's November 1st mailing, I included 4 sets of 4 tags. These are the third set - the Snowman tags:


 I used the Tim Holtz snowman die and some lovely paper from K&Co. One of my very favourite Christmas paper packs - I could have just FRAMED some of the papers in that pack!  After cutting the shapes and punching the hole at the top for the bakers twine, I sponged the edges with blue dye ink.


 The lacy image from the (Stampin' Up) Mixed Bunch set reminds me of snowflakes, so I stamped that on white card stock then punched it out with the coordinating punch and inked the edges. I also stamped one of the circles from the same set and punched those out with a 3/4" circle punch (Stampin' Up).


The white snowflake was in my stash ... it's from a Sizzix die that cuts two similar sized snowflakes. Since I seem to prefer the shape of the other snowflake, I've been adding these ones to a little box to use 'one day'. They worked perfectly with the punch! Everything was layered with foam tape, and then I added a red gem to the center of the circles.


The back was finished using a dog tag punch (Stampin' Up) to pen the To/From on with, then the red & white bakers twine was threaded through the punched hole in his hat. These tags just make me smile.

Thanks for stopping by today!


Monday 19 November 2012

Sue's Christmas Tree Tags

I just realized that I have not yet shared all the Christmas tags I made for Sue for her November 1st mailing!  Here are the Christmas Tree ones:


I cut the (Sizzix) trees out of sparkly embossed patterned paper, then grabbed my package of Martha Stewart flag/banners. I've said before that this is a never-ending package - I don't seem to get even close to using them up, because they must multiply at night.  :-)


The banners were stamped with "Happy Christmas" (Stampin' Up) in brown, popped up with foam tape, and I added glitter glue dots at each point.


To give a clean area for the To/From (penned) I punched a dog tag shape (Stampin' Up) from scrap white card stock and attached that to the back.

While it's hard to tell in the photos, there is a small punched star (EK Success) a the top of each tree that has glitter on it.


Bakers twine finished them off and they are ready for attaching to a bag or package!

Thanks for stopping by today.


Saturday 17 November 2012

Snowflake and Gingerbread Man Tags

Can you tell how much I liked making these punched snowflake tags?  Here are another two - and then I promise to move onto something else.  These were made the same as Wednesday and Thursday's tags.  The exception is the one on the right - I messed up stamping on the tag and used a piece of gingerbread man/ heart print patterned paper to cover the mistake.


 The gingerbread man was stamped and die cut (Stampin' Up) from white card stock then attached to a leftover small scalloped red tag.


I stamped Happy Christmas  (Stampin' Up) in red on a scrap strip of white card stock, notched the ends with scissors, and attached it to the tag with foam tape in the center. The edges were glued down to the tag so the banner has a bit of a curve.  The heart was punched out using the Stampin' Up heart trio punch (the smallest heart).

On the other gingerbread man, I attached 3 flat red 'beads' to his belly.


Thanks for stopping by today!

Friday 16 November 2012

Snowflake and Tree Tags

These tags were made the same as the ones yesterday, although I used a tree stamp & die set (Stampin' Up) for the decoration.


The trees were stamped with a green rainbow ink pad and I added some festive colour to the dots with pencils. I like them OK - but I prefer the penguin tags from yesterday so I only made two of these tree ones.


The To/From (MFT) was stamped on scrap white card stock, then punched out with a Stampin' Up label punch. The label was attached to the red card with two sided tape.

Thanks for stopping by today!


Thursday 15 November 2012

Snowflake and Penguin Tags

I always like it when I can use my Tim Holtz tag die, and I got a new stamp set that I ADORE. So you can imagine how happy these tags make me.  :-)


I can't take credit for the original idea, I saw similar tags online and since I had a great snowflake punch I knew I could adapt the idea. Each tag is made of two base layers - a white one and a red one and they are held together with red twine and bakers twine.


 I punched the snowflake (Martha Stewart) out of the white tag, then placed a gem in the center on the red backing tag.  'No Peeking' (MFT) was stamped at the bottom edge in red.


 The penguins were stamped twice onto scrap white card stock - once in black and once in red. The black penguin was fussy cut, as was the red hat and scarf. Then they were attached together with Stampin' Up Dimensionals. I've mentioned before how much I love these - they give height without giving too much height. Love 'em.


Finally, I stamped the To/From label (Fiskars) onto scrap white card stock with red ink, cut them out and attached them to the red tag.

These were fun to make and they just make me happy - they could easily be my favourite tags so far!

Thanks for stopping by today.

Wednesday 14 November 2012

Shae's Christmas Card 2012

My cousin asked me to make her a two special cards for her granddaughters. I've already shared the one I made for Ayda, and this is the one I made for Shae. Because the cards will be hand delivered, they are a full 6" square!


This sweet reindeer image was on a sheet of patterned paper by K&Co. I cut it into a 5.5" square, stitched a tiny jingle bell to the bow (over the printed one), &  added glossy accents to his nose. When it was dry, I matted the reindeer panel with a gold print paper from the same stack then popped it up on the folded card base.


The paper has glitery accents, and 'snow' on the reindeer's antlers. The words were penned inside to personalize the card for Miss Shae.

Thanks for stopping by today!