Friday 30 September 2016

Squirrel Pull Card

Good morning friends

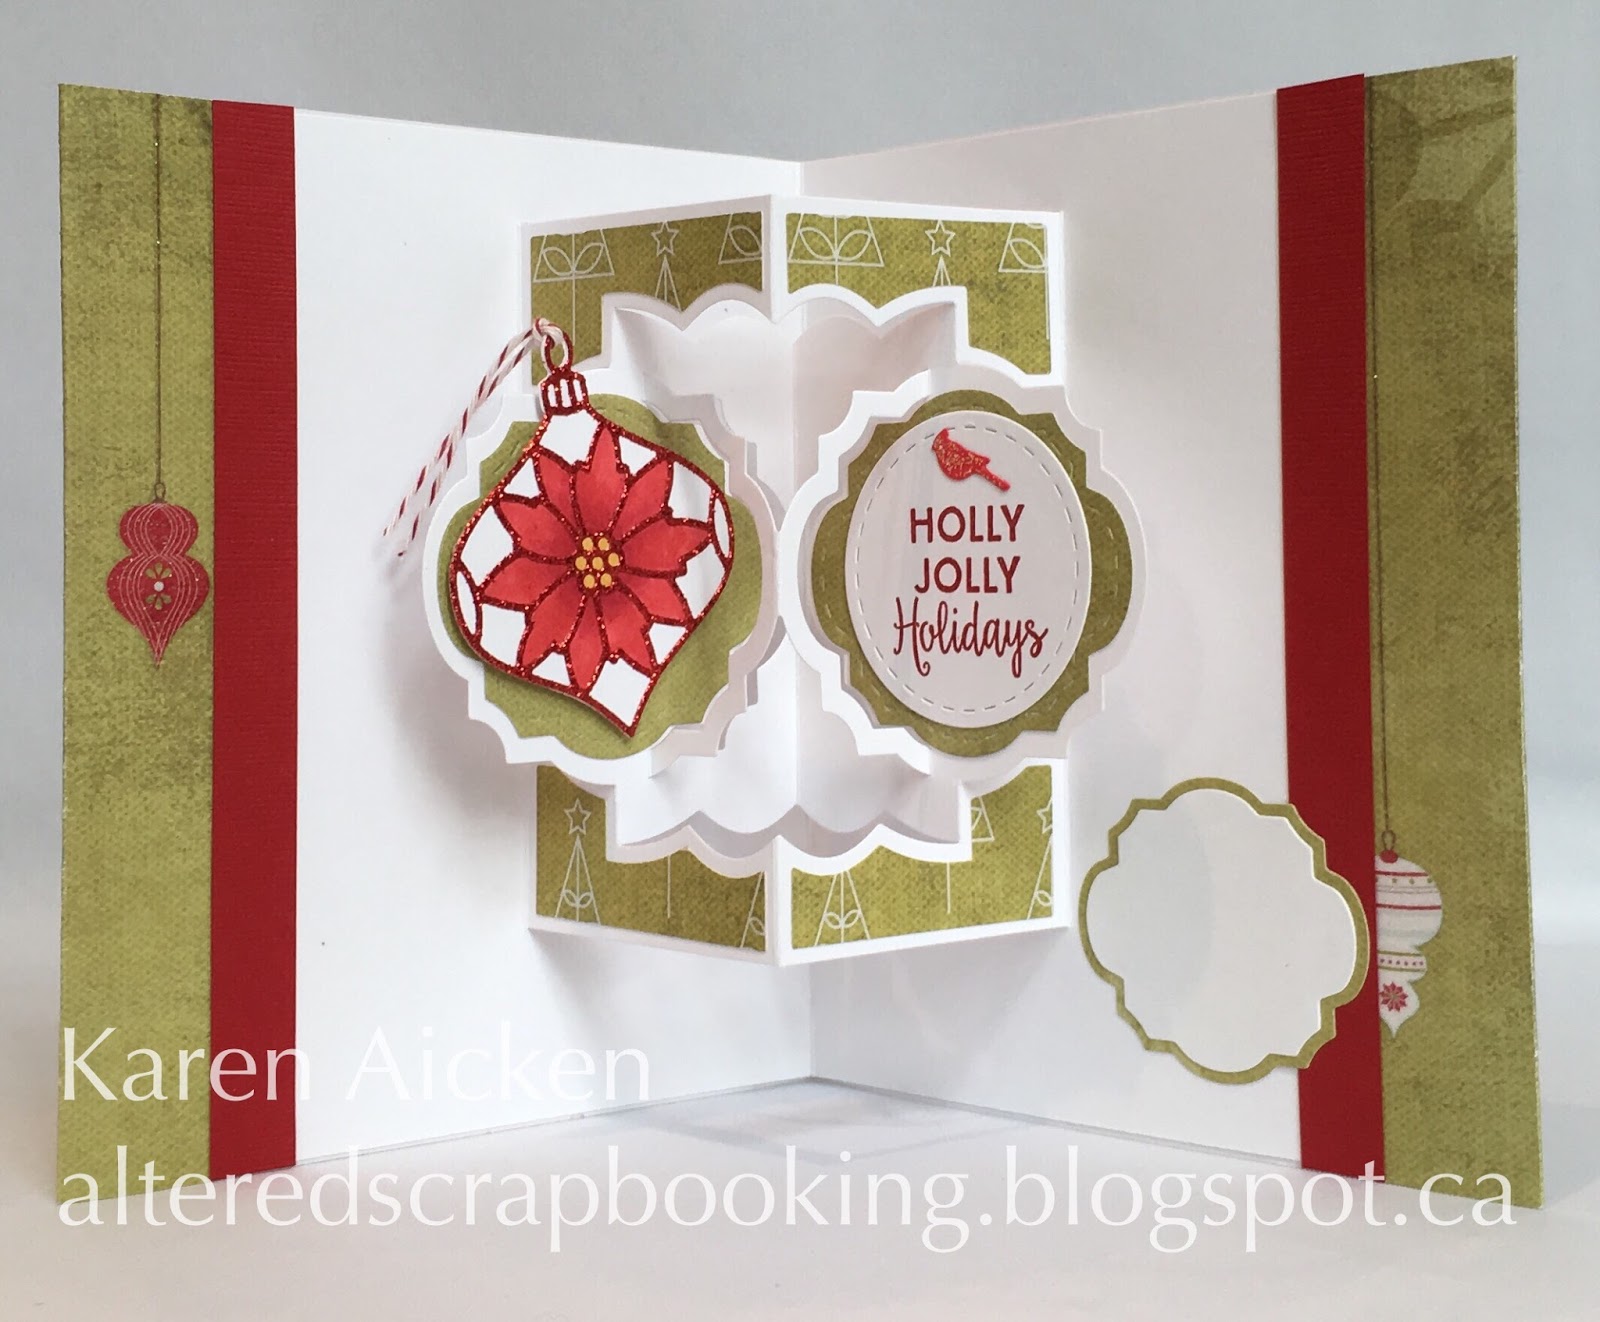
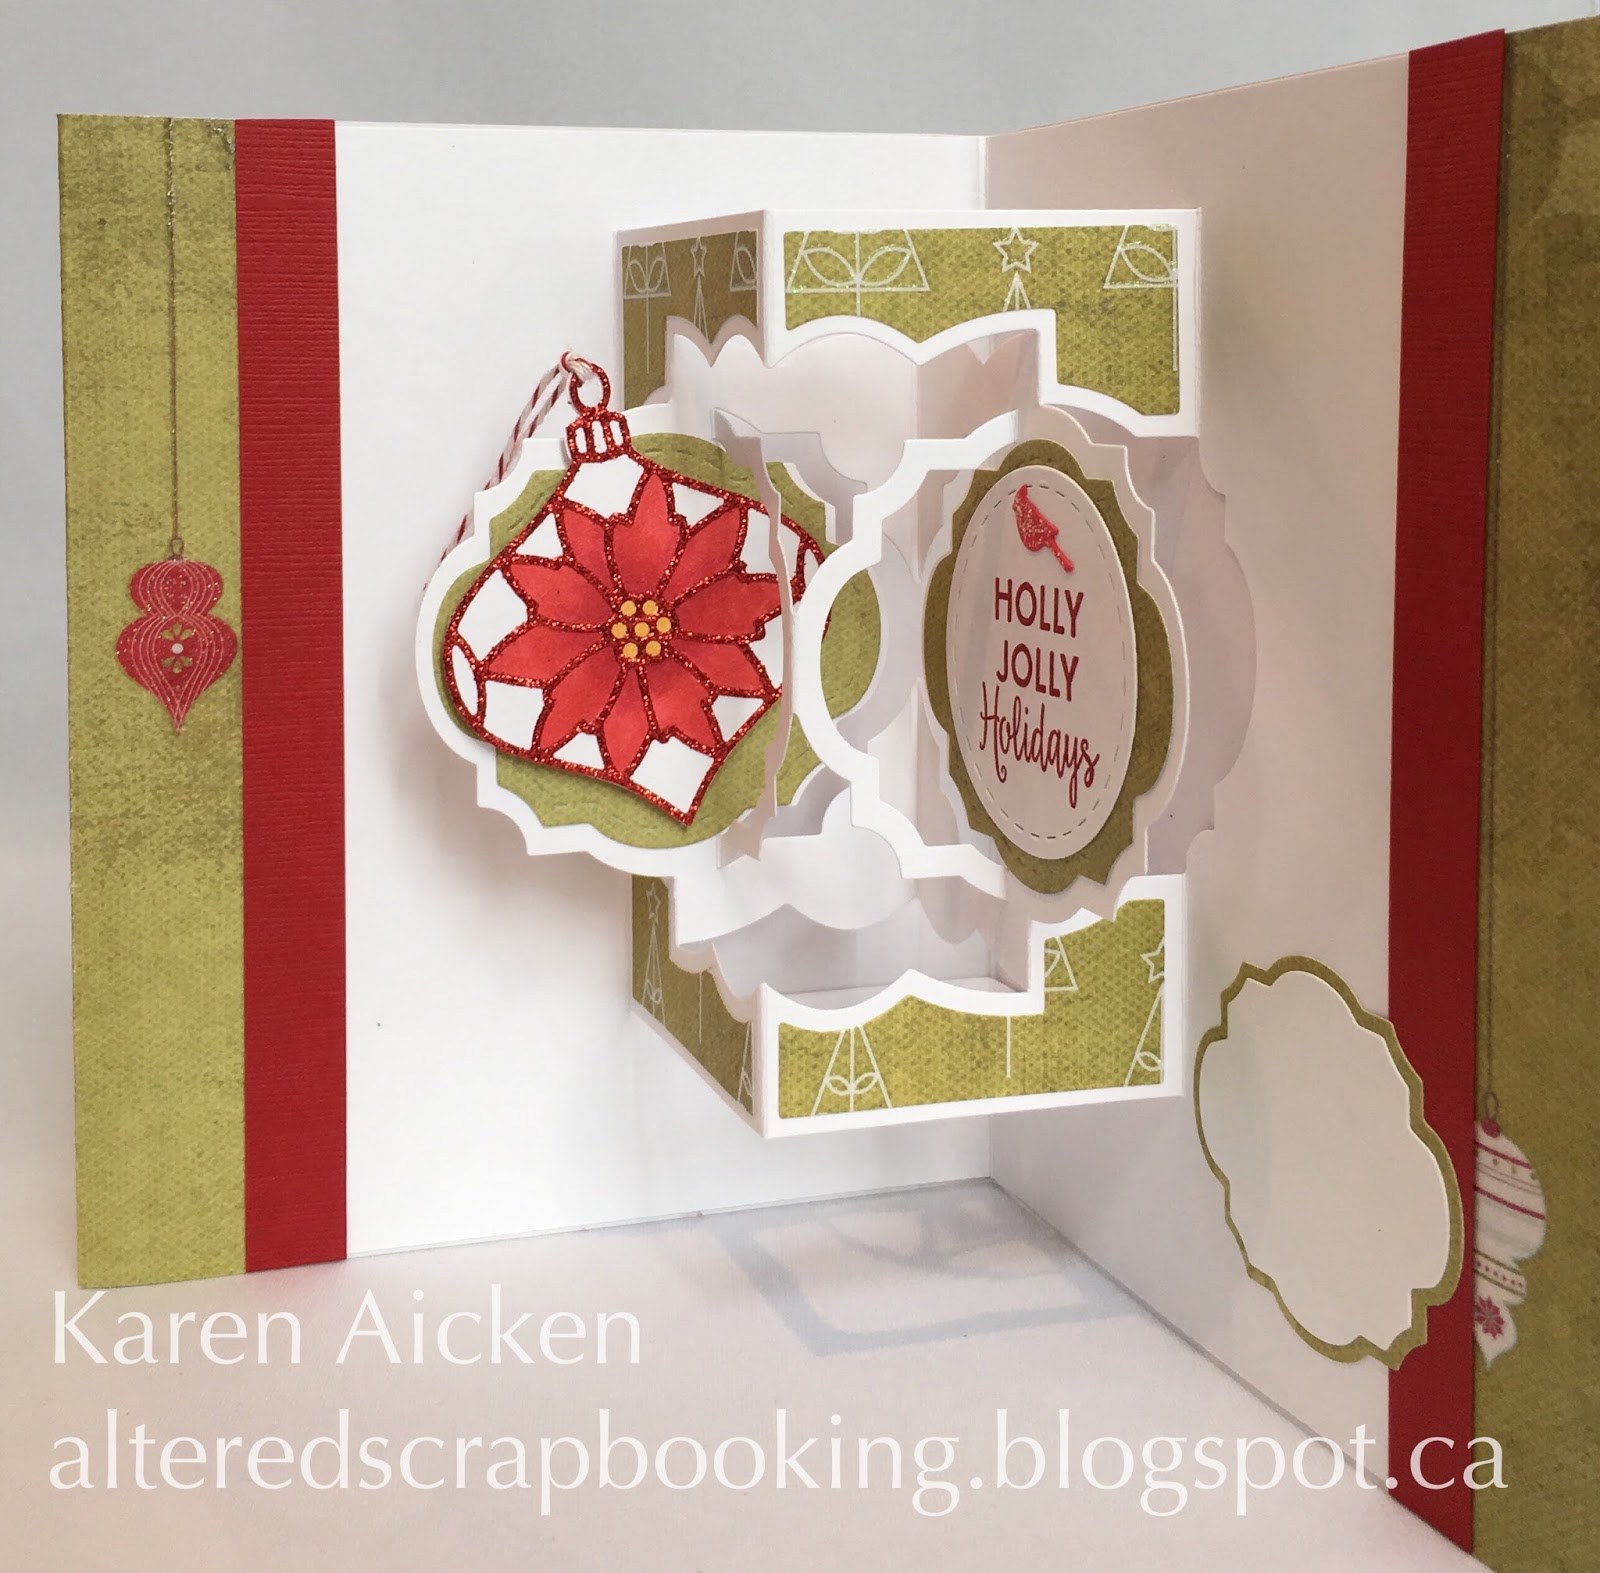
It's Flip-It Friday here on my blog and I have a Z-fold card to share today. Once again I used a patterned A2 card, this time with the print on the left and the solid back on the right.  The Spiral Circle Pull Card is easy peasy to use - simply place the alignment nubs on the scored centre line and cut. A little Washi Tape decorated the edges.


I thought this little squirrel sticker from my stash was so cute!


When the sides are pulled, the card opens to reveal the hand lettered greeting.


Into my Thanksgiving stash with this card.

Below is a photo of all 4 of the cards I made using the brown patterned cards that were in the package. The other three were posted earlier. My friend "B" brought the patterned cards to Arizona with her when she came to visit and split the package with me. It was her idea to use the patterned cards with the Pull Card dies, and you can see I use it a fair bit! You can always search 'Pull Cards' on the right of my blog to see all of them.


Supplies:
Patterned A2 card - Michaels
Washi Tape
Spiral Circle Pull Card, Pop it Ups - Karen Burniston (Elizabeth Craft Designs)
Stickers - stash
Card size - 5 x 5-1/2", fits in a 5 x 7" envelope.

Thanks for stopping by today

Thursday 29 September 2016

Label & Circle Holiday Tags

Good morning friends

As soon as I saw the new Labels & Circles die set by Karen Burniston, I knew they would make wonderful Christmas tags.


The largest Label was cut from patterned paper and again from white card stock. The red ring piece was cut from adhesive backed card stock, which made it easy peasy to adhere. I also used one of the new clear Holiday Stamps - such a nice greeting, don't you think? I added tiny Glitter Dots above and below the greeting for some holiday shimmer & shine.


The white Label was scored across the top as shown below, then I adhered it to the back of the patterned paper label with adhesive ABOVE the score line only.


This allows the tag to open for you to write your message, while keeping the front clear of score lines.


Christmas tags are such a great way to use up patterned paper extras or scraps, and the Labels and Circles make it so easy!

Supplies:
Patterned paper - My Minds Eye
Labels and Circles, Pop it Ups - Karen Burniston (Elizabeth Craft Designs)
Twist Circle Pop-Up (Stitched circle and ring), Pop it Ups - Karen Burniston (Elizabeth Craft Designs
Holiday Clear Stamps- Karen Burniston (Elizabeth Craft Designs)
Glitter Dots - Elizabeth Craft Designs
White card stock
Red card stock - Bazzill
Xyron
Bakers Twine


Thanks for stopping by today

Wednesday 28 September 2016

Leafy Pop-Up Thanksgiving Cards

Good morning friends

Not only do I have dozens of Christmas Pop 'n Cut card bases cut and ready to decorate, I discovered these Thanksgiving ones in my 'In Progress' box as well.

There were 10 of them, all pretty much identical. I took  photo of four of them, as that was what 8 of the cards looked like. The other card uses up a narrow strip of the leafy patterned paper and there were 2 of those.


The brown layer is actually a pearlized card stock - and it catches the light. So pretty. On the two cards with the narrow strip of leafy patterned paper I embossed the entire panel before adhering it to the card front.


The cards were made with the A2 Pop 'N Cut Base and the flower insert. The whole inner card was embossed with a leaf embossing folder, then I just adhered a bunch of punched and die cut leaves.


Thanksgiving greeting stamps are hard to find so I was happy to add this one to my collection last year. Plus, the label stamp comes with them!


Supplies:
Beige Astroparche card stock
Charcoal Stardream card stock
Pop 'n Cut A2 base with Flowers insert - Karen Burniston (Sizzix)
Patterned papers - unknown
Various die and punched leaves
Flags - My Favorite Things
Thanksgiving Greetings - The Alleyway Stamps
Thanksgiving verse and labels - Reverse Confetti

Card size - A2


Thanks for stopping by today


Tuesday 27 September 2016

Spider Halloween Card

Good morning friends

I have a flat Halloween card to share today, using some of the new Halloween Collection items by Karen Burniston for Elizabeth Craft Designs.

The Graveyard scene is fabulous for Halloween projects. Here I cut it out of white card stock, and used it as a mask to stipple purple ink through it. Then I stamped my favourite dot stamp (Stamps by Judith) through the mask as well.

The Bats stencil makes a great background, but you can also isolate a few of them as I did here. The sky and moon were also sponged or stippled onto the white panel.


I had these cute black web embellishments in my stash so added one then cut a Spider from green to adhere to the web. The 31 was stamped in black then cut out with the oval from the Anita Frames and adhered with yellow brads.


Here is a peek at the inside - loving the new clear Halloween stamps! Also the Labels and Circles are ones that I seem to be turning to again and again.


Supplies:
Bats Stage it Stencil - Karen Burniston (Elizabeth Craft Designs)
White card stock
Fired Frames Stitched Rectangles - Elizabeth Craft Designs
Halloween Scene, Pop it Ups - Karen Burniston (Elizabeth Craft Designs)
Spider web - American Crafts
Stamps by Judith (dots)
Black Sharpie
Labels and Circles, Pop it Ups - Karen Burniston (Elizabeth Craft Designs)
Wink of Stella
Halloween Clear Stamps - Karen Burniston (Elizabeth Craft Designs)
Prisma colour pencils
Gamsol
Dotted Scallop Rectangles - Elizabeth Craft Designs
Black card stock
Anita Frames Pop-Up (Oval), Pop it Ups - Karen Burniston (Elizabeth Craft Designs)
Labels and Circles, Pop it Ups - Karen Burniston (Elizabeth Craft Designs)
Yellow brads

Card size - 4-1/2 x 6"

Thanks for stopping by today

Monday 26 September 2016

Karen Burniston's Designer Challenge - "Be Inspired"

Good morning friends

Welome to the second Designer Challenge for September 2016. This month Caz is offering the challenge: Take inspiration from a fellow teammate for a card or technique of any theme!

This was a hard challenge ... the Designer Challenge team is amazing, and they inspire me daily. To have to narrow it down to one card from one teammate? Couldn't do it.

However, I was wanting to try one after seeing Fran Sabad's beautiful Vertical Flower Pot Pop Stand Card so that is where I started. But I also wanted to try the Rectangle Pull Card spinner with the Flower Pot as in Kelly Booth's fun Halloween Card. So for this card, both Fran and Kelly are my inspiration.

Since all the 'OOOOOH' is on the inside, I kept the front of my card fairly simple. Hand lettering, patterned paper and the Outdoor Edges used as a border. Done. The flowers inside stick out a little on the bottom and on the right, but I am completely fine with that. I think of it as a little teaser. If it bothered me, I would have just made the outer card a little larger.


Here is the card as it is opening ...


Then ... ta da - a fully three dimensional flower pot filled with holly, candy canes and Christmas flowers. There is SO much wow with this die, and it's completely generic so you can fill it with all kinds of things for all kinds of occasions.

Since the recipient will likely turn the card to view it from all angles - the embellishments are double sided with a card stock strip sandwiched and sticking out between the layers. The strip is how I adhered them to the honeycomb grid inside the flower pot.

I added two charms (with the hang tabs trimmed off) to the spinner from the Rectangle Pull Tab ... the little gift and the dotted tree. I added gold gel pen dots to the embossed dots on the tree for some holiday shine.


I trimmed the vine into holly shapes with fine point scissors, and also added a couple of candy canes from the Holiday Charm set. The words were stamped with pale ink, then I went over the stamping with a gold gel pen. It's a fun way to add a 'hand lettered' look.


The Outdoor Edges worked really well as a border - I will have to remember that idea for another time.

Be sure to check out Karen Burniston's BLOG tomorrow (Tuesday) where she will have her post. She has given us hints and I for one cannot WAIT to learn the technique she will be sharing.

Supplies:
Flower Pot Pop Stand, Pop it Ups - Karen Burniston (Elizabeth Craft Designs)
Holiday Charms, Pop it Ups - Karen Burniston (Elizabeth Craft Designs)
Rectangle Pull Card (spinner), Pop it Ups - Karen Burniston (Elizabeth Craft Designs)
Anita Frames Pop-Up (labels), Pop it Ups - Karen Burniston (Elizabeth Craft Designs)
Outdoor Edges, Pop it Ups - Karen Burniston (Elizabeth Craft Designs)
Holiday Clear Stamps- Karen Burniston (Elizabeth Craft Designs)
Patterned paper - DCWV
Fine Point Tweezers - Elizabeth Craft Designs
Gold gel pen - Sakura
Glitter Dots - Elizabeth Craft Designs
Black fine point marker
Bic markers
White card stock
Hand lettering

Card size - 6 x 5" - fits in a 5 x 7 envelope for mailing.


Thanks for stopping by today


SaveSaveSaveSave

Sunday 25 September 2016

Holiday Pop-Up Card with Ornaments

Good morning friends

I've been having so much fun using the Anita Frames Pop-Up to make Holiday Cards. So much WOW when you open these cards!

The patterned paper has embossed glittery bits, but cracked along the spine when I scored and folded it. To remedy that, I added some paper tape (medical, Micropore tape) along the inner fold. The paper was cut to 12 x 6" but as I often do when the patterned outer card is larger than the inner card, is I folded the edges to the inside.


I kept the outside fairly simple, stamping the words on a scalloped panel and adding a cardinal cut from red glittered paper (thanks 'B'!)


Inside you can see the amazing Anita Frames Pop-Up, and how bringing the patterned paper over to the inside brings the pattern and colours in as well.


I used an ornament die from Elizabeth Craft Designs to decorate on of the labels, and a stamped stitched circle for the other.


Supplies:
Patterned paper - My Minds Eye
Anita Frames Pop-Up, Pop it Ups - Karen Burniston (Elizabeth Craft Designs)
Red card stock - Bazzill
White card stock
Ornament Set 2 - Elizabeth Craft Designs
Elizabeth Craft Designs Adhesive, 1/2", 1/8" and 2-1/2" widths
Copics
Dotted Scallop Rectangles - Elizabeth Craft Designs
Front stamp - Taylored Expressions
Cardinals - Impression Obsession 
Labels and Circles, Pop it Ups - Karen Burniston (Elizabeth Craft Designs)
Inside stamp - My Favorite Things
Bakers Twine

Card size - 5 x 6"

Thanks for stopping by today


SaveSave

Saturday 24 September 2016

C4C 355 Birthday Pull Card

Good morning friends

It's Saturday  so that means a new challenge at the Crazy 4 Challenges Blog. Our September 2016 hostess is Raquel Mason and our Guest Designer is Fran Sabad.

Raquel's son Jake celebrates his birthday today, so her challenge is to make a Birthday Card for someone you love. Our son had a birthday this month, so this is the card I made for him using some fun beer stickers from my stash.

I started my card with an A2 patterned card - pattern on the right side and and the solid coloured back on the left. These cards are white inside, and they are perfect to use for any of the Pull Cards by Karen Burniston for Elizabeth Craft Designs. 

As is, it would create a 5-1/2" square card. I trimmed 1/4" off each side for a 5 x 5-1/2" card which fits perfectly into a 5 x 7" envelope for mailing.


I stamped the banners with Karen Burniston's new Occasions Clear Stamps, then die cut them with the coordinating die in the Anita Frames Pop-Up. The banners were strung with bakers twine.


Check out the C4C blog to see how the Crazies have been inspired by the challenge. We'd sure love to see your take on it, so be sure to stop by the Crazy 4 Challenges blog and link up your creations. If you are uploading to an online gallery, please use the keyword C4C355.

Supplies:
Patterned A2 card - Craft Smith
Oval Pull Card, Pop it Ups - Karen Burniston (Elizabeth Craft Designs)
Beer Bottles - Jolee's
Anita Frames Pop-Up (banner), Pop it Ups - Karen Burniston (Elizabeth Craft Designs)
Occasions Clear Stamps - Karen Burniston (Elizabeth Craft Designs)
Bakers Twine
White card stock
Oval Landscape Accordion (Stitched Oval), Pop it Ups - Karen Burniston (Elizabeth Craft Designs)
Words - My Favorite Things

Card size - 5 x 5-1/2"

Thanks for stopping by today

Friday 23 September 2016

Fullers Anniversary Card

Good morning friends

I think it's kind of cool what you can do with limited supplies, when you have some great generic dies to help you out. We were visiting Arizona for a few days in July where I have a few things, but certainly not a fully stocked craft room.

I used this patterned paper to make a 'Get Well' card for a friend that I shared earlier, and again for this Anniversary card.


 Inside is the new Anita Frames Pop-Up by Karen Burniston for Elizabeth Craft Designs


Supplies:
Patterned paper - Basic Grey
Anita Frames Pop-Up, Pop it Ups - Karen Burniston (Elizabeth Craft Designs) Shipping mid-August
Banner - Stampin' Up
White card stock
Double Sided Adhesive, 1/8" width - Elizabeth Craft Designs
Oval Pull Card (heart), Pop it Ups - Karen Burniston (Elizabeth Craft Designs)
Stickles
Labels and Circles, Pop it Ups - Karen Burniston (Elizabeth Craft Designs) Shipping mid-August

Card size - 4-1/2 x 5-1/2"


Thanks for stopping by today


Thursday 22 September 2016

Warm Winter Wishes Pop-Up Card

Good morning friends

I have a confession. I have an 'in progress' holiday card bin and it has dozens (DOZENS!!!) of Pop 'n Cut cards cut and ready to embellish and assemble. I went a little crazy with my Karen Burniston  Pop 'n Cut dies when I first brought them home from Arizona. 

Just a little :-)

So you will be seeing quite a few as I start finishing off cards from that bin.

Here is one using some cute snowman stickers from my stash. I really like this Scalloped Front Card die for it's size - it's 4-1/2 x 6".  The stickers were added to white card stock then fussy cut. For the front, I used one of Karen Burniston's new clear Holiday stamps, the snowflakes from the All Season's Tree and the little snow mound from the Garden Bench Pop-Up.


Inside is the A2 Pop 'n Cut with the Wavy Label Insert, which was my favourite at the time. The patterned paper is embossed and shiny, and the stickers all have glittery bits.


As much as I want to be playing with my NEW dies and supplies - it is very satisfying to be using some older products as well. And I have another completed card for the upcoming holidays.

Supplies:
Patterned paper - stash
White card stock
Stickers - The Paper Studio
A2 Pop 'n Cut base with the Wavy Label insert - Karen Burniston (Sizzix)
Scallop front card base - Sizzix
Garden Bench (snow mound) Pop it Ups - Karen Burniston (Elizabeth Craft Designs)
Holiday Clear stamps (no swirls on the Merry Christmas) - Karen Burniston (Elizabeth Craft Designs)
Stickles
All Seasons Tree (snowflakes) Pop it Ups - Karen Burniston (Elizabeth Craft Designs)

Card size - 4-1/2 x 6"


Thanks for stopping by today

Wednesday 21 September 2016

Ghosty Halloween Card

Good morning friends

Today's share is the Halloween card I made for my parents to give to our Grandson Ilai. I used a couple of the new Stencils by Karen Burniston for the card front, then doodled some lines between the bats with an orange fine point marker.


The ghost is a glittered sticker from my stash that was adhered to white card stock then popped up on the card front. I did some hand lettering inside, and for this one I remembered to take a photo!


Supplies:
White card stock
Stickers - stash
Stripes Stage-It Stencil - Karen Burniston (Elizabeth Craft Designs)
Stitched Rectangles - Elizabeth Craft Designs
Bats Stage-It Stencil - Karen Burniston (Elizabeth Craft Designs)
Fun foam
Staedtler Fine Point Markers

Card size - A2


Thanks for stopping by today

Tuesday 20 September 2016

Felt Holly Pop-Up Card


Good morning friends

I am having lots of fun using Karen Burniston's new Anita Frames Pop-Up die for my holiday cards. The front has one of the coordinating Labels & Circles, a new clear stamp and some felt embellishments from my stash.


Inside is where the magic happens ... the Anita Frames Pop-Up truly makes a WOW card.


Anyone I've given an Anita Frames card to, turns it over to view it from the top or bottom because they think the folds are just so darned cool. So here is a photo of the card from above.


Supplies:
White card stock
Patterned paper - Chatterbox
Anita Frames Pop-Up, Pop it Ups - Karen Burniston (Elizabeth Craft Designs)
Holiday Clear Stamps - Karen Burniston (Elizabeth Craft Designs)
Felt embellishments - Stampin' Up
Coloured pencils - Staedtler
Clear Double Sided Adhesive, 1/2" width - Elizabeth Craft Designs

Card size - Standard A2


Thanks for stopping by today

Monday 19 September 2016

Father's Day Bear Card

Good morning friends

It's Masculine Card Monday here on my blog and I have a square Bear card to share today.


I found these bear images at the Mesa Rubber Stamp Show in the Spring. There are several bear images, and they work so well for masculine cards. The embossed birch panel was swiped with metallic Pan Pastels for just a touch of shimmer.


Inside there are two fussy cut fish tied together with Bakers Twine, and the large area for a greeting. The fish come in the same set as the bears.


I ended up doing some hand lettering inside and gave this card to hubby for Father's Day. Funny thing though, I forgot to sign it after doing the lettering so he joked that I can give it to him again next year. Ha!

We have out of town guests, and went for a drive in Kananaskis on Friday to enjoy the beautiful fall colours and sunshine. We were lucky enough to spot a Grizzly! One other car had pulled over and respectfully took photos from their vehicle as well. We sat and watched her feed for over 10 minutes and were completely mesmerized. A real highlight of their visit! I always call in those types of sightings, and apparently we were watching Grizzly Bear #152 - a real beauty.

Supplies:
Bear & fish - Local King Rubber Stamps
Heavy White card stock - Michaels
MISTI - My Sweet Petunia
Kraft card stock
Embossing folder - Stampin' Up
Gold Pan Pastels
Hairspray
Fun foam
Bakers Twine
Chalks
Clear Double Sided Adhesive, 1/4" width - Elizabeth Craft Designs

Card size - 5" Square


Thanks for stopping by today


Sunday 18 September 2016

Count Your Blessings

Good morning friends

I had a little bit of this beautiful textured pumpkin paper leftover, and made three Thanksgiving Cards with it. I only photographed one, since they are identical. The stamped fishtail banner is mounted with fun foam.


These will probably go to my parents to send out, as I make their cards as well as ours.

Supplies:
Beige Astroparche card stock
Patterned paper - K & Company
Blueprints #24 - My Favorite Things
Stamps - The Alleyway Stamps
Green card stock - Bazzill
Fun foam
Spiral Circle Pull Card (leaf), Pop it Ups - Karen Burniston (Elizabeth Craft Designs)
Stickles
Scalloped scissors

Card size - A2


Thanks for stopping by today


Saturday 17 September 2016

C4C 354 Halloween Tent Card

Good morning friends

It's Saturday  so that means a new challenge at the Crazy 4 Challenges Blog. Our September 2016 hostess is Raquel Mason and our Guest Designer is Fran Sabad.

When I saw Raquel's sketch, I immediately thought of doing a Tent Card. Last year fellow Designer  ChallengeTeammate Frances Byrne came up with a way to create a Tent Card using an Accordion die so I went with the Accordion Oval for my card instead of the Circle Accordion. Ha, I usually go my own way with a sketch.


I adore that little expanding ghost from the new Halloween Charms. This card folds completely flat for mailing, then stands open with the little ghost swinging in the centre.


I'm also loving Karen Burniston's new Halloween Scene die set - The spooky branch is SO fun and the graveyard scene is proving to be quite versatile.


I like to add a panel to the back of my Tent Cards, as a place for a greeting and signature. Here I used one of the new Halloween Clear Stamps in orange and went over the web and spider with a fine point black marker.


Check out the C4C blog to see how the Crazies have been inspired by the challenge. We'd sure love to see your take on it, so be sure to stop by the Crazy 4 Challenges blog and link up your creations. If you are uploading to an online gallery, please use the keyword C4C354

Supplies:
Black card stock
White card stock
Patterned paper - Recollections
Accordion Oval, Pop it Ups - Karen Burniston (Elizabeth Craft Designs)
Halloween Charms, Pop it Ups - Karen Burniston (Elizabeth Craft Designs)
Halloween Scene, Pop it Ups - Karen Burniston (Elizabeth Craft Designs)
Halloween Clear Stamps - Karen Burniston (Elizabeth Craft Designs)
Anita Frames Pop-Up (oval), Pop it Ups - Karen Burniston (Elizabeth Craft Designs)
Props 9 Pop it Ups - Karen Burniston (Elizabeth Craft Designs)
Black ribbon
Glitter Dots - Elizabeth Craft Designs
Fine point tweezers - Elizabeth Craft Designs
Black Ribbon


Card size - standard A2


Thanks for stopping by today