Wednesday 30 April 2014

Purple Butterflies

Good morning friends!

I have a Butterfly Pivot card to share today ...


I love the lacy butterfly overlay that comes with the die set, AND the separate body and silhouette.  I combined them here with shiny, embossed paper and a Happy Birthday die to make a card for Seniors Secret Service.


I added some hand lettering inside ...


... and two 1/4" wide patterned paper strips on either side of the inside fold ...


... for a card that I hope will delight a senior on her birthday.


Supplies used: 
Butterfly Pivot die - Pop it Ups, Karen Burniston (Elizabaeth Craft Designs)
Happy Birthday die - Elizabeth Craft Designs
Patterned paper -Recollections
White card stock 
Pencil crayons
Odorless Mineral Spirits
Corner rounder - Creative Memories

Thanks for stopping by today!


Tuesday 29 April 2014

Dog Tag

Good morning friends!

Today's share is a cute little dog themed tag. I usually bring treats to a friends dog when we visit but it seems a little much to actually wrap them as a gift. Plus the dogs want some RIGHT NOW as they know I always bring them goodies.


I don't use a lot of digital stamps (digi's) but I DO own some. There are times when I just cannot get to my stamps and these make it an easy way to access some images. This dog image is a digi, printed on white card stock, fussy cut and coloured with blended coloured pencils.


The tag die is from Elizabeth Craft Designs - I really like the shape of it. It's a good deal too, you get three different sized tags (I used the largest and the smallest here) as well as Fall and Christmas embellishment dies.  I embossed the largest tag with one of their new embossing folders and inked the edge.


Adding a dimensional tag takes it up a level from just handing them a box of treats, at least for the owners. :-)

Supplies used:
Kraft card stock
White card stock
Tag dies - 763, Elizabeth Craft Designs
Embossing folder - 106 Dancing Leaves - Elizabeath Craft Designs
Digi stamp - Melissa Bastow (Dorky Doodles on Etsy) 
Pencil crayons, Gamsol and blending stump
Bone stamp - The Alley Way Stamps

Thanks for stopping by today!

Monday 28 April 2014

'White on White' Christmas Card

Good morning friends!

It's time for the Elizabeth Craft Designs Designer Challenge, which was to create an Elegant White on White card.  I had SO many ideas, but finally settled on a winter card which is odd because I love to get AWAY from snow and cold.

I have to tell you how much I am enjoying all the Elizabeth Craft Design products. Now they even have embossing folders! Their dies are lovely and they cut SO nicely. I just had to take a picture of the bits and pieces I used for the front of my card.


On the triple leaf, I drew along the veins with a glue pen, then added Warm Diamond Silk Microfine Glitter. The snowflakes (LOVE!) were cut from glittered card stock. To create that, I simply added a Double Sided Adhesive sheet strip to white card stock and removed the remaining liner. Pour on the Warm Diamond glitter, tap off the excess and polish it in with your finger. Ta Da - glittered card stock ready for die cutting.


The decorative square is 4-3/4", cut from white card stock and embossed with the Damask embossing folder. I added the white wreath, then added a strip of Score Tape along the bottom. This was also glittered and polished. Then I laid out my Triple Leaves and attached them with foam tape.


The layered snowflake was popped up on top of that then I set aside this panel.


While the next picture shows the 'Lots of Dots' embossing folder, the procedure is the same for the Damask one. The panel I wanted to emboss was larger than the folder. I embossed the first half, then lined up the folder again. Then, just place your top cutting pad even with the embossing folder and you will not end up flattening the first embossing when it goes through your machine!


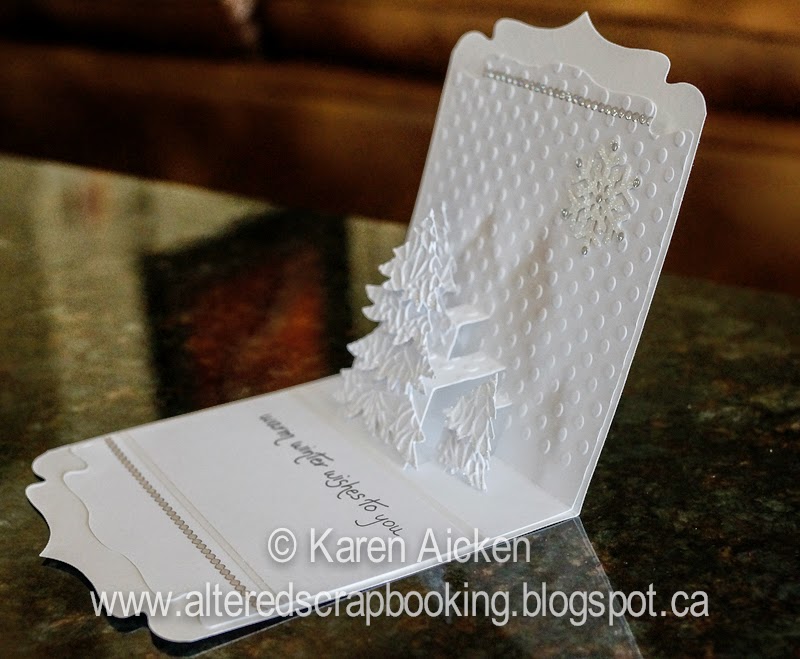
As soon as I saw the '5 Part Pine' die set, I knew it would be a 'must have' for my collection. There are so many uses and looks you can get from this one little die set and I can't wait to play with it some more. Here I cut the pieces from white card stock, then embossed them all with the Curvy Swirls embossing folder. (I think that one is my absolute favourite). I swiped down the left side and across the bottom edge of each die cut and added Warm Diamond Silk Microfine Glitter. Then I simply played with the different pieces until I had the trees I wanted for my pop-up.


Ok - fair warning. I took lots of pictures, as I wanted to show all the shimmer and shine on the card. I added Glitter Dots and a Glittered Peel-Off border, and the card base is white pearl.  I used the Agatha Edge die set on the front and the inside, and the Lots of Pops die created my Pop Up base.


I penned the words, since I don't have access to my Christmas stamps right now.


Get ready for lots of 'White on White' inspiration from the ECD Design Team, and watch for Joset's big blog post at the end of the month. It's so much fun to see everyone's cards all shown together in a big group post!

Supplies used:
Card size: 5-1/2 square
White pearl card stock - Recollections
Damask embossing Folder - KB104 Elizabeth Craft Designs 
Swirly Curves embossing folder - E119 Elizabeth Craft Designs  
Lots of Dots embossing folder - E114 Elizabeth Crft Designs
Big Triple Leaf die - 796, Elizabeth Craft Designs
Wreath - 731 Wreath and Bow, Elizabeth Craft Designs  
5 Part Pine - 755 Elizabeth Craft Designs 
Warm Diamond Silk Microfine Glitter - Elizabeth Craft Designs
Snowflake dies - 757, Elizabeth Craft Designs
Double Sided Adhesive Sheets - Elizabeth Craft Designs

Glitter Dots - 7018 Elizabeth Craft Designs
Glitter Border - 7010 Elizabeth Craft Designs

Agatha Edge - Karen Burniston (Elizabeth Craft Designs)
Lots of Pops - Karen Burniston (Elizabeth Craft Designs)
Corner rounder - Creative Memories
White card stock - Office Depot and Papertrey InkGlue pen (for veins)
1/8" Score tape - for glittered border

Thanks for stopping by today!


Sunday 27 April 2014

Strawberry Girl Accordion Card

Good morning friends!

I have an Oval Accordion card to share today ... I made it back in early February, when I first got the Pop it Ups dies from Karen Burniston. I didn't have a lot of supplies with me, so I relied on an adorable digital stamp from Tiddly Inks and fussy cut images from the paper for embellishments.


I cut one of the smaller ovals from the set, and folded it over the top corner as a place to add some fussy cut flowers and berries.


The image was coloured with pencils and blended with odorless mineral spirits and a blending stump, then fussy cut out and popped up on the layered oval.


I added some more fussy cut flowers and Bakers Twine ...


 ... and some fussy cut strawberries.


The words were hand lettered, and coloured with pencils and a blending stump. I cut it out with another oval die that comes with the Accordion Oval and decorated with fussy cut flowers and a berry. I love that the Pop it Ups dies come WITH the decorator dies for layering.


This was one of the cards I brought to my Pop it Ups Demo at Paper Pastimes in Calgary, and everyone thought it was ... SWEET!

The Pop it Ups Accordion cards are hugely popular - they are such a versatile stamp. Having the larger space that the Oval Accordion provides is great for the images that don't work on the Circle Accordion or Fancy Label Accordion because they are too tall. Remember that you can add as many pages as you want to your Accordion card. While I tend to add two pages as I did here, some of the Karen Burniston Designer Challenge Team generally add three or more.

Elizabeth Craft Designs have some lovely (LOVELY) Peel-Off stickers that are made to fit all three of the Accordion Card dies as well so our design options just keep on growing!


Supplies used:
Digital Stamp - Minnie's Berry, Tiddly Inks
Pencil crayons
Odorless Mineral Spirits & blending stump
Oval Accordion Card - Pop it Ups, Karen Burniston (Elizabeth Craft Designs)
Patterned Paper - g.c.d.

Thanks for stopping by today.

Saturday 26 April 2014

Garden Shed House Pivot Card

Good morning friends!

I received some FABULOUS Happy Mail this week ... Karen Burniston sent me her new House Pivot die. I have been itching to play with it since it was released last month and I have made 3 cards already. Plus, I had to start writing down all the ideas - this is going to be a FUN die to play with!

For this card, I reversed the folds so the fence is on the front rather than the house. In order to accomplish that, I cut the die on the OUTSIDE fold, rather than the inside fold.


Getting the patterned panel on the front took a bit of fiddling, but I'm glad I did it AND got it to work. Since the die could not cut through 4 layers of heavyweight patterned paper (I know - I tried and had to toss the first effort) - I added the green panel to the blue printed one. The panel was 6" square. Then I cut the fence portion of the House Pivot on the very left edge of the panel. I cut away the fence portion, then started trimming the top/bottom/right edge. Slowly. A bit at a time. When I was happy with it I attached the panel to the front of the card. Whew.


The House Pivot die comes with wonderful decorator dies ... sweet windows & window boxes, a door and door frame, a fence picket (which can also be a candle), chimney and roof gable. I have yet to use anything but the roof gable and fence picket ... but I did cut a window so I could just play with it. So cute.


Frances Byrne has amazing stamps - and I'm afraid a number of us on the same design teams as Frances are finding lots of new-to-us companies to become customer's of. CC Designs is one that I have placed a couple of orders through, and the words on the card are from them.


The house portion has a wonderful brick pattern you can quickly emboss into it - but since I was using this woodgrain paper I didn't use that feature on this card.


I have had these 3-d stickers for YEARS so it was wonderful to use some of them on this card. Not often I have had a use for garden tools and glove stickers.


Finally, here are the views from the back and the top ...


Be sure to check with your local retailer for Karen Burniston's newest Pop it Ups die ... the House Pivot. These are wafer thin dies that are easy to ship and easy to store, so they ship world wide. Have your retailer contact Elizabeth Craft Designs directly to place their order.

Also, Karen Burniston has a YouTube video showing how to assemble the House Pivot Card die - click HERE to see the video.

Supplies used:
Card Size - 5" square
House Pivot Card die - Pop it Ups, Karen Burniston (Elizabeth Craft Designs)
Patterned paper - Crate Paper
White card stock
3-d Stickers - K & Co.
Word stamp - CC Designs
Wink of Stella - because I can't seem to make a card and NOT use it anymore.
Tombow Markers


Thanks for stopping by today!


Friday 25 April 2014

Birthday Fishes - a Flip-It Card

Good morning friends!

It's Flip-It Friday here on my blog, and I have a birthday Flip-It card to share today. But before I get to it, I just HAVE to share that Karen Burniston's Designer Challenge Team got a sneak peek yesterday at some of the new Pop it Ups release.

Oh My. I can't give you details, but I can say that they will be released sometime in June and that will give you lots of time to use them for the December HOLIDAYS.  Shhhhhhh. 


I am having SO much fun with my new Paper Smooches  (www.papersmoochesstamps.com) goodies, I just had to make a card for Seniors Secret Service using this cute fish. I'm entering it into the Paper Smooches Sparks Challenge, which is "Anything Goes" this week!


I'm also entering this card over at 'Seize The Birthday', where it's also an 'Anything Goes' challenge.


Here is another look at the card.  I used three different sheets of Lawn Fawn paper. Actually cut into the pad of paper. I've been hoarding it and my heart was racing as I started to cut. Sheesh. I thought the blue patterned paper would work well with the tree one to mimic lake water.


Inside I combined "Reel Great" from the My Guy set, with the 'Birthday Wishes' from the Party Posse set.  Gotta love a good pun.


You can see I also added the punched label I usually do, as a place to sign the card so the writing doesn't show when the card is first viewed in the closed position.


... AND I added some narrow black Peel-Off border stickers on each edge. Once you start working with those, you can't stop!


Supplies used:
Circle Flip-It - Stephanie Barnard (Sizzix)
Patterned paper - Lawn Fawn (Into the Woods)
Fish, Rod and words - Paper Smooches 'My Guy' stamp set
Birthday Wishes - Paper Smooches 'Party Posse' stamp set
White card stock
Border Peel-Off - 1167 Elizabeth Craft Designs
Circle dies - Spellbinders
Label punch - Stampin' Up
Tombow markers
Wink of Stella (on the fish and fishing line)

Thanks for stopping by today!