
Good morning friends!
I can't believe it's September - that means we move THIS MONTH! The time is just flying by, but we have a good supply of boxes now and that will make the packing easier. I can stop thinking about finding boxes all the time! We are doing great with the purging too - hubby has done TWO runs to the dump and there will be one or two more before we are done. I have given bags and bags and bags away to the charity, and have at least a dozen boxes ready to go for this next round.
The new backsplash is on in the kitchen, but we are holding off on the grout until the new cabinets are installed next week. So now I can move things back into my kitchen AGAIN, although I'm getting good at tossing or packing items every time I have to move all these things.
I have friends coming over this week to help me start in the studio - probably the room in this house with the most stuff. I have 9 boxes now and have barely made a dent. Yikes!
Today's share is a Katie Label Pivot card that was just plain fun to make. This was also for my Paper Pastimes demo in June and Carole had requested I do cards with no stamps. (The reason is that sometimes my cards use stamps that she doesn't have in stock, and customers usually want the exact stamps they see on demo cards.) Easy peasy to make a card like these using Peel-Off's!
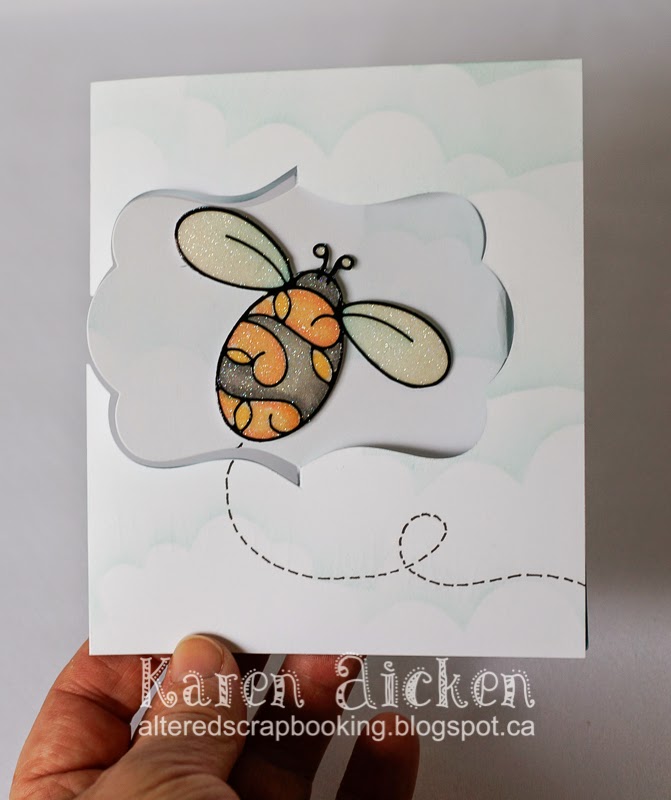

I used white card stock for the base, and sponged clouds on the front and inside with a hand made stencil, a sponge and dye ink. Then I added 1/2" strips of teal card stock to the inside edges for a pop of colour.
The bee's were done by attaching the Peel-Off's to double sided adhesive. When I open my package of double sided adhesive, I usually pick a couple of sheets and attach light weight white card stock to the back of them. That way it's ready for trimming and adding Peel-Offs to for glittering! I poured on the Silk Microfine Glitter then burnished it in with my fingers after I poured off the excess. The burnishing really brings up the sparkle in this glitter, and is an easy step that should not be missed. I added some colour with Tombow markers and let the pieces dry overnight.

When the bee's were dry, I fussy cut them out and attached them to the labels with foam tape. The flight trails were added with a fine point marker, as was the hand lettering.

Finally, here is the card from above and from the back:


Supplies:
Size - 5 x 4-1/4 (I like to play around with my A2 cards, trimming off 1/4 to 1/2" off one of the edges. It changes up the look of the card, but they still fit perfectly in a standard A2 envelope!)
768 Katie Label Pivot, Pop it Ups - Karen Burniston (Elizabeth Craft Designs)
2341 Lady Bugs Peel-Offs (Bees) - Elizabeth Craft Designs
Double Sided Adhesive - Elizabeth Craft Designs
641 Cool Diamond Silk Microfine Glitter - Elizabeth Craft Designs
White Card stock
Tombow markers
Teal card stock scrap
Black Pigma Micro Pen
I can't believe it's September - that means we move THIS MONTH! The time is just flying by, but we have a good supply of boxes now and that will make the packing easier. I can stop thinking about finding boxes all the time! We are doing great with the purging too - hubby has done TWO runs to the dump and there will be one or two more before we are done. I have given bags and bags and bags away to the charity, and have at least a dozen boxes ready to go for this next round.
The new backsplash is on in the kitchen, but we are holding off on the grout until the new cabinets are installed next week. So now I can move things back into my kitchen AGAIN, although I'm getting good at tossing or packing items every time I have to move all these things.
I have friends coming over this week to help me start in the studio - probably the room in this house with the most stuff. I have 9 boxes now and have barely made a dent. Yikes!
Today's share is a Katie Label Pivot card that was just plain fun to make. This was also for my Paper Pastimes demo in June and Carole had requested I do cards with no stamps. (The reason is that sometimes my cards use stamps that she doesn't have in stock, and customers usually want the exact stamps they see on demo cards.) Easy peasy to make a card like these using Peel-Off's!
I used white card stock for the base, and sponged clouds on the front and inside with a hand made stencil, a sponge and dye ink. Then I added 1/2" strips of teal card stock to the inside edges for a pop of colour.
The bee's were done by attaching the Peel-Off's to double sided adhesive. When I open my package of double sided adhesive, I usually pick a couple of sheets and attach light weight white card stock to the back of them. That way it's ready for trimming and adding Peel-Offs to for glittering! I poured on the Silk Microfine Glitter then burnished it in with my fingers after I poured off the excess. The burnishing really brings up the sparkle in this glitter, and is an easy step that should not be missed. I added some colour with Tombow markers and let the pieces dry overnight.
When the bee's were dry, I fussy cut them out and attached them to the labels with foam tape. The flight trails were added with a fine point marker, as was the hand lettering.
Finally, here is the card from above and from the back:
Supplies:
Size - 5 x 4-1/4 (I like to play around with my A2 cards, trimming off 1/4 to 1/2" off one of the edges. It changes up the look of the card, but they still fit perfectly in a standard A2 envelope!)
768 Katie Label Pivot, Pop it Ups - Karen Burniston (Elizabeth Craft Designs)
2341 Lady Bugs Peel-Offs (Bees) - Elizabeth Craft Designs
Double Sided Adhesive - Elizabeth Craft Designs
641 Cool Diamond Silk Microfine Glitter - Elizabeth Craft Designs
White Card stock
Tombow markers
Teal card stock scrap
Black Pigma Micro Pen
Thanks for stopping by today
Bee-utiful card, glad you are surviving all that packing.
ReplyDeleteso cute
ReplyDeleteelma