Wednesday, 8 January 2014

'Happy By The Pool' Pop 'n Cut Card


Good morning friends.  I have a fun card to share today, one I sent to a fellow Pop 'n Cut lover. When I do my Pop 'n Cuts, I usually keep the outsides fairly simple. This one has a couple of patterned papers, a stamped and fussy cut word balloon and I penned 'across the miles' along the bottom edge.


This is another card where I had to get pretty creative. I made it when we were in Arizona in November, and while I did have some stamps and ink pads with me that trip I didn't have the ones I wanted to use when I was making this one. So ... I made do with pencil crayons, sponged hills/sky/sun, and I actually inked one of Karen Burniston's embossing folders and pressed it into the 'pool' area for some texture.  I wanted the card to reflect me sitting by the pool in the desert ... but of course I didn't have a single cactus stamp with me. Sheesh.


Just look at how great that Pop 'n Cut chair insert is!  I used the A2 base and white card stock, keeping it flat until the decorating was done.  Then I ran the die through the Big Shot again with red wood grain printed paper just on the chair area.  A little trimming, some adhesive on the back and the red chair slipped right over the white one that cut with the card inside.


Yipee-Skippee ... that's exactly how I feel when I can be sitting in the Arizona warmth and not freezing or driving on icy roads. Sorry it's a little blurry - the 3-d dog sticker is really cute in real life. My friend is a dog lover, and I knew she'd get a kick out of the dog siting in the chair.


I used Karen Burniston's Flagpole die and attached the hand cut fish tail banner to the back of the chair.


Here is a better look at the pool texture.  Grin.  The border was made with a tiny stamp in one of my MFT stamp sets ... repeated on a curve helped it resemble the tiled edge of a pool.


(Remember you can always see my Sizzix Flip-it, Pop N Cut and Accordion Flip cards by looking on the right side of my blog under LABELS then scrolling down to the 'S' section.)


Supplies used:
A2 Pop 'n Cut base die with the Chair insert - Karen Burniston (Sizzix)
White card stock - Staples
Patterned paper - Doodlebut
Word stamps - Stampin' Up
Embossing folder - Textured Impressions Sassy and Circle Label set -Karen Burniston (Sizzix)
Dog sticker - The Paper Studio
Flagpole die - Karen Burniston (Sizzix)
Hello stamp - Lawn Fawn

Thanks for stopping by today.

Tuesday, 7 January 2014

Cupcake Accordion Card (Sneak Peek)

Good morning friends! On Sunday I posted a card made with Karen Burniston's new Heart Pivot die ... and talked about how excited I was to play with some of her other new (wafer thin!!) Pop it Ups dies that will be released this month.  Click HERE for that post and the details.

Her Sizzix Accordion Flip album was hugely popular, and fans will be happy to learn that there are THREE new Accordion dies in this release through Elizabeth Craft Designs!  The Fancy Label, a Circle and an Oval.  Each Accordion die COMES WITH coordinating decorator dies for layering. A few cuts with wire snips and the dies separate and are ready to use.

Today's share is a two panel birthday card I made with the Accordion Fancy Label die set.  Here is the front of the closed card ...


... and here is the card opened ...


I made this card while I was in Arizona this month, and I didn't have any stamps with me. Or ink pads. Or markers, etc etc. When you don't have many supplies, you have to get creative. I do keep  a Big Shot and patterned paper / card stock in Arizona, so creating the card with the Pop it Ups dies was fun and easy. The image part was also easy, using sweet Peel-Off's from Elizabeth Craft Designs.

Colouring them took a bit more thought. Initially I thought I'd just bring all the pieces home with me and colour them there.   But I decided to try my trusty pencil crayons, blending them with a stump and mineral spirits.  Success - woot!!  I added some sparkle with a Sakura gel pen and I was SO happy with the results.

I hand cut all the little banners, and added some more Peel-Offs to decorate them. See the red printed outer frame? I made that using a cool accessory die set (sold separately from the Accordion die sets). The set comes with three different 'frame' designs; each one cuts one quarter of the frame with perfectly mitered corners. While I used all four of them here to create the frame, I've also used just one or two of them for a fun effect. I told you Karen Burniston thought of everything when she was designing the Pop it Ups line. You can cut three different frames from just the one set, and even layer them together as another option.


Since I didn't have any stamps, I did some hand lettering for the birthday words ...


Here is the back of the card, with the card closed ...


The center portions on the back of the card are popped up with foam tape, and I added another Peel-Off coloured with pencils to one.  The other is for a signature and penned greeting.


Finally, here is a look at the back of the card...


The dies will be ready to ship to retailers right after CHA (January 10 - 14th 2014), so if you are interested in purchasing them be sure to contact your local shop and have them place their pre-orders! They will also be shipping to Canada and overseas, so don't think that these are only available in the US. If your local retailers are attending CHA, have them stop by the Elizabeth Craft Designs booth #441 and see the dies in action as well as all the sample cards.

Below is a look at the dies you get in this set and a sample card by Karen Burniston.  6 dies!! Notice the panel on the right of the sample card, as it uses one of the separate frame dies.


Here is a look at the 3 frames that come in the set ... you get the three top pieces, which you cut 4 times and join together to create perfect little frames for the Accordion card.  How cool are these! They make layering a breeze, and I love that there are three different styles to choose from in one set.  You can also use these on a regular square card, or as a way to frame out an area on a 5x7" card. 


Supplies used for my card:
771 Accordion Fancy Label - Karen Burniston, Pop it Ups (Elizabeth Craft Designs)
Patterned Paper - Brioche by Memory Box
774 Fancy Frame Edges - Karen Burniston, Pop it Ups (Elizabeth Craft Designs)
378 Cupcake, Hearts and Flowers Peel-Offs - Elizabeth Craft Designs
2478 Candle Peel-Off - Elizabeth Craft Designs
Sakura gel pen 
Prismacolor Pencils and odorless mineral spirits

Thanks for stopping by today!

Monday, 6 January 2014

Jalopy Stash!

Good morning friends!

It's Masculine Card Monday here on my blog, but I don't have a card to show you. Instead, I'm sharing the pile of Old Jalopy embellishments I made!


These took a surprisingly long time ... I worked on them a little bit here and a little bit there over a couple of days. I think if I'd had a Xyron Sticker Maker for all those little pieces the process might have been faster than the wet glue (Tombo) I was using.  But they turned out great, and I'm happy to have them ready to use on masculine cards, tags and gift bags.


The patterned papers were in my stash, and the brown card stock is by Bazzill.  Tim Holtz makes the Sizzix Old Jalopy die.

Thanks for stopping by today!

Sunday, 5 January 2014

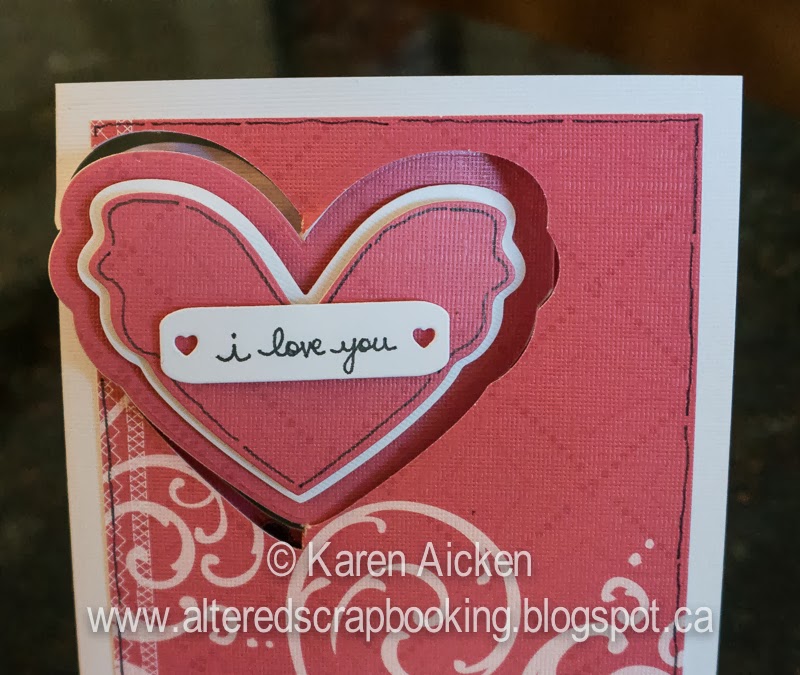
"I Love You" ... a Heart Pivot Card

We've been given the 'go ahead' from Els at Elizabeth Craft Designs to start posting our cards, so here is my first. Warning, this is a LONG post.  :-)

Many of you know that Karen Burniston is a magical paper engineer. You may also know that she is now working with Elizabeth Craft Designs as their first Licensed Designer. And you have to know that means new dies.

Wonderful new dies. Wafer thin dies that still animate your cards. WAFER THIN dies!  That means they are more reasonable to ship and easier store, which was becoming a huge issue for me. I love my thick & heavy Sizzix dies, but if I have no place to put them that isn't a good thing.

Since her Pop 'n Cut dies will be available from Sizzix through 2014, she has named her new collection Pop it Ups.

Pop it Ups ... that's a name you are going to be seeing a LOT of,  I can promise you. These dies are AMAZING. Karen sent me a couple to play with, and I immediately started with the Heart Pivot die. There is also a Butterfly Pivot and a Label Pivot.

Pop it Ups ... I've already mentioned they are wafer thin, but I have to tell you these dies allow you to cut your animation ANYWHERE  along the fold of your card. You can see in my "I Love You" card, I placed the Pivot Heart die towards the top of the card which allowed that cute skunk to remain uncut.


Not only can you place the die anywhere along the fold, you can use different sized cards! Easily.  If it fits through your die cut machine, you can choose your size. AND SHAPE of card!   I cut a Heart Pivot into a heart shaped card (which I will share another day).  I also plan to cut a Heart Pivot into a cloud shaped card ... see why I'm so excited about these new Pop it Ups dies?

It gets better too. Each Pop it Ups die COMES WITH the decorator die pieces! All the layers, little accents - everything is included. Included! You simply snip the little threads apart with wire snips and you are ready to create. Easy Peasy.

OK - onto my card, which I kept very simple. Here is the front, which while it IS a love card it's not a Valentine. The Heart Pivot is good for a lot more than just Valentine cards!


This one is an A6 size (4.5 x 6"). A tip for cutting the Pivot Cards, is that whatever pattern or colour is on the inside of your card is what will show on the hearts (or butterfly or label) on the outside when the card is closed.  This paper wasn't double sided, so the skunk and swirls are on one side and the flip side is white.  Since I wanted the skunk to be on the inside of the card, I cut a smaller panel of the red swirled paper and attached it to the front of the card before cutting the Heart Pivot. I attached it with adhesive all over, not just on the edges, as I didn't want it to come apart after cutting.

The white heart layer, and the red heart are decorator dies that come with the Heart Pivot die! I added some hand lettering onto a heart label from the Lucy Label Pop Up set. It's so easy to mix and match the dies from the different sets - Karen Burniston thought of everything when she was designing these!


Just for fun, I added a metallic heart to the skunk with an iRock tool and Stickles to his nose.  The smaller hearts were cut with Sizzix dies and I added doodles around the edges. 


Just in case you were wondering what it looks like, here is a picture of the back of the card...


And a top view...


The dies will be ready to ship to retailers right after CHA (January 10 - 14th 2014), so if you are interested in purchasing them be sure to contact your local shop and have them place their pre-orders! They will also be shipping to Canada and overseas, so don't think that these are only available in the US. If your local retailers are attending CHA, have them stop by the Elizabeth Craft Designs booth #441 and see the dies in action as well as all the sample cards.

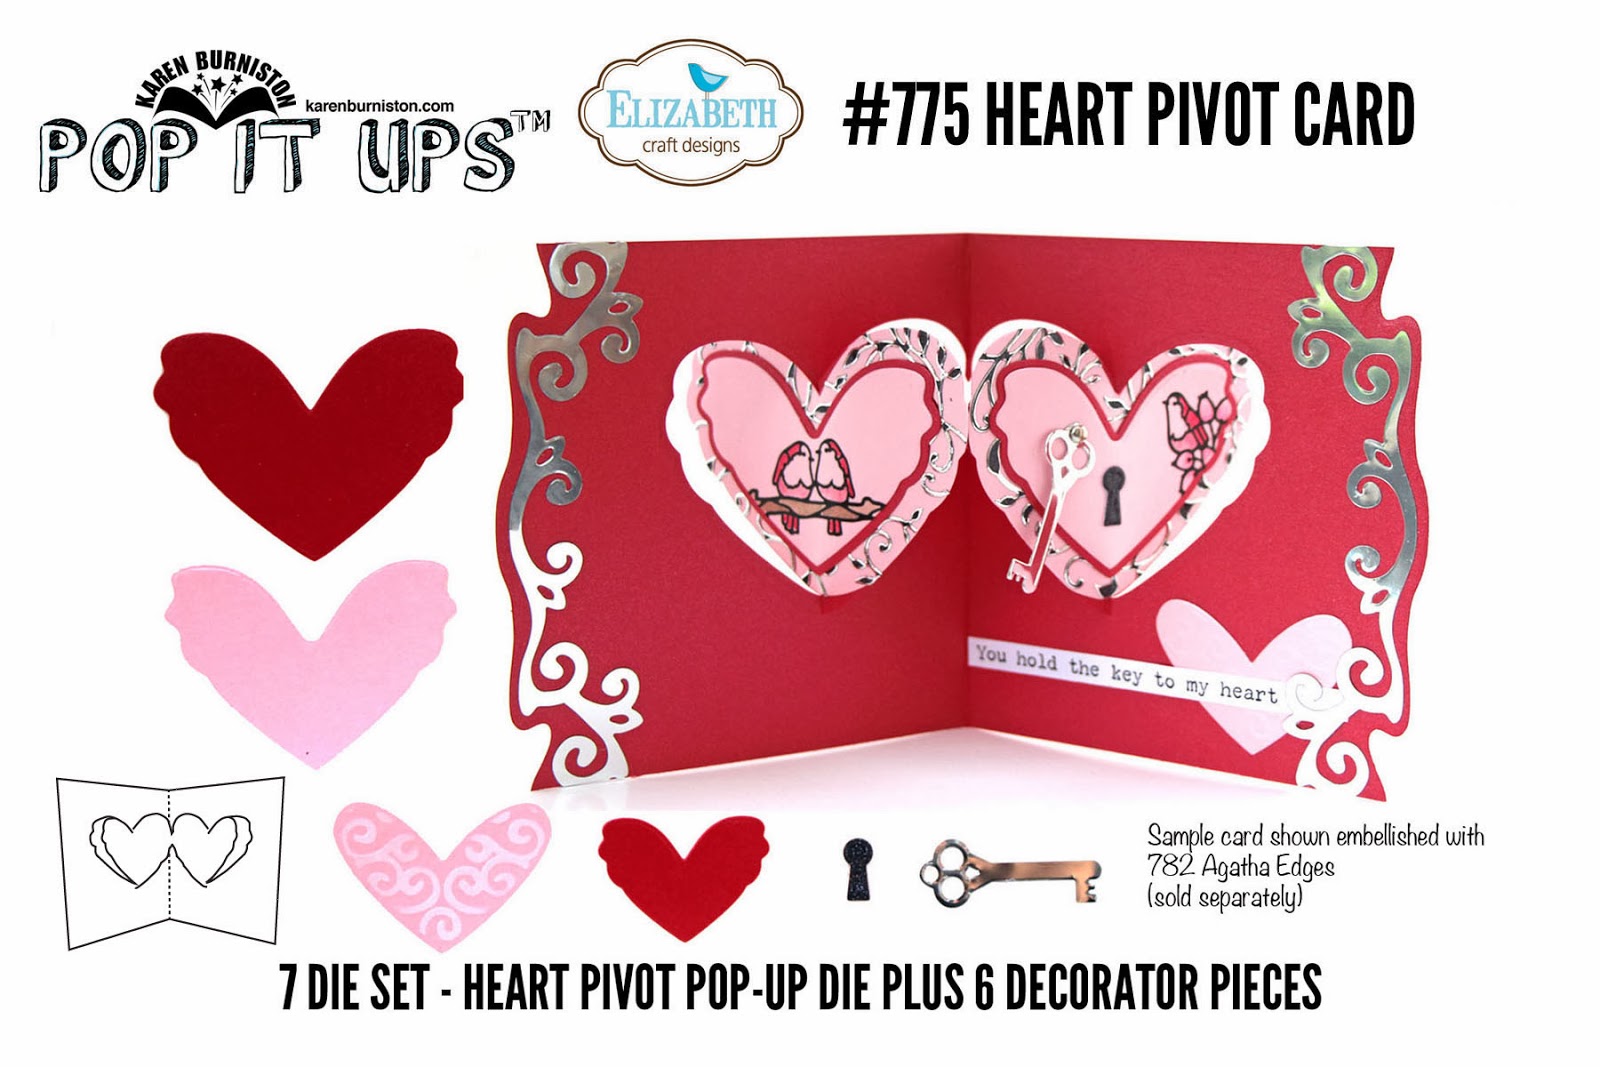
Here is a peek at the packaging for the Heart Pivot die, which shows all seven dies you get in the set. Also shown on Karen Burniston's sample, are her Agatha Edges dies ... you're gonna love them too!


I have started labels for Pop it Ups, and for Elizabeth Craft Designs on the right of my blog. You can scroll down and click on the labels to see cards I'll be making using products from both.

Supplies used:
775 Heart Pivot - Karen Burniston, Pop it Ups (Elizabeth Craft Designs)
Patterned Paper - DCWV
779 Heart Label from the Lucy Label Pop it Ups set - Karen Burniston, (Elizabeth Craft Designs)
Stickles
Movers & Shapers, Heart and Wing set - Karen Burniston (Sizzix)
iRock tool - Imaginisce 
foam tape

Thanks for stopping by today!


Saturday, 4 January 2014

Scalloped Edge Sympathy Cards

Good morning friends ... I found out this afternoon that they will be transferring my Dad from the hospital to a full care facility in the middle of the city on Wednesday morning. The hospital has been really good about keeping him there until Gregg and I get back, and we are very grateful. I don't know how he is going to take the news, as with the stroke his short term memory has been affected and he still thinks when the inflammation in his heel goes down he can go home.  He has a broken hip, and his heel is fine! He cannot bear weight on his own, but in his mind he is just days away from going home.  Sigh.

Today's share is a couple of Sympathy cards I made using lovely vintage looking printed paper.

The card fronts were cut with a scalloped card die (Sizzix) and the card is an A6 size. I love this large size of card, especially since I was able to find envelopes at Staples and didn't have to order 500 of them.  :-)


I stamped the envelopes with one of the flowers from the Sympathy stamp set, and the butterflies were water coloured and punched and glittered.


Because the patterned paper isn't all that sturdy, I added a matted panel inside the cards for stability. To get that scalloped border, I simply cut the top half of the die again with the blue paper and trimmed the sides and edge opposite the scalloped one. I like how it echoes the scallop from the front of the card.


Supplies used:
Patterned paper - K&Co
Label die - Spellbinders
Words - Stampendous
Scalloped card die - Sizzix
Butterfly punch - Stampin' Up
Foam tape
Glitter - Martha Stewart

Thanks for stopping by today!

Friday, 3 January 2014

Final Sneak Peak

Ooooohhh ... head over to Karen Burniston's blog (click HERE) to see the final sneak peak of her new die release with Elizabeth Craft Designs.

Lots of Pops?  Gotta have it.  And that Garden Bench? WOW!


Flip-It Squirrel Cards

Good morning friends!  It's Flip-it Friday here on my blog, and I have two nearly identical Flip-it cards to share today.  I made them in early November, when I received my Papertrey Ink order with that CUTE squirrel stamp/die set. I just had to try it out!

.

To make the cards I cut the Circle Flip-It die four times ... once from the leaf patterned paper, once from the neighborhood patterned paper and two from white card stock. The white ones are the card bases, and I cut apart the patterned ones to use for layering.


I coloured the squirrel and nut with pencils blended with mineral spirits, die cut it and popped it up on layered circles.


I usually add a punched label as a spot to sign the card. It is hidden when the card is closed.


A little hand lettering inside and the cards are finished and ready for Thanksgiving 2014.  Grin. The squirrel is pretty cute though, and I'm thinking he can be holding a heart for Valentine's day too. Or a decorated egg for Easter.  Or a balloon for a birthday .....


(Remember you can always see my Sizzix Flip-it, Pop N Cut and Accordion Flip cards by looking on the right side of my blog under LABELS then scrolling down to the 'S' section.)

Supplies used:
Patterned Paper - Doodlebug
Circle Flip-It die - Stephanie Barnard (Sizzix)
Squirrel stamp and die set - Papertrey Ink
Punched Label - Stampin' Up
Coloured pencils
White gel pen
Circle dies - Spellbinders


Thanks for stopping by today!