Thursday, 14 June 2012

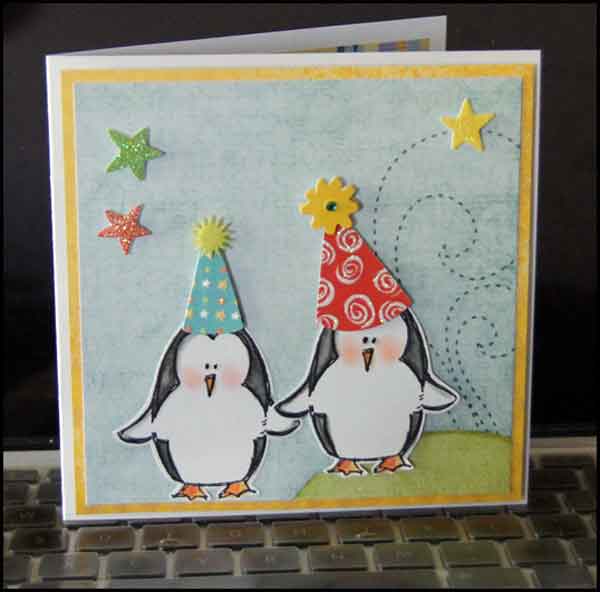
Penguin Birthday Card

I have a friend who likes penguins, so this is the birthday card I made for her.


This was such a fun card to make!  First, those darling penguins. If you have been following my blog, you will know how much I love the critter stamps at Stamps By Judith. This sweet penguin was another of my Mesa Rubber Stamp Show purchases back in March.

The card is 6" square, and the blue panel with the green hill is actually the top 6" of the paper I used on THIS CARD.  :-)   So the 'hill',  is actually the top of the tree.


I stamped the penguin twice on white card stock, and added colour with pencils, Copics and chalks. Then I fussy cut them out, and added Glossy Accents to their beaks.  The hats and stars are stickers from my stash - I thought they fit the theme really well. Fun fun FUN!


Above is a peek at the inside, using one of my new Papertrey Ink stamps. It's so good to have some new birthday verse stamps!!

I am still TRYNG to stay away from challenges this month. June is going to be crazy busy around here, and when I'm in my studio I need to be focusing on items other than challenge cards. Come July I'll get back at it. Please forgive me for not keeping up with my comments on your very often blogs this month.

Thanks for stopping by today.

Wednesday, 13 June 2012

Magnolia Anniversary Card

I put aside some of my more pressing projects last night, to participate in a couple of challenges with my card.  First, the Dynamic Duo challenge this week has the following colours:

 And I loved the sketch at the Clean And Simple Stamping Blog. One of my favourite card layouts is to decorate a panel and attach it to the card base with foam tape.


Since I will need an Anniversary card shortly, this is what I came up with:


I used card stock from my stash, and a Martha Stewart border punch for the white panel. The little strip of rose card stock was embossed with a Stampin' Up embossing folder for some nice texture. I love how it looks like fabric.


The word (Stampin' Up) was stamped with grey ink, and I found this lovely K& Co Magnolia sticker in my stash to use as the embellishment. The grey card base is 5.5 x 7.75",  cut to fit into a Hallmark envelope I have. I like how 'hefty' this one is, yet still mail friendly.

AACK, looking at this photo I realized that the green on the leaves of the embellishment might mean that this doesn't qualify for the Dynamic Duos challenge, as you are only to use the two listed colours and a neutral. 

Thanks for stopping by today!

Tuesday, 12 June 2012

Party Hat Recycled Card

I have another recycled card to share today. Our nephew's fiance sent me this sweet card for my birthday, and again - it was too nice not to share. It was a smallish card, only about 3 x 5.5".


I cut the main panel, inked the edges, then added a scalloped border to each side with PTI die.  That panel was attached to an orange sparkly panel (paper by MME) and that was in turn attached to the front of an A2 card.


I added another strip of orange sparkly scalloped paper inside the card as well as the stamped birthday verse. I loved how sparkly the little party hats were on the original card, and the colours went so well with the MME paper stack.  Easy Peasy!

Thanks for stopping by today.

Monday, 11 June 2012

Merry Monday #24 Challenge Card

This is an exciting day for me! My first time at being a Guest Designer for Lesley's Merry Monday challenge! Each week she offers a sketch, and the challenge is to make a Christmas card using the sketch.

What a great way to get your Christmas cards done without that last minute rush. Especially with all the inspiration from her talented Design Team! Be sure to check them out HERE.

The sketch this week is another really good one.  I love it when I can see multiple uses for a sketch, and had a hard time narrowing down which idea I was going to use for today's challenge post.

Finally, I settled on a stamp I've had for years -  the Azadi Earles snowman face - and I decided to stay very close to the sketch.


The card is 5 x 6.5", and the sparkly patterned paper is from a My Minds Eye paper stack. I'd been hoarding it, but because I LOVE snowflakes for holiday cards I cut into the sheet.


The white strip was embossed with a Sizzix embossing folder, and after colouring the snowman (coloured pencils & odorless mineral spirits) I added Crystal Effects to his eyes, nose and mouth. I like the dimension the Crystal Effects give an image - and how it catches the light. The photo above gives a hint of the sparkle in the snowflake paper as well!

I actually made two cards - nearly identical. I couldn't decide whether or not to add a punched snowflake or not, so made one of each. And in the end? I prefer the one without.


The lacy layer behind the snowman circle was cut with a My Favorite Things doily die, and I used paper tape for the little red strip. I also added 3 gems to the holly on the snowman hat for a little more holiday sparkle.


I really liked all the little paper banners in the new Stampin' Up catalogue samples and thought I'd try my hand at one. I cut a 1/2" strip of white card stock then  inked just the HAPPY from the Papertrey Ink stamp and stamped that on one end of my strip. After carefully folding it on an angle, I repeated the inking/stamping process with the HOLIDAY word. I had to make three of these little banners because I actually screwed one up.

The corner of a square punch helped with the notches - whoever came up with that one was brilliant! Then I attached it to the card, between the snowman and doily layer.

FOR PETE'S SAKE,  I could have just stamped the words each on their own banner because you can't tell that it's folded. It took me waaaaaay longer to make the banners than it should have, ha ha - all because of that folding. Too funny.


I have a large, pretty Christmas ornament stamp that would also work with this sketch - using a velvet ribbon to 'hang' it from the strip. I also wanted to try a reindeer instead of the circle shape - so these are ideas I'm tucking away for when I have some more time.

Thanks to Lesley for the privilege of being your Guest Designer this week! Remember to check out the Design Team inspiration HERE.

Thanks for stopping by today!

Sunday, 10 June 2012

Recycled Birthday Card

Ahahaha - I received this card for my birthday, and no way could I miss passing on the fun. So after it stood on the mantle for a month, I cut down the card to make this one. I'm thinking I will give it to my brother for HIS birthday. 


The white card base is 5.5 x 5.5" square, and I used some sparkly patterned paper by MME for the striped background. The dog panel was popped up with foam tape.


The expression on this dog's face is just TOO FUNNY.


I was even able to recycle the words from inside the card "Pepe just figured out your age in people years".  Ahahahaha.

Good thing my brother has come to expect a card like this from us. 

Thanks for stopping by today!

Saturday, 9 June 2012

Father's Day Card #3

I am going to TRY to stay away from challenges this month. June is going to be crazy busy around here, and while I will be in my studio I need to be focusing on items other than challenge cards. Come July I'll get back at it. Please forgive me for not keeping up with my comments on your very often blogs this month.
 
This is the third (of 3) cards I made for my Mom to use for Father's Day.  Yes, it is another dog themed card.   And yes, it is another dog stamp from 'Stamps By Judith'. 

We are a dog loving family, what can I say?  :-)


The card base is 5.25" square white card stock and I added some patterned paper scraps from my stash. After stamping the dog I used Stampin' Up's Water Colour Wonder crayons. After it was dry, I used two more 'Stamps By Judith' stamps - the hearts, and orange ink. Also, foam tape!


I had some fun with the inside on this one.  First, I used a Stampin' Up label punch to punch a shape out of scrap paper. Then I used the negative image as a stencil and sponged orange ink through it to create the label shape on the card.  The letters were die cut (Sizzix) out of green card stock, and I added some doodles after the letters were stuck down.

The little Hero Arts dog house stamp was coloured with Copic markers, punched out with a square punch, then attached inside the card after inking the edges.


Thanks for stopping by today!

Friday, 8 June 2012

Sue's May First Card

Since I haven't done a "Fancy Card Friday" in awhile, I thought today would be a good day to share the card I sent to Sue for our May first mailing:


It's a large, 6" square card. Since I was tucking it into a magazine for her, I didn't have to worry about the square envelope going through the mail on it's own and that freed me up to decorate it with LAYERS.  In fact, the whole project is full of layers!


I border punched a strip for the bottom of the envelope, and used a 'My Favorite Things' die set for the name label. All papers are by K&Co (who else??).  :-)  A couple of Martha Stewart punched butterflies and the envelope was finished.

The card itself was inspired by one by Kimberley Crawford in a stamping magazine.  I used the Elegant Edges cartridge to Cricut cut the fancy label shape with all three layers.


Once the label was cut and assembled, I used a Spellbinders die to cut the butterfly from the center then popped it up onto the shadow layer with foam tape.  It doesn't show up in the photo, but I outlined inside the label details with my Sakura glitter pen for just a touch of shimmer and shine.

The words (Wordsworth) were stamped with brown ink then punched out with the Modern Label Punch (Stampin' Up). I adhered it inside the cut out butterfly with a Martha Stewart paper banner piece and a tied button. The pretty ribbon is from Stampin' Up - another one of my Clearance Rack deals from last year.


The inside has layers as well. Since the butterfly I cut out of the front was cut with a die 'shadow' that came with a coordinating topper, I attached the shadow inside the card and cut the topper out of a leftover piece of patterned paper from the front of the card and layered the two together.


Attaching the butterflies together just at the center, allows the wings to be lifted for a little dimension.

It was a really fun card to make, and I enjoyed dusting off my neglected Cricut for this one.

Happy Friday, and thanks for stopping by today.