Thursday, 2 January 2014

Felt Flower Accordion Card

Good morning friends!  Today's share is a simple Accordion card, decorated with felt embellishments.

Below is a photo of the card front ...


Here is a photo of the back ...


... and here is the accordion card opened ...
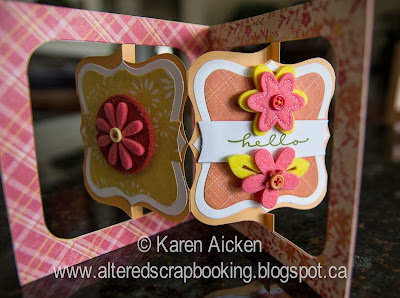


Finally, I added patterned paper to the back of the bracket shapes to finish it off.


(Remember you can always see my Sizzix Flip-it, Pop N Cut and Accordion Flip cards by looking on the right side of my blog under LABELS then scrolling down to the 'S' section.)

Supplies used:
Patterned Paper - Colorbok
Felt Embellishments - Pebbles
Hello stamp - Stampendous
Accordian Flip die - Karen Burniston (Sizzix)
Frame and Bracket Label die - Karen Burniston (Sizzix)
Label Framelit set - Karen Burniston (Sizzix)

Wednesday, 1 January 2014

ANOTHER New Die Sneak Peak

Head on over to Karen Burniston's blog (click HERE) to see another sneak peak of her new ... are you sitting down? ... ACCORDION DIES!  Shaped ones!  There is a circle, a fancy label and an oval. 
Also some great frames to cut out for layering. Woot!

New Die Sneak Peek!!!

I'm SO excited to share this post with you.  Karen Burniston has joined with Elizabeth Craft Designs, and will be releasing her new dies at CHA this month. THIS MONTH!!!!

Check out Elizabeth Craft Designs Facebook page for a chance to win a one of these new dies.  Click HERE

Also, for a cool sneak peak - check out THIS video!


You are gonna LOVE these new dies.....

Label Window Pop 'n Cut Cards

Good morning friends!  I thought for my first blog post of 2014, I'd share two of the cards I made to donate to Seniors Secret Service:


I have had a lot of fun with the Window Label insert for the Pop 'n Cuts bases - every time I play with it I find it easier to use and easier for me to envision what the finished card will look like. These two are nearly identical, using opposite papers.


I used several different Karen Burniston dies for these cards -- everything works so well together.


I've been trying my hand at hand lettering on some of my cards, and for these ones I added some colour with pencils.

(Remember you can always see my Sizzix Flip-it, Pop N Cut and Accordion Flip cards by looking on the right side of my blog under LABELS then scrolling down to the 'S' section.)

Supplies used:
A2 Pop 'n Cut Base with Window Label Insert - Karen Burniston (Sizzix)
Patterned Paper - GCD Studios
White card stock
Edge and Scroll die - Karen Burniston (Sizzix)
Labels and Stitched Frames - Karen Burniston (Sizzix)
Butterfly Movers & Shapers - Karen Burniston (Sizzix) 
Bling - my stash
Happy Birthday To You stamp - Stampendous
Button Twine - Papertrey Ink

Thanks for stopping by today. 

Tuesday, 31 December 2013

Pretty Mug Pop 'n Cut Card

Wow - it's hard to believe this is the last day of 2013.  I'd like to take a moment and wish each and every one of you a wonderful New Year.

My card share today is one I made and sent to my Mom when I was visiting Arizona last month. I like to send her 'Happy Mail', and whenever I have a new die I usually send her the first card I make with it.


I loved this paper, not just because I ADORE the colours, but it has sparkly embossed areas too. I fussy cut one of the blooms from a scrap of the same paper and popped it up over the sheer flower embellishment.


I haven't had much time to play with this 'Mug & Heart' Pop 'n Cut insert - but I love it and am looking forward to making more with it. I have loads of tea and coffee themed stamps that will work with the mug, but for this one I opted for a simple sentiment.


I added a die cut swirly heart to mimic steam coming from the mug, and fussy cut the green border strip from a piece of patterned paper.


(Remember you can always see my Sizzix Flip-it, Pop N Cut and Accordion Flip cards by looking on the right side of my blog under LABELS then scrolling down to the 'S' section.)

Supplies used:
A2 Pop 'n Cut Base with Mug & Heart  Insert - Karen Burniston (Sizzix)
Patterned Paper - First Edition
Swirly Heart - Movers & Shapers, Magnetic Flower & Heart - Karen Burniston (Sizzix)
'Silk' Flower and leaves - Creative Impessions
Words - Studio G (Michaels)
Label - Sizzix


H A P P Y   N E W   Y E A R ! ! !


Monday, 30 December 2013

Doggie Feel Better Card

Good morning friends!

It's Masculine Card Monday here on my blog, and I wanted to share the card I made for my Dad. He loves dogs, and asks about our three every time we visit him in the hospital.


I like using Kraft card stock, so was happy to find these larger (5-1/2 x 6") cards and envelopes at Hobby Lobby.  I added matted panels and die cut the grass out of green patterned paper from my stash.


The dog was die cut from plaid sparkly paper and some scraps, and I used my iRock tool to adhere 3 green gems to the collar.


The dog was popped up with foam tape, and I added a white panel inside to write our message and sign our names. He was happy with his card, and it's on display with the many other get well wishes he has received.

Thanks for stopping by today.

Sunday, 29 December 2013

Scottie Dog Christmas Cards & Tags

I don't have a lot new to report on my Dad. He remains in hospital - in fact he had another fall there on Christmas Day night.. This time he was trying to climb out of the bed, but he cannot bear weight yet so down he went. It happened during the night, so when we visited him on Boxing Day we were quite surprised to see him with a big stitched gash on his nose. They did Xrays on him and there was thankfully no sign of a concussion. He's going to be turning all kinds of pretty colours in the coming days though, because of blood thinners and bruising.  Today is his 20th day in the hospital.

Because I didn't get to share all my 2013 Christmas cards, here are a couple that I made for my dog-loving friends:


These cards are the larger, 5-1/2" x 6" size. I added matted pattern paper panels and stamped the words with red ink right onto the top layer.  I ADORE this Scottie dog die, and for these cards I cut him out of kraft & black dotted paper then fashioned a glittery red coat by hand.  I love this red sparkly paper SO much I save all but the smallest of scraps. I was able to punch two circles from those scraps for ornaments. I stamped the ornament hanger (Impress), popped up the punched circle then added some glitter glue.


I added a glittery black brad for his eye ...


... and tied a Bakers Twine bow to sit on the punched holly.


Just for fun, I also made two tags.  The dog was die cut twice for each tag, once from Kraft card stock and once from the patterned Kraft paper.  The patterned paper dog was popped up onto the Kraft base with lots of foam tape once he was done, and the bakers twine loop ties were sandwiched between the two layers.


Thanks for stopping by today!